Create an Administration
You can create class-based and eligibility-based administrations within ADAM.
What's the Difference?
A class-based administration requires that students must be in a class to be enrolled. There are two criteria options you can use to enroll students into a class-based administration: Classes and District/Grade.
When you set the criteria, you are choosing class criteria, not student criteria. For example, if the student criteria are set to collect all 5th graders, and a student is in two 5th grade classes, the enrollment load will fail because ADAM would try to add the student into the administration two times: once for each 5th grade class they are in.
The student cards for class:based administrations include the administration name, the student's login credentials, and the test code for getting into this specific proctor group.
See step-by-step instructions.
Once you define the criteria on the administration, it cannot be changed. You cannot add new eligible classes or courses, nor can you modify the edible grade on the administration.
- If you specify a list of eligible classes or specify an eligible class grade, you can make students eligible for the administration by moving them in and out of those classes or classes set with that grade value.
- If you specify a list of eligible courses, you can make students eligible for the administration by creating new classes linked to the eligible courses and move students in and out of those classes.
After Creating a Class-Based Administration
- Students in a class meeting the selected criteria are enrolled in the administration.
- A proctor group is created for each eligible class and student sessions are added to those proctor groups. Students can move in and out of the administration based on enrollment in an eligible class. Movement is allowed until the student starts the test session.
Eligibility-based administrations allow you to roster students that are not enrolled in a class. When you set the criteria, you are choosing student criteria.
After creating an eligibility-based administration, proctors can sign in to create their proctor group and give students their test code on test day. School admins can also pre-create proctor groups before testing.
- If you pre-create proctor groups, the test cards contain the students' login credentials and the test code.
- If you don't pre-create proctor groups, test cards contain student login credentials but not the test code. Students receive the test code from the proctor.
After Creating a Eligibility-Based Administration
- A single proctor group is created for this administration, named Unassigned. Student sessions are not associated to a proctor/class-specific proctor group in advance of the student logging in to take this test.
- Proctors are provided with the unassigned test code and proctor password. When the proctor logs into the Proctor Dashboard, they are prompted to create a proctor group.
- An email is sent to the proctor a student test code and proctor password. The student test code also appears on the Proctor Dashboard. The proctor gives the student test code to the students to log in.
If the administration requires Proctor Approval, the Proctor Dashboard indicates that a student is trying to sign in to the test. The proctor can approve this action.
See Proctor an Eligibility-Based Administration for more information.
Step-by-Step
Both methods for creating an administration require that the test-taker exists as a user in ADAM with a student role.
The exception is when Add Temporary Students is enabled. This allows a permissioned user to add a test-taker 'on the fly' into the proctor group and match them up with the student's official user account later. ,
- Select Test Management, then select Administrations.
- Select Administer New.
Reference the expandable sections below to configure the new administration as needed.

Depending on the test chosen for the administration, you may not have access to all the configuration pages below.
+Test Select...Test: Select the test you want to administer.
Administration Name: Enter a name for the administration.
Details: Enter any additional information that may be useful for proctoring.
+Access...
Some tests have pre-defined access values that cannot be changed.
Secure Access: Select Kiosk Only if the administration requires students to use the secure browser.
Show All Rubric Content: Select the checkbox to display the rubric to the student.
Org: Select an organization to limit the administration to specific organizational levels.
Access Window: Select the time zone, start/end dates, and (optionally) the day start/end times for the administration.
+Data/Accessibility...
Some tests have pre-defined data and accessibility values that cannot be changed.
Allow Not Reseated: Allow sessions to be continued without being reseated.
Disable Auto Submit: Sessions will not be automatically submitted at any time.
+Students...Select the method for assigning students to the test. Only schools in your district will be available.
Classes
When selected, the criteria for finding eligible classes are based on:
- School: Find all classes associated with a school. Classes are required to be associated with a school.
- Course: Find all classes associated with one or more courses. Classes are required to be associated with a course.
- Academic Session: Find all classes associated with the selected school and an academic session. Classes are required to be associated with an academic session.
- Classes: Find all classes associated with the selected school, academic session and one or more classes.
District/Grade
When selected, the criteria for finding eligible classes are based on:
- Grade: Find all classes associated with a grade. Classes are not required to have a grade.
- Course: Find all classes associated with one or more courses. Classes are required to be associated with a course.
- Districts: Find all classes associated with the selected grade and one or more districts. Classes are required to be associated with a school and a school is required to be associated with a district.
Eligibility Criteria
When this option is chosen, the criteria for finding the eligible student are based on:
- Grade: Select the grade(s) that the students must be in to take the administration. Students without a set grade level in ADAM are not eligible.
- Organizations: Select the organization(s) that the students must be enrolled in to take the administration. The organization can be at any organization level (based on your authority). Students are required to be associated with a school, schools with a district, districts with a state, and state with national.
- Course: Select the course or courses the students must be in to take the administration.
- Disable Proctor Approval: Select the checkbox to allow students to continue test sessions without proctor approval.
- Estimation: The estimated number of students assigned to the administration appears as you select criteria. The estimated student count appears regardless of the Pre-create Eligibility Sessions setting in Client Settings.
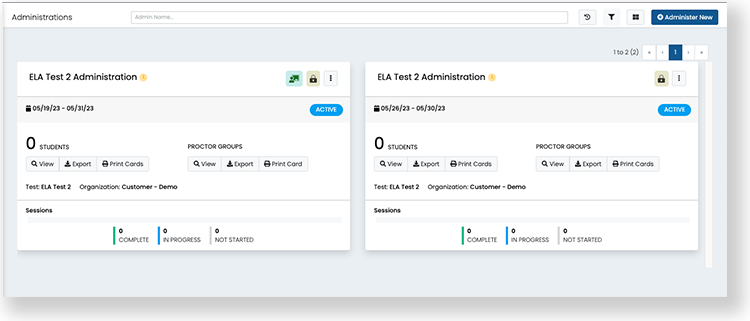
Verify the selected options, and then select Submit. The administration card appears on the Test Management > Administrations page. The image below shows cards for an eligibility-based and class-based administration.