Client Settings: General Settings
Use the General Settings page to configure basic client information, security settings, and system features for your organization.
NOTE: This page is only available to designated admin roles. The grouping of option into sub-headers is coming to all sites in summer '26, so your order may vary slightly in the 'Classic' look and feel version. For now, some options are only available in the Classic version.
Classic User Interface:
Updated User Interface:
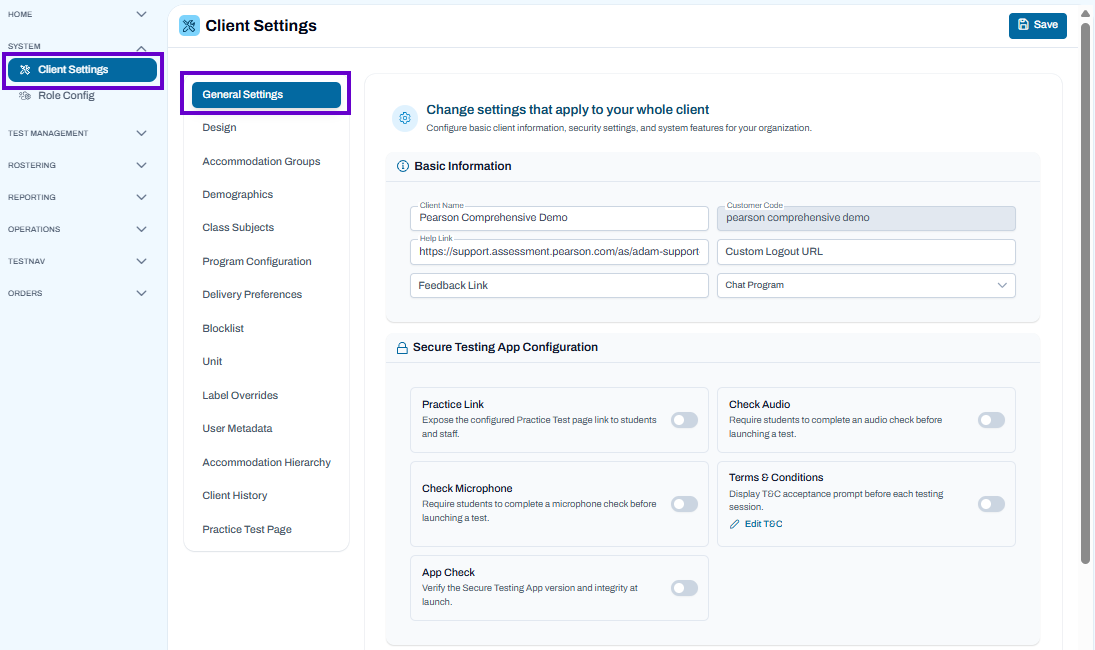
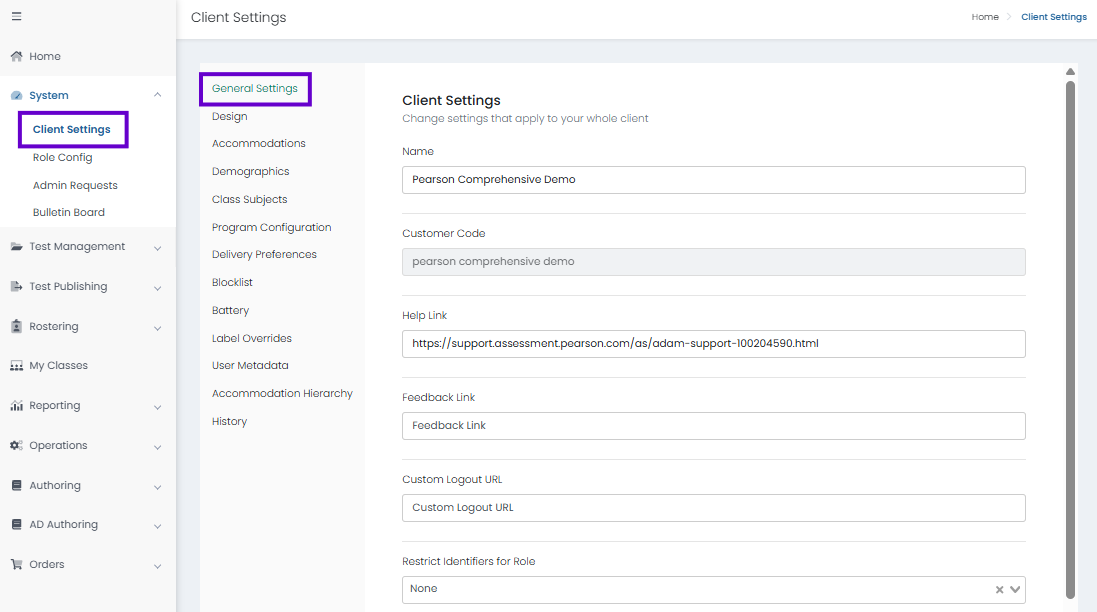
- Go to System > Client Settings.
- Select the General Settings tab.
- Enter the following settings:
- Basic Information
- Client Name: Enter the customer or program name.
- Customer Code: A unique customer code is generated automatically based on the client name. This is required when for ordering paper test materials, etc.
- Help Link: Enter the URL for the Help system. The generic support pages are at https://support.assessment.pearson.com/as/; some customers may point to a customized version or portal instead.
- Feedback Link: Allows for an addition of a feedback link that displays a dismissible banner to users. This allows users to enable Net Promotor Score (NPS) collection inside of ADAM. Adding this URL: https://survey.pearson.com/jfe/form/SV_72JDKdUhAXPGg18?source=ADAM, Additionally, users can access the feedback link from the My Profile menu.
- Custom Logout URL: Indicate where user should land upon logout. Recommended when integrating with LaunchPad SSO to redirect users away from the ADAM login page (to their district homepage, for example).
- Chat Program: Enables selection or activation of a program context for integrated chat or support features.
- Secure Testing App Configuration
- Practice Link: Expose the configured Practice Test page link to students and staff.
- Check Microphone: Require students to complete a microphone check before launching a test.
- App Check: Verify the Secure Testing App version and integrity at launch.
- Check Audio: Require students to complete an audio check before launching a test.
- Terms & Conditions: Display T&C acceptance prompt before each testing session.
- Security & Validation
User Identifier Pattern: Defines the required format or validation rule that user identifiers (e.g., usernames or IDs) must follow.
Identifier Pattern Description: Provides a human-readable explanation of the identifier format to guide users and administrators.
- Restrict Identifiers for Role: Define the rules around building the identifiers for new users in ADAM. See also: Orgs: Restrict Identifiers for Role.
- Session Timeout (1-900) Minutes: Select a session timeout for ADAM users (this timeout does not apply to test sessions). The Custom option allows up to 900 minutes. A warning message will appear before a session times out, and users can click Continue to reset the timer. If users are active, the timer will reset automatically.
- System Features
- New Rescan: Always select for faster rescans.
- Performance Reporting: Save Student Response State: Must be enabled to support the display of student responses in the Reporting > Performance > Student Performance > Roster. Additionally, Test Management > Program Configuration > Report Visibility (Student Performance) / Report Setting (Show Item Content) must be enabled at the test level. This setting will start to capture responses going forward; an automatic process will be run to make prior responses available if enabled. Item content as well as responses will be visible. As a best practice, enable these options before students start testing to avoid the need to run a manual "backfill." If there is any chance this may be wanted later, turn on before testing starts.
- Allow Test Scoring Rules: Enable to provide an area to paste in JSON instructions for custom test scoring rules (in Test Management > Tests > Create/Edit > 1. Test Config > Human Scoring Settings).
- Family Login Portal: DO NOT USE. Enables access for families to view student results through a separate portal.
- Basic Information
- Select Submit.