Create and Publish a Test
A test in ADAM is a package that holds one or more test forms (see Author a New Form). While many tests contain only one form, a test might contain more than one form to support accommodation needs (for example, English and Spanish versions).
Workflow: Create Form(s)→ Create New Test → Publish Test → Create New Administration
Pay attention to the names you give to each of these pieces, as names might contain subtle differences.
Prerequisites:
- Confirm you are signed in as a role with permissions to add tests and publish tests.
- Form(s) are available.
Create a Test
- Go to Test Management > Tests.
- Select New Test.
- Complete the Test Config, Settings and Overrides and Program Settings pages. Expand the sections below for details.
Tests: New
The Tests page defines:
- Forms used on the test, accommodation ruled, or spiraled.
- Connection information to OSCAR (if applicable).
Enter the following information:
- Test Name: Follow any local naming convention.
- Test Display Name: Optional. If used, it replaces the public display of the Test Name. Currently this change does not apply to the Student Dashboard.
- Test Identifier: Enter a unique code if not pre-populated. Can copy and paste test name if unique. Used internally.
- Status: Must be active in order to schedule an administration.
- Details: Optional. Provide details for users who may use this test to create an administration or practice test.
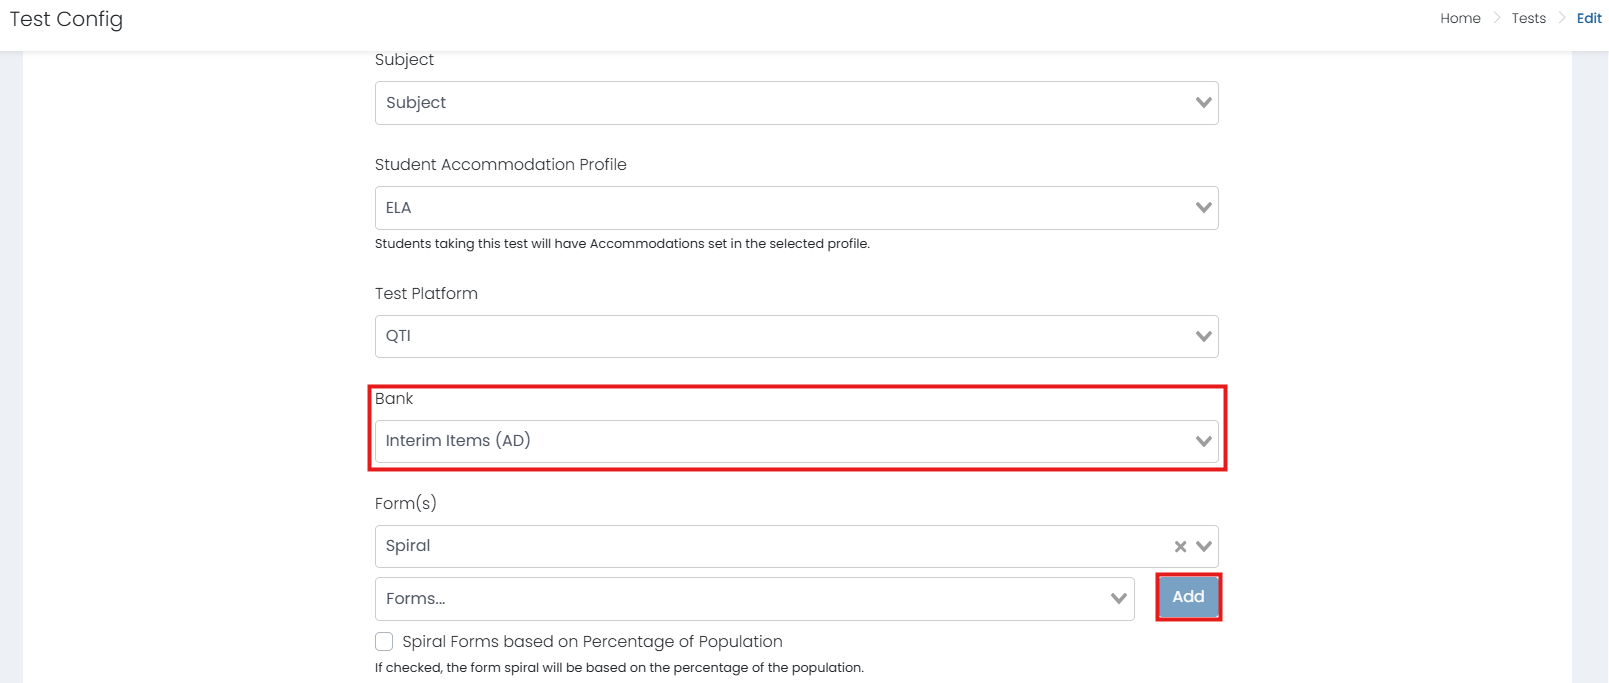
- Subject: Choose one.
- Student Accommodations Profile: Select the accommodations profile to use. Select the "Do not use" option if accommodations are not used on the test.
- Test Platform: Select AD or QTI in the menu. This defines the data that appears in the Bank menu. (Note: QTI is for TestNav tests, AD is for forms with items available in AD Authoring.)
- Bank: Choose the bank containing the form(s) needed for this test.
Classic User Interface:
Updated User Interface:

- Battery: Select a battery if the test is a battery test. Only available if using TestNav.
- Battery Unit: Select a battery unit.
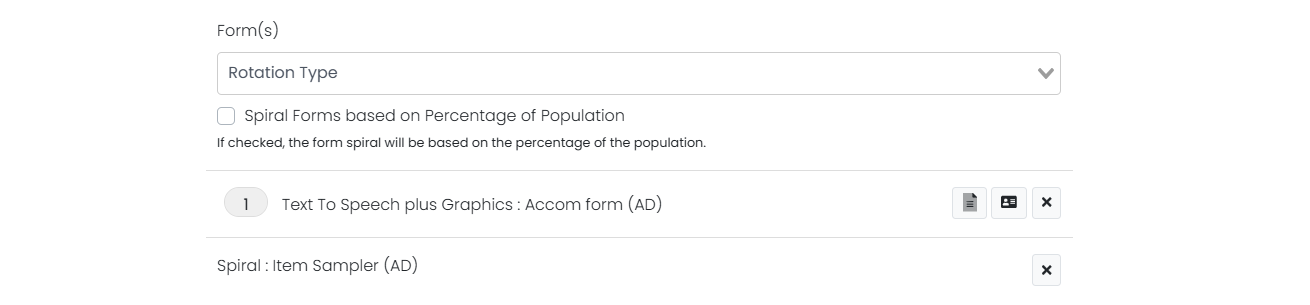
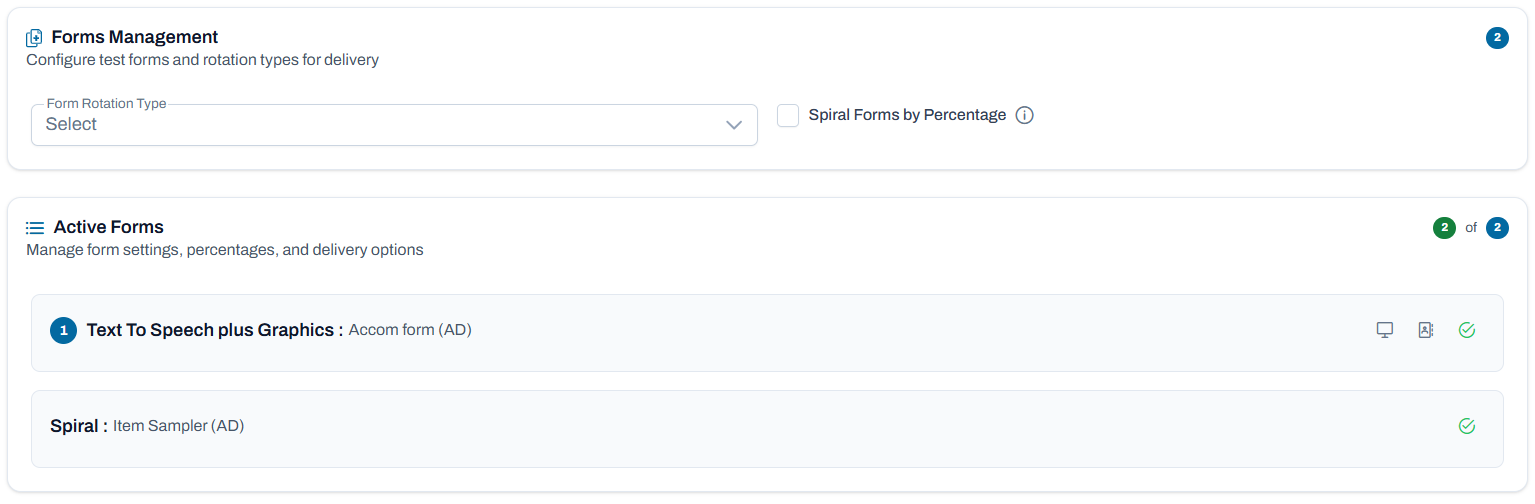
- Form(s): Select Spiral or Accommodation from the Rotation Type menu.
- Accommodation: If forms are configured specifically to support an accommodation(s), select that accommodation, select one or more forms, then click Add. For Language accommodation forms, you can specify an Alternate Test Name so that students will see the test name in the language used on the form. For example, the test name will appear to students in English for the English form and Spanish for students assigned the Spanish form.
- Spiral: Select the form(s), then select Add. Note that forms set to spiral can support accommodations.
- Don't Deliver To: If checked, the test is not delivered to any students who match the selected accommodation.
- Spiral forms based on Percentage of Population: If using multiple forms, set the distribution of each selected form; for example, 75% from the first form and 25% from the second.
- Accommodated Forms Priority: Some students may have multiple accommodations that would each serve a different test form. The priority numbers indicate which form a student would receive if they have competing accommodations. Creating or editing a test with multiple forms displays priority badge to indicate the order of forms assignment for accommodated forms. Regular (spiral) forms will not display a priority badge.
Classic User Interface:
Updated User Interface:
- Disable Online Testing for Paper Forms: Use this form setting indicates that a paper form is not allowed to be delivered online. If set and a student tries to take an online test, an error will be shown in the test delivery engine.
Classic User Interface:
Updated User Interface:

- Test Prerequisite: If this test requires students to complete another test before attempting this one, open the dropdown to configure these fields. Discuss this configuration with your program delivery team.
- Human Scoring Settings: If this test has open ended items that must be human scored, open the dropdown to configure these fields.
- Show Human Score Pending: If checked, progress report will show the human score pending count for submitted sessions.
- OSCAR Settings: Discuss this configuration with your program delivery team.
- Allow Teacher to Grade Tests: Select to allow teachers to score open ended items. When enabled, can narrow the test window at the administration level. See also: Create an Eligibility Administration.
- Hand Scoring Roles: Select which user roles can score. This feature allows non-teachers to perform scoring for this test. See also: Scoring by Non-Teacher Users.
- Dates: Indicate the scoring window.
- Miscellaneous Settings
- Student Form Selection: Select to allow students to choose the form to administer.
- Disable Manual Submit of Test Sessions: Proctors will not be able to manually submit student sessions.
- Allow Training Administrations: This test can be made available for training administrations.
- Disable Auto Submit: Student test sessions will not be automatically submitted.
- Maximum Test Attempts: Students will get limited attempts for tests. Enter the number of attempts allows.
- Disable Unsubmit Sessions: The proctor will not be able to unsubmit sessions on the Proctor Dashboard.
- Allow Section Move: Proctors will be able to move students to a new section on the Proctor Dashboard. This checkbox is only available for tests with multiple sections (and that are not computer-adaptive tests).
- Allow Section Submit: If checked, user will be able to submit section on proctor dashboard.
- Allow Mixed Sections: Allows a test to contain both linear and CAT sections.
- Allow Proctor Launch: Allows proctors to launch student tests on behalf of students, providing a proctor launch feature for the test management system. This enables proctors to take tests as students when needed by opening a new browser window. This functionality includes both a test setting and a permission. This feature is not available for secure tests (kiosk mode) or those administered in TestNav. Requires additional permissioning for the user in System > Role Config > Test Management > Proctor Launch.
- Admin Code: An Admin Code is required for TestNav tests.
- Prevent Teacher Assignment: Assumes test is published to schools.
Hide Progress by Sections on Progress Report: For tests that only have one section of items, use this option to hide section-level progress as it is not applicable. The default behavior is to show the section progress if the test has forms with multiple sections.
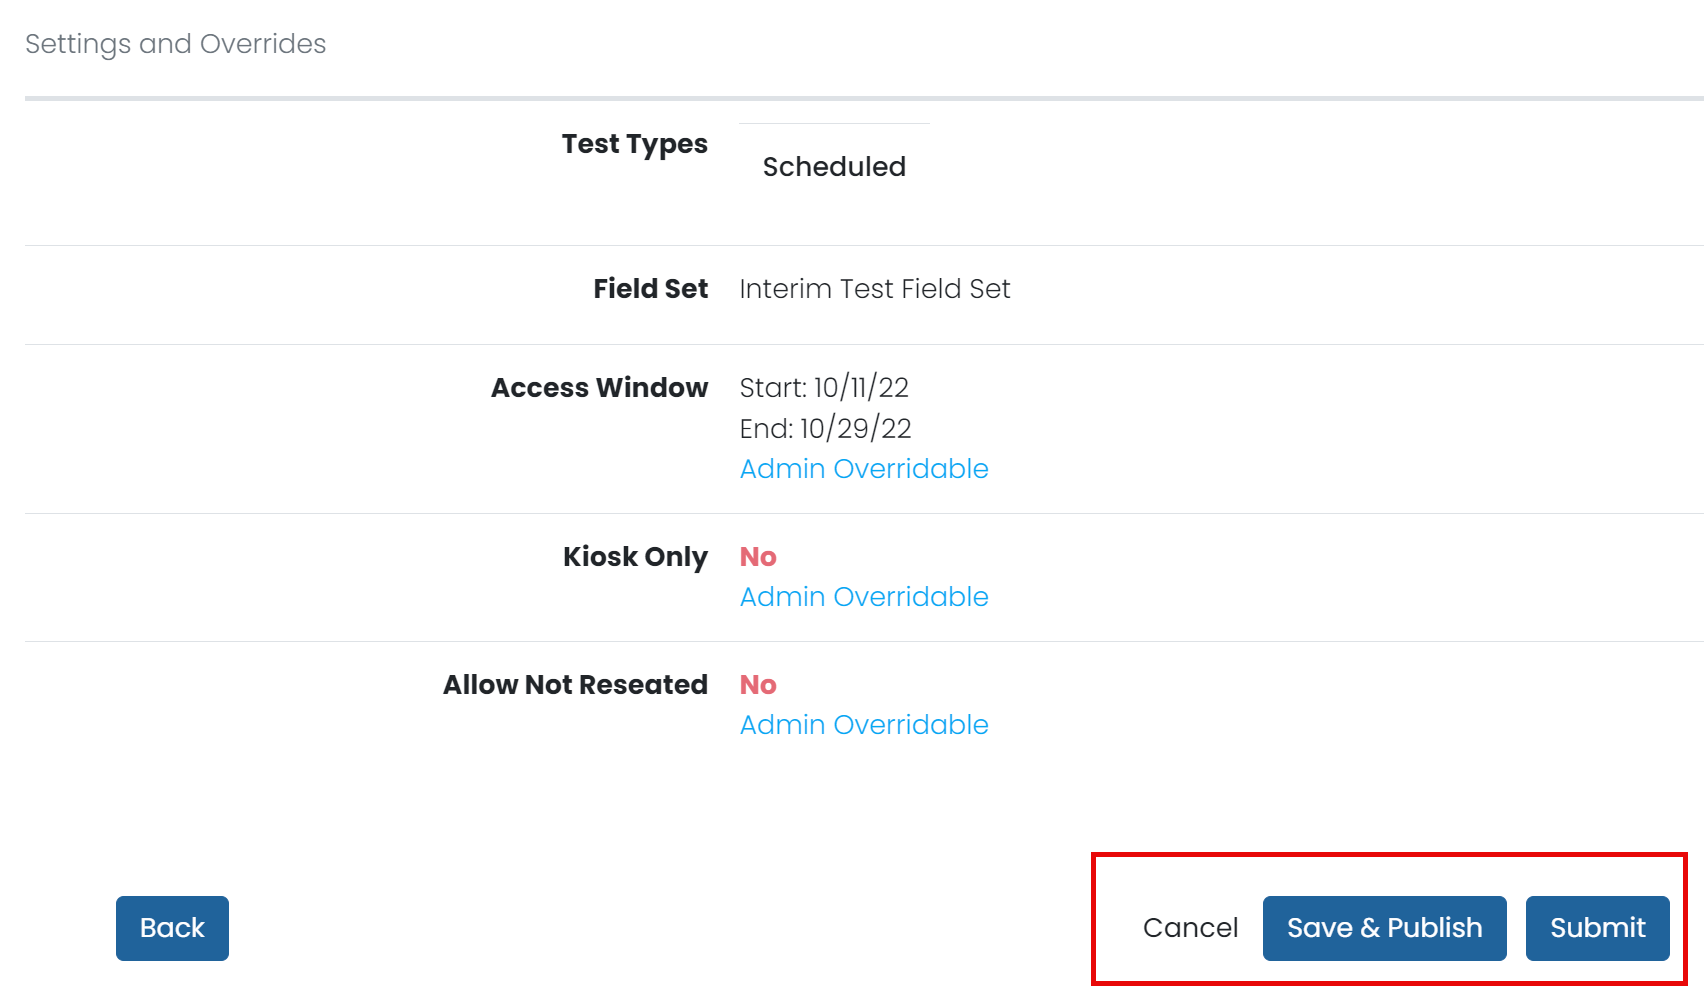
Settings and Overrides
The Settings and Overrides page defines:
- Test type
- Security settings
- Access window
Set or confirm settings for the following:
- Test Types: Select one or more to determine if the test is visible for each of the test types. One or all of the test types can be selected.
- Practice allows the test to be used when creating Practice Tests.
- Scheduled allows the test to be used when creating Administrations.
- The Field Set dropdown list appears when you select Scheduled. Select Show Test Login Preview to see what a student would see when signing in to a test if not accessing from My Classes for AD Player-delivered tests.
- Secure Access: If test will be delivered with AD Player, select Kiosk Only to require secure browser for testing. Do not select for any test delivered with TestNav as security settings are configured elsewhere.
- Access Window: Define Time Zone, Start Date, End Date and Time Settings.
- Data/Accessibility: Options that appear in this section depend on the selected Test Types.
- Auto-Enable TTS: Appears when a test is set to Practice Test. Select to enable TTS.
- Auto Reseat: Select to allow a session to be resumed without reseating. (This option was previously titled Allow Not Reseated; the change reflects that the feature enables automatic reseating of sessions when students re-log into tests, rather than simply allowing sessions to continue without reseating.)
- Note: For tests delivered in TestNav, the 'Exit Session' action sends the PNP information to TestNav, only for tests/admins that have 'Allow Not Reseated' set to true. When allow not reseated is turned on, updated accommodations are not reviewed during the auto-resume process. If a student's accommodations are updated after testing begins, a proctor will need to manually exit the session and once the test status is updated to EXITED and the TestNav status set to ‘Reseat’ the updated accommodations have been sent, as applicable.
- Disable Proctor Group Approval: When creating administrations with this test, this setting provides ability to disable proctor group approvals by default.
Note: Make sure you are familiar with Allow, Lock and Defer options.
- Allow: Set a default value that the session creator can edit.
- Lock: Set here and do not allow changes in the administration.
- Defer: Do not set a value here and wait to set a value when creating the administration.
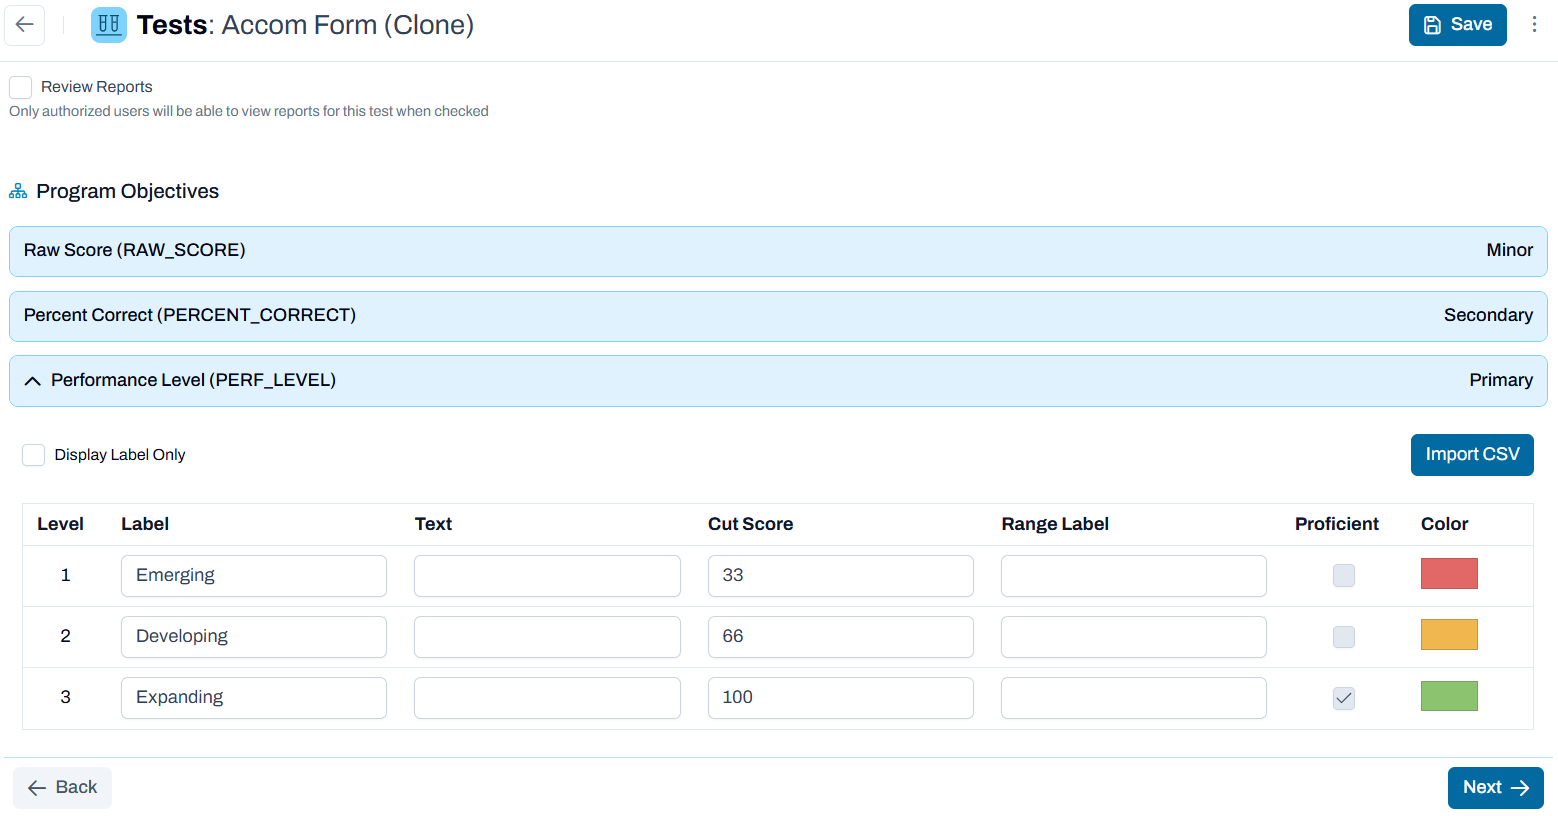
Program Settings
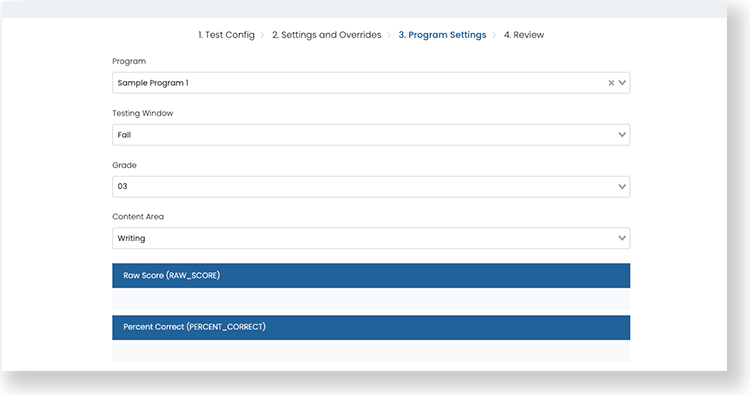
On the Program Settings page, select the following:
- Program: Select a program to make the Performance Report available for this test. Data that appears in the following fields depends on the selected program's configuration.
- Testing Window: Select a test window.
- Grade: Select a grade for the test.
- Content Area: Select a content area.
- Review Reports: Select this checkbox to place all reports for the test under review. Users with permission can review the test reports, and then clear the checkbox here or on the Program Configuration > Test Edit tab to make the reports available to other users.
- Review the program objectives at the bottom of the page. In some cases, you can override the default settings from the program (such as the cut scores for Performance Level).
Classic User Interface:
Updated User Interface:
Review
- Confirm your choices on the Review page. Select:
- Save: Save the test and its settings, but do not publish. The test does not appear as an option when creating an administration or practice test until it is published.
- Save & Publish: Click the three dots next to "Save" to bring up the "Save & Publish Option." Save the test. You are brought to the Test Publishing page to publish the test.
Classic Interface:
Updated Interface:


Publish a Test
- Select Test Publishing, then select Orgs to Test or Tests to Orgs.
- Orgs to Test lets you assign organizations to a test. Using Orgs to Test controls which tests are available based on a user’s Org Scope when they create an Administration or Practice Test. A District level user can create administrations for their district and its schools, whereas a school level user can only access their schools.
- Test to Orgs lets you assign tests to an organization.
- Note that changes to which organizations a test is published to only affects the Test menu when creating a new Administration or Practice Test. It does not change a user’s access to existing tests.
- Search for the test, then select the edit icon on the test row.
- Search for the appropriate organizations, then select the organization checkboxes.
- Select Submit. After the test has been published, the selected organizations can use it to create an administration.
See also: Two Options for Publishing a District Level Test