Define Bank Workflow
In the AD Bank Edit window, you must set up three workflows for each bank: Form Workflow, Item Workflow, and Shared Stimulus Workflow. For instructional purposes, these steps refer to defining the Form Workflow of a bank. However, the process for all three is almost identical.
Status Transitions let you control the sequence of Workflow statuses, as well as which user roles have permission to transition a status. You can set a Status Transition to allow an Admin role the ability to skip statuses in the workflow.
Create a Status
Navigate to AD Authoring > Banks.
Select the Edit Bank icon. You can also select the entire Bank tile to open the Bank Edit window.
Select Form Workflow.
Select Add New Status. Before configuring Status Transitions, it is recommended that you first create all Form Workflow statuses.
Status Name: Enter a name for the status. The Status Name is used in the Form search and in the Form Status menu.
Check the Initial box to indicate that this status is the default status for new forms being created. Only one status can be set to Initial in a workflow. The status that indicates the end of the workflow should be set to Final.
- Clone to Initial: When selected, cloned items in this bank revert to the initial status instead of copying the exact status of the item being cloned. Each workflow now has a new ‘Clone to Initial’ setting that can be selected in order to override all previous status of items being cloned.
- Remove Clone: When selected, items in this bank will not display the Clone icon in the Item Dashboard (so that the item cannot be cloned).
Status Visibility: Select all role(s) that can view forms with this Form Workflow status. Add All Users is a shortcut to add all roles; you can individually remove roles as needed.
- Status Transitions: Select the status that items in this status can transition to. If you haven't made it yet, you can add this later. Do add at least one role for Roles that can transition to it.
Select Save Changes.
Repeat this process until you have added all the Form Workflow statuses needed for your process.
Select Save. Do not forget to save the entire bank or your changes will be lost.
Add Status Transitions
For each content status, determine what roles can transition from the current status into another status.
In Form Workflow, select anywhere in the Status tile to open it. You can also select and drag Status tiles to change their sequence.
Select Add Status Transition.
Define the Status Transition.
Next Status: Set a rule to allow this form to move from its current status into a new status.
Roles that can transition to it: Define what roles have authority to move the form to the next status.
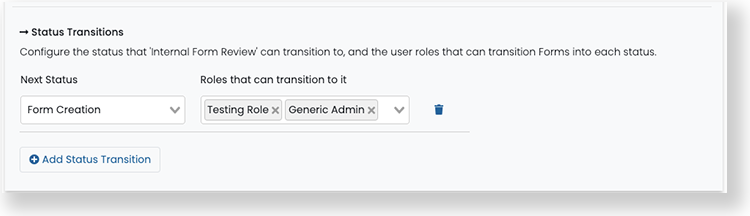
Repeat the process of adding Status Transitions to each status. For example, you could set up the Status Transitions to maintain the workflow for the Testing Role but allow the Generic Admin to skip part of the flow.
Select Save Changes.
After you have set all Status Transitions, select Save. Do not forget to save the entire bank or your changes will be lost.
Read Only Status
You can set up items and stimulus statuses to be read-only for some user roles. User roles entered in this area can view, but not edit. This option is located in Item Workflow and Stimulus Workflow.
Sample setup and image of Read Only tooltip