You can choose to precache content by test or session.
| Digi Accordion |
|---|
| expanded | true |
|---|
| title | Recommended browser list for precaching... |
|---|
|
...
Precaching refers to downloading encrypted test content from the Pearson testing server to the proctor caching computer on your local network. Precaching is done using PearsonAccessnext with ProctorCache.
...
|
| Browsers | Operating Systems |
|---|
|
...
| Precache using the Java applet | Precache without the Java applet |
|---|
|
...
...
...
| 10 | Yes | With this browser, you cannot precache without using the Java applet. | | Chrome |
|
...
...
| 10 | With this browser, you cannot precache using the Java applet. | Yes |
* You cannot precache with Firefox 52, as Java plugin is not supported on Firefox 52. |
Depending on your browser, you can precache content with or without using the ProctorCache Java applet.
...
Prerequisites
If you cache content by sessions, you must perform the following task only after you create a test session(s)
...
.
You must either disable pop-up blocker or
...
add an exception to allow pop-ups from your precaching URL.
| Digi Accordion |
|---|
| To | , use the steps for your browser below: | Expand |
|---|
|
- Click Firefox > Preferences...
Click Content and select the Block pop-up windows check box. Then, click Exceptions. | Expand |
|---|
| title | Click here to view a screenshot... |
|---|
|  Image Removed Image Removed
|
Your secure test website should appear in the Site column, and Allow should appear in the Status column. | Expand |
|---|
| title | Click here to view a screenshot... |
|---|
| Image Removed |
If you do not see your secure test website in the Site column with an Allow status, type your secure test website in to the Address of website field, and click Allow.
Click Save Changes.
|
| Expand |
|---|
|
- Click Tools > Pop-Up Blocker. Pop up blocker is turned on.
Select Pop-Up Blocker Settings and add your secure website into Exceptions. | Expand |
|---|
| title | Click here to view a screenshot... |
|---|
| | Image Removed |
|
| Expand |
|---|
|
- Click Settings > Show Advanced Settings > Privacy.
- Click Content Settings... under Pop-ups select Do not allow any site to show pop-ups and then click Manage exceptions.. and add your secure website.
Click Done. | Expand |
|---|
| title | Click here to view a screenshot... |
|---|
| Image Removed |
|
| Expand |
|---|
|
- From Safari menu, click Preferences > Security. Pop up blocker is turned on.
Deselect Block pop-up windows. This will allow pop-ups. | Expand |
|---|
| title | Click here to view a screenshot... |
|---|
| | Image Removed |
|
Precaching can be done two ways:
- Precache by Test: Content for selected tests
- Precache Test Content: Content for selected test sessions
Precache Test Content by Test
To cache content by test, follow these steps:
...
...
Step-by-Step
| UI Tabs |
|---|
| UI Tab |
|---|
| title | Cache Content by Test |
|---|
| From Setup, select Precache by Test. 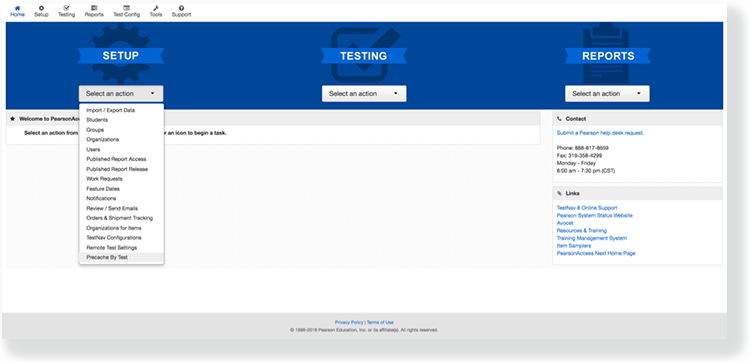 Image Added Image Added
Click the checkbox to select one or more tests from the list.
|
|
| Expand |
|---|
| title | Click here to view a screenshot... |
|---|
|
Image Removed |
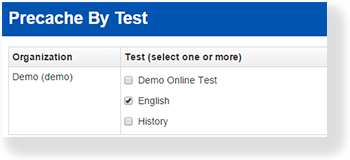 Image Added Image Added
Select one Precache Server from the list. - Click Precache
|
|
...
- .
- A popup message displays. Click Precache again to start precaching.
|
|
| Expand |
|---|
| title | Click here to view a screenshot... |
|---|
|
| Image Removed |
...
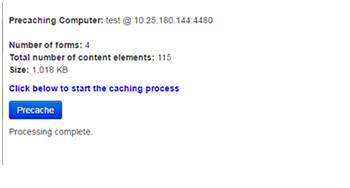 Image Added Image Added
- Dependent upon your browser security settings, a second popup message may display. Agree to any necessary prompts to continue processing.
 For example, when using Chrome, click Send anyway. For example, when using Chrome, click Send anyway.
- The TestNav status tab/window reflects the precaching status.
|
|
...
If no precaching is reflected, return to the popup message from step 5, and click Precache once again focusing on any security popups.
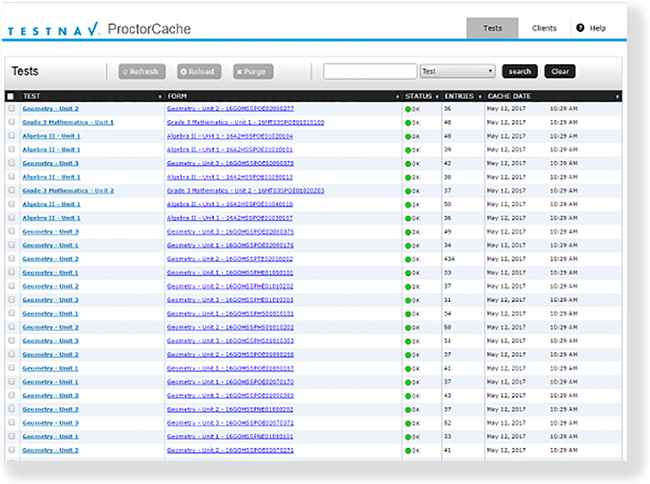 Image Added Image Added- Close
|
|
...
- the pop-up window after processing completes.
|
|
...
...
...
Perform this task after you create a test session(s).
To precache test content follow these steps:
From Testing > Sessions, search to find test session(s) set up to use proctor caching or click the down arrow next to the Search button and select show all results. Select the session(s) you want to edit.
| From Testing, select Sessions. 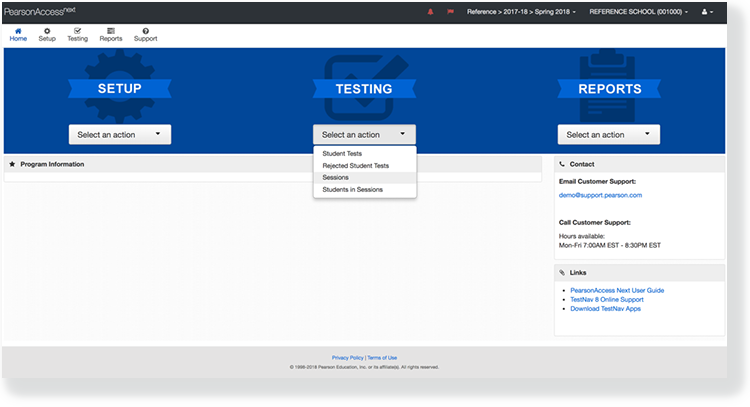 Image Added Image Added
Type a session name into the search field, and click Search. 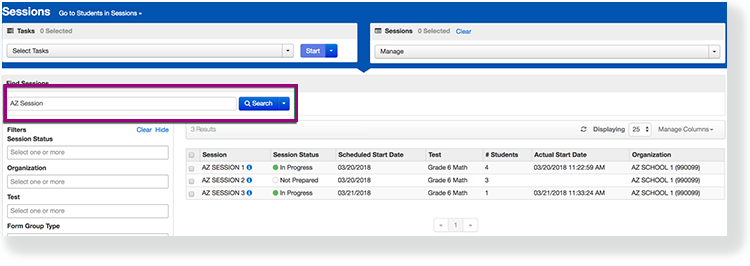 Image Added Image AddedClick the checkbox next to the session. 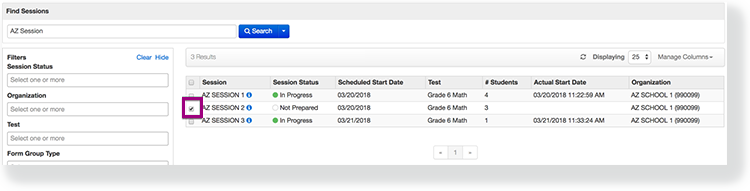 Image Added Image Added
Click Select Tasks, select Precaching Test Content, and click Start. 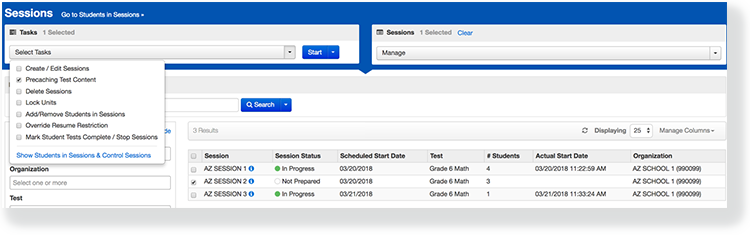 Image Added Image Added
Click Precache. If content does not appear
|
|
...
| title | Click here to view a screenshot... |
|---|
...
Open the task list and select Precaching Test Content and click Start.
...
| title | Click here to view a screenshot... |
|---|
...
- when precaching and there are no students in the session, add students to the test session and try again.
|
|
...
| title | Click here to view a screenshot... |
|---|
...
Precaching starts.
| Expand |
|---|
| title | Click here to view a screenshot... |
|---|
|
| Image Removed |
...
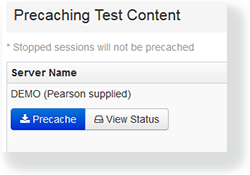 Image Added Image Added
- Dependent upon your browser security settings, a second popup message may display. Agree to any necessary prompts to continue processing.
For example, when using Chrome, click Send anyway.
- The TestNav status tab/window reflects the precaching status.
|
|
...
If no precaching is reflected, return to the popup message from step 5, and click Precache once again focusing on any security popups.Image Added- Close
|
|
...
- the pop-up window after processing completes.
|
|
Effects
...
| You can view available cached test statuses... |
|
...
- From Testing, select Sessions.
Type a session name into the search field, and click Search. Click the checkbox next to the session. Click Select Tasks, click Precaching Test Content, and click Start. Click View Status to open ProctorCache in a new window. From the application, you can refresh downloaded test content
|
...
An information page displays that caching is in progress and the parameters being used. At the same time, the ProctorCache application will open. From that application you can view caching progress. See Set Up and Use ProctorCache for directions.
| Expand |
|---|
| title | Click here to view screenshots... |
|---|
|
This screenshot shows that precaching has started. Image Removed The ProctorCache page provides access to cache status. See Set Up and Use ProctorCache for more details. Image Removed |
View Available Tests Cached Content Status
To view available tests cached content status, follow these steps:
From Testing > Sessions, search to find test session(s) that you want to view or refresh or click the down arrow next to the Search button to reveal and select the option to show all results. Select the session(s) you want to view or refresh.
...
| title | Click here to view a screenshot... |
|---|
...
Open the task list and select Precaching Test Content and click Start.
...
| title | Click here to view a screenshot... |
|---|
...
, reload the content, or purge content from the cache. See Set Up and Use ProctorCache for directions.
|
...
| title | Click here to view a screenshot... |
|---|
...
You can also refresh downloaded content for that test, reload the content, or purge content from the cache.
Related Information
To learn how to refresh and reload cached content, see Set Up and Use ProctorCache: Refresh, Reload, and Purge ProctorCache.
...


