
| Excerpt | ||
|---|---|---|
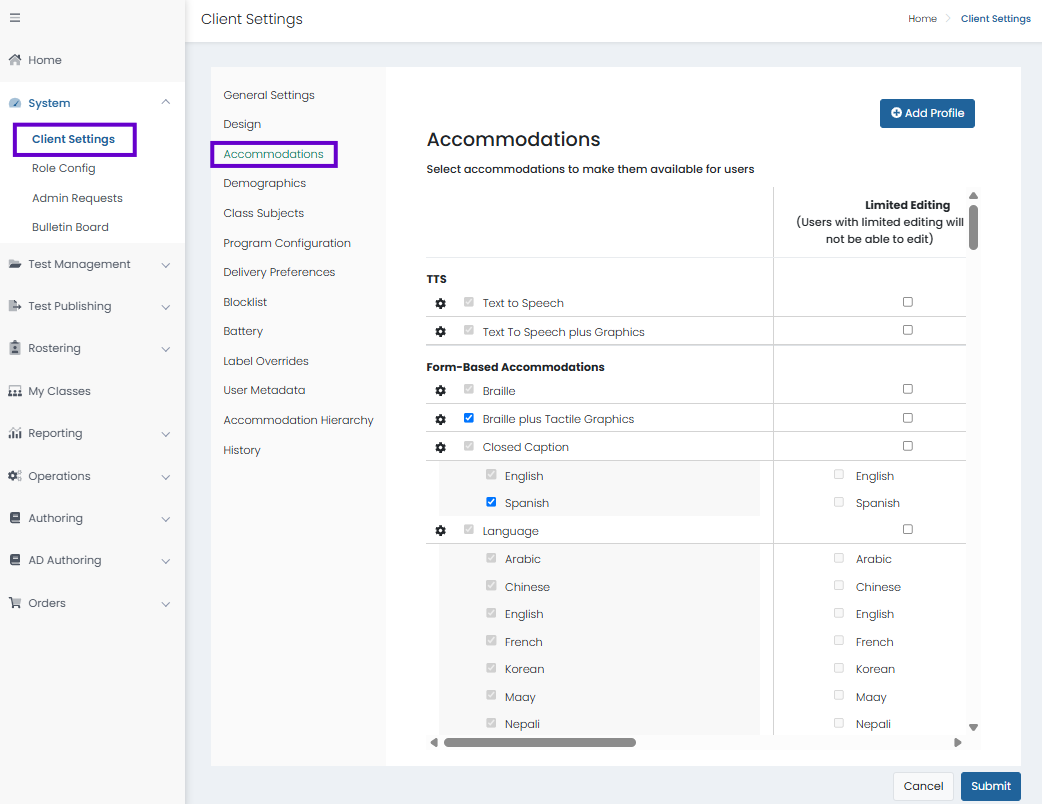
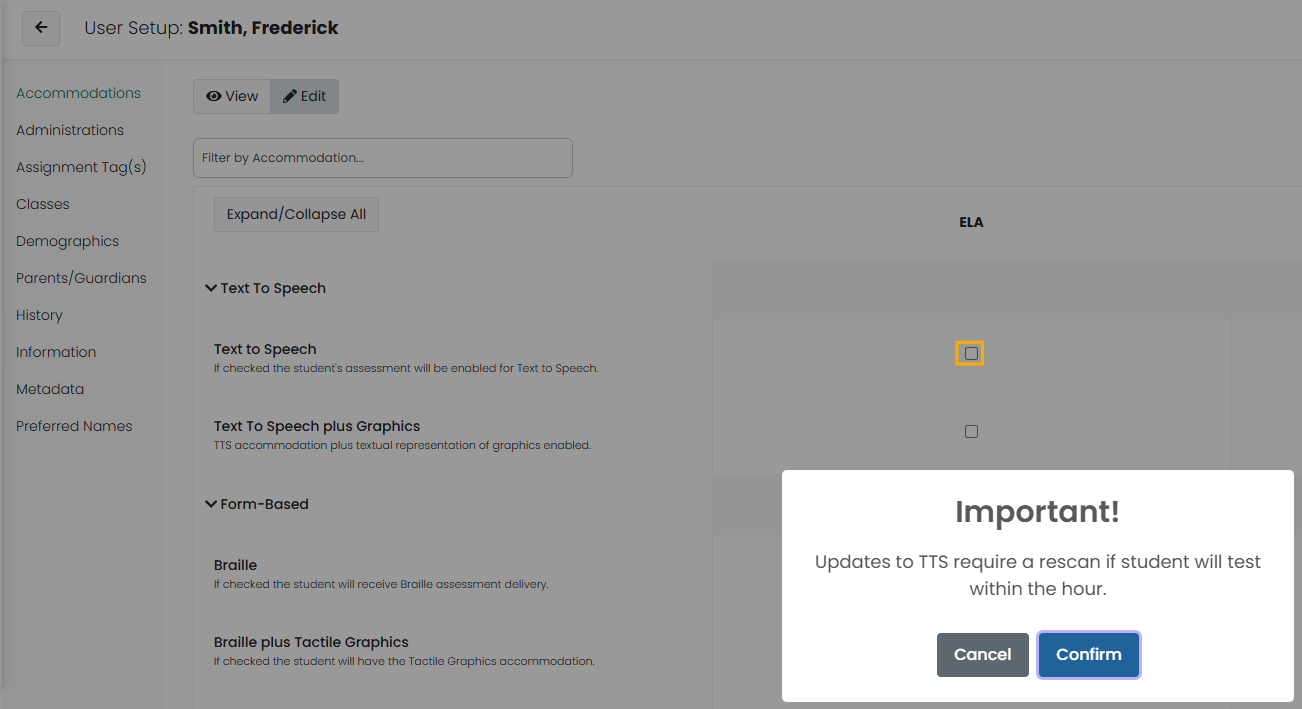
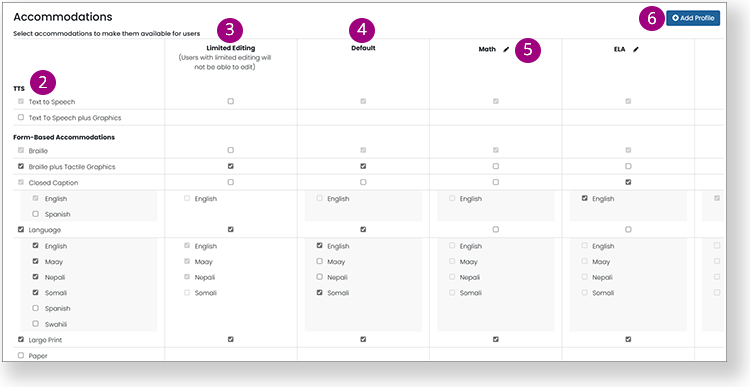
See also: Client Settings: Accommodation Hierarchy, Accommodations Overview Administrator roles with the appropriate permissions can add or edit the accommodation profiles in Client Settings. A student's accommodations for each profile can then be selected in their student record. Note | | |
|

| Info |
|---|
All profiles will be available in the student record, where you can select the appropriate accommodations for that student from each profile. After an accommodation has been assigned to students or tests, its checkbox will be disabled to prevent data errors. |
UPDATED USER INTERFACE FUNCTIONALITY
NOTE: This section details the updated Accommodations configuration settings within the updated user interface.
Enable Accommodations
Updated User Interface:
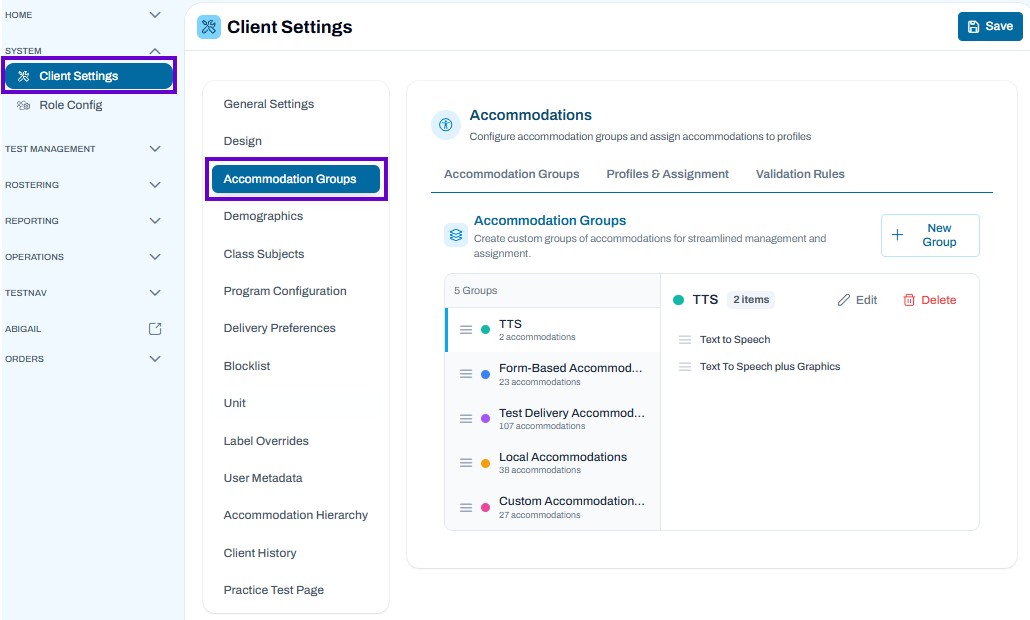
Accommodation Groups
Use the Accommodation Groups page to organize related accommodations into reusable groups that can be assigned to accommodation profiles. Grouping accommodations simplifies administration and helps ensure consistent accommodation settings across users and programs.
View Accommodation Groups
- Open Client Settings > Accommodation Groups.
- The left panel displays all available accommodation groups and the number of accommodations in each group.
- Select a group to view its included accommodations.
Create a New Accommodation Group
Accommodation Groups allow administrators to organize related accommodations into reusable collections that can be assigned to accommodation profiles. Using groups simplifies accommodation management and helps ensure consistent accommodation assignments.
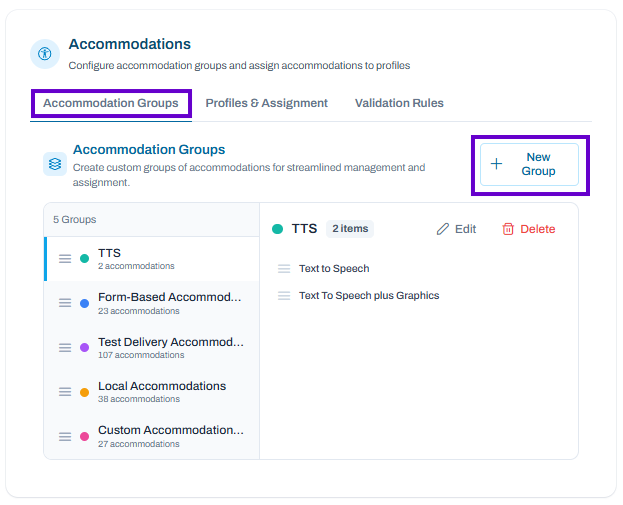
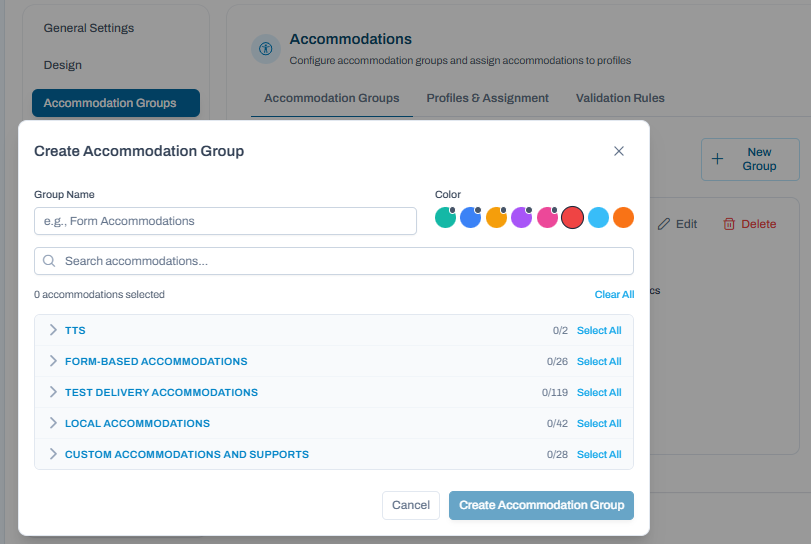
To Create a New Accommodation Group
- Navigate to Client Settings > Accommodation Groups.
- Select New Group.
- In the Group Name field, enter a descriptive name for the group (for example, Form Accommodations or Read-Aloud Supports).
- Optionally, select a color to help visually identify the group throughout the system.
- Use the Search Accommodations field to quickly locate specific accommodations.
- Expand an accommodation category by selecting the arrow next to the category name.
- Select the accommodations you want to include in the group.
- Use Select All to add all accommodations within a category.
- The selected accommodation count updates automatically as accommodations are added.
- Review the accommodations included in the group to ensure they meet your intended configuration.
- Select Create Accommodation Group to save the group.
After Creating a Group
Once created, the accommodation group becomes available for use within the Profiles & Assignment section (described below), where groups can be associated with accommodation profiles. Changes made to a group are reflected wherever that group is assigned.
Tips
- Create groups based on common accommodation types, programs, or administrative needs.
- Use clear, descriptive names so users can easily identify the purpose of each group.
- Review existing groups before creating new ones to avoid duplicate configurations.
- If selected accommodations need to be removed before saving, deselect them individually or use Clear All to start over.
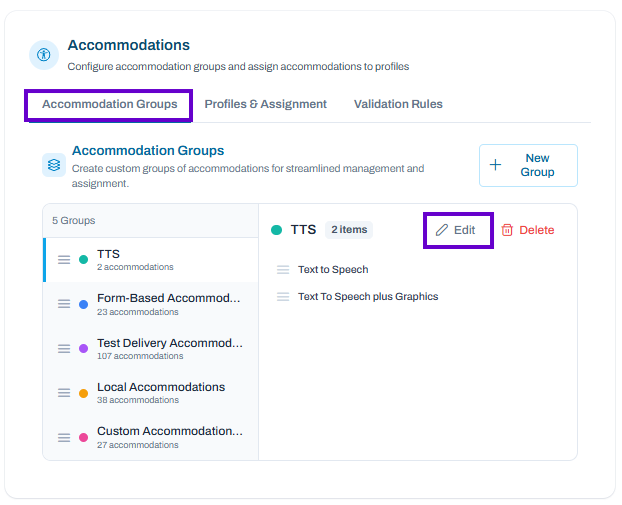
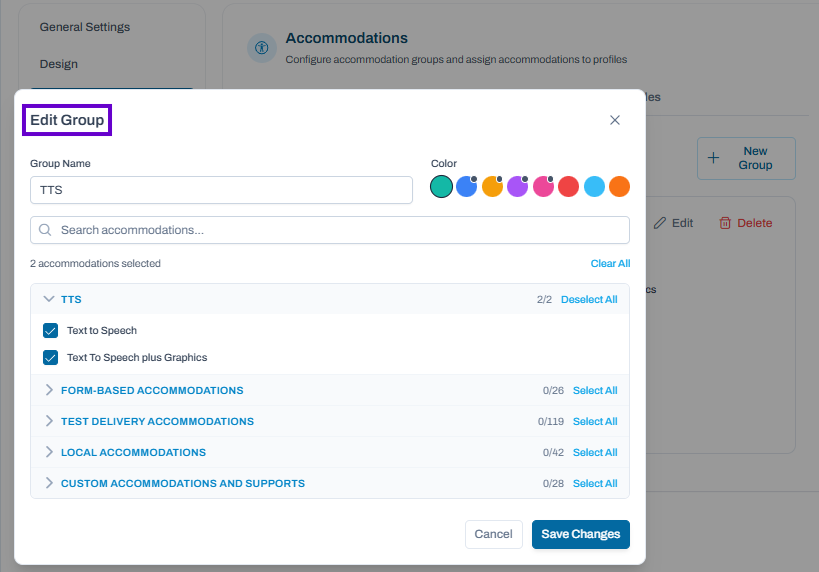
Edit an Existing Accommodation Group
- Select the accommodation group to modify.
- Choose Edit.
- Add, remove, or update accommodations within the group.
- Save your changes.
Delete an Accommodation Group
- Select the accommodation group you want to remove.
- Choose Delete.
- Confirm the deletion when prompted.
Best Practices
- Create groups based on common accommodation categories, such as Text-to-Speech, Form-Based Accommodations, or Local Accommodations.
- Use groups to streamline accommodation assignment and reduce configuration effort.
- Review group membership periodically to ensure accommodations remain accurate and up to date.
Note: Creating or modifying an accommodation group does not automatically assign accommodations to users. Groups must be associated with accommodation profiles through the Profiles & Assignment tab.
Profiles & Assignment
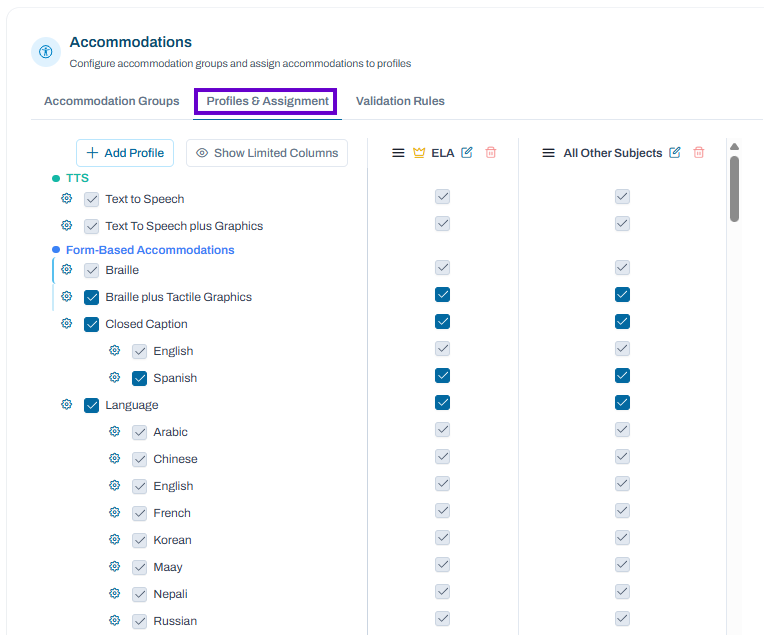
Use the Profiles & Assignment tab to create accommodation profiles and assign accommodations to specific subjects or testing programs. Profiles provide a streamlined way to manage accommodation configurations by grouping accommodations together and controlling which accommodations are available within each profile.
Create a New Profile
- Navigate to Client Settings > Accommodation Groups > Profiles & Assignment.
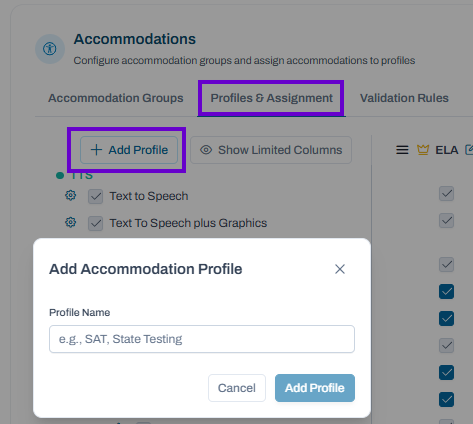
- Select Add Profile.
- Enter a name for the profile.
- Save the profile to create a new assignment column.
Assign Accommodations to a Profile
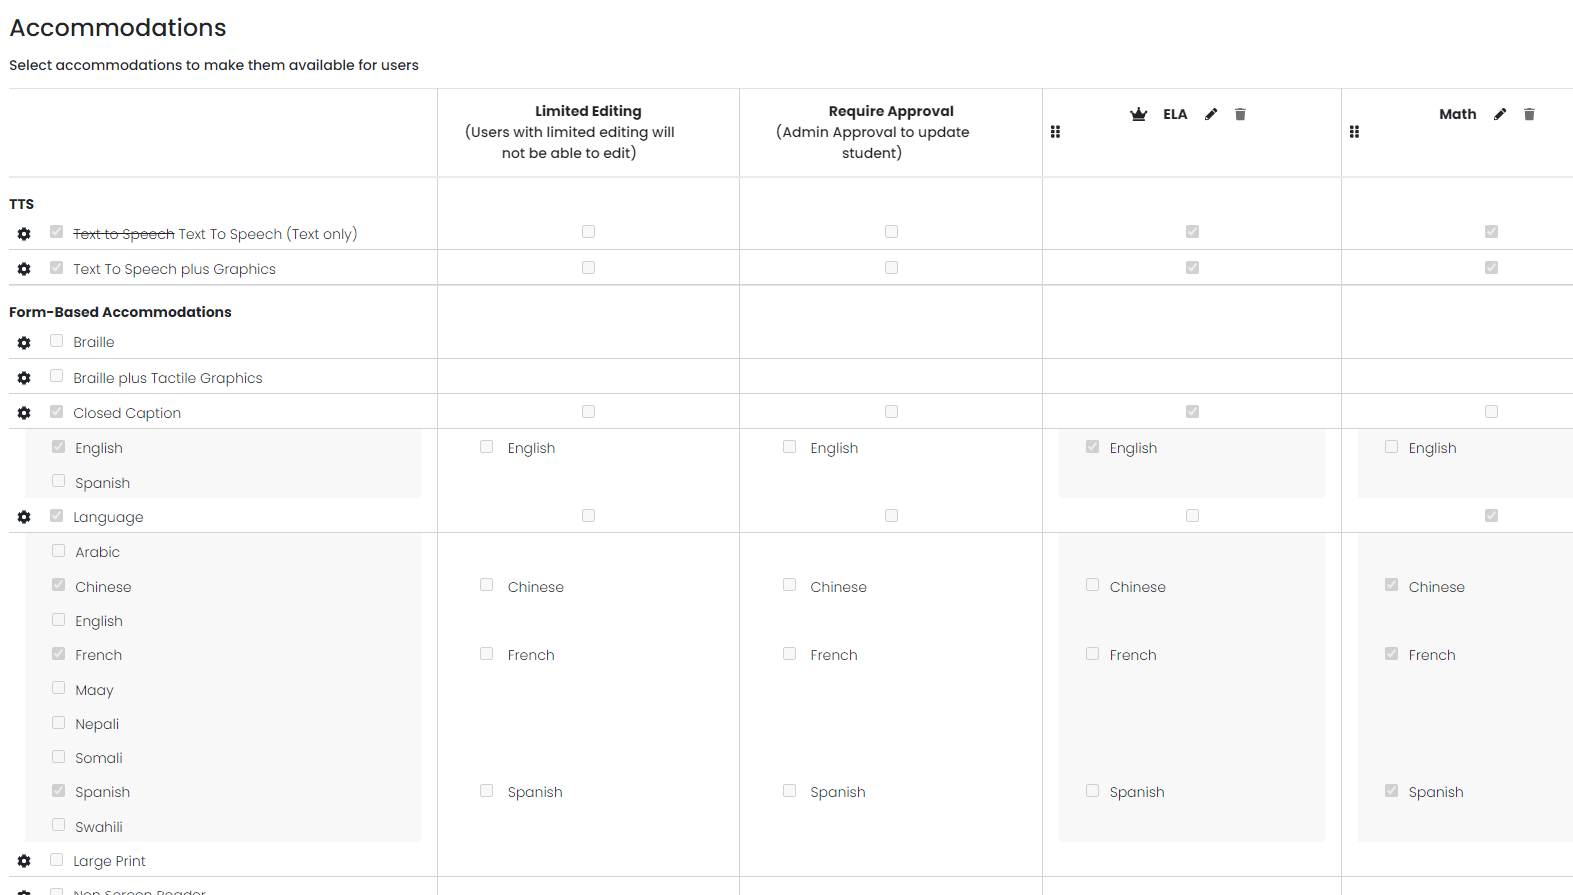
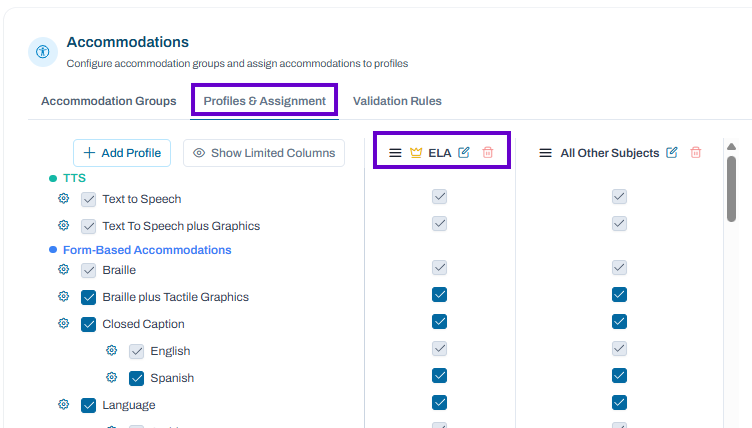
- Select the profile you want to configure. (in the screenshot below, ELA is the Profile)
- Locate the accommodation or accommodation group in the left panel.
- Select the checkbox in the profile column to enable an accommodation for that profile.
- Continue selecting accommodations as needed.
- Changes are saved when you select Save.
Edit a Profile
- Locate the profile column header.
- Select the Edit icon.
- Update the profile name or configuration as needed.
- Save your changes.
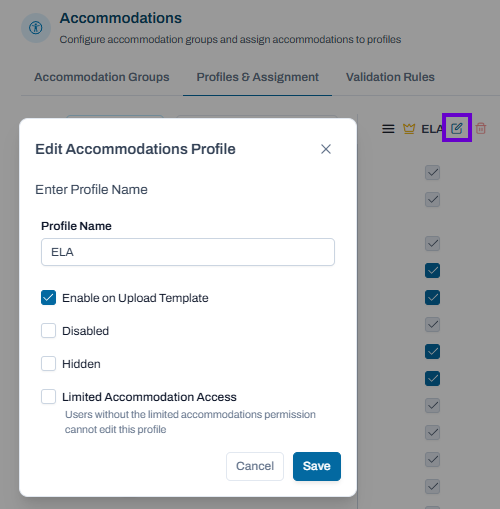
Edit an Accommodation Profile
Use the Edit Accommodation Profile dialog to update a profile's name, availability, visibility, and editing permissions. These settings determine how the profile is displayed and who can work with it throughout the system.
Update the Profile Name
- In the Profile Name field, enter a new name for the profile.
- Choose a descriptive name that clearly identifies the purpose of the accommodation profile.
- Save your changes when finished.
Enable on Upload Template
Select Enable on Upload Template to make the profile available when creating or processing accommodation upload templates.
When enabled:
- The profile can be included in supported import and upload processes.
- Administrators can assign accommodations in bulk using upload templates.
Disable a Profile
Select Disabled to prevent the profile from being actively used.
When a profile is disabled:
- The profile remains in the system.
- Existing configuration settings are retained.
- Users cannot actively utilize the profile until it is re-enabled.
Hide a Profile
Select Hidden to remove the profile from standard profile views.
When a profile is hidden:
- The profile remains configured in the system.
- The profile is not displayed in normal workflows for most users.
- Administrators can unhide the profile if it is needed again.
Limit Accommodation Access
Select Limited Accommodation Access to restrict who can modify the profile.
When enabled:
- Only users with the appropriate limited-accommodation permissions can edit the profile.
- Users without the required permissions can view the profile but cannot make changes.
- This setting helps protect accommodations that require additional administrative oversight.
Save or Cancel Changes
- Select Save to apply your updates.
- Select Cancel to close the dialog without saving changes.
- Select the X in the upper-right corner to exit without making changes.
Best Practice: Use meaningful profile names and permission settings to ensure accommodations are managed consistently and only by authorized users. Profiles intended for specialized accommodations or restricted workflows should be configured with Limited Accommodation Access enabled.
Delete a Profile
- Locate the profile column header.
- Select the Delete icon.
- Confirm the deletion when prompted.
Configure Subject-Specific Accommodations
Profiles can be configured separately for different subjects.
- Locate the subject column (for example, ELA or All Other Subjects).
- Select or clear accommodation checkboxes within the desired subject column.
- Accommodations selected for one subject do not automatically apply to other subjects unless configured.
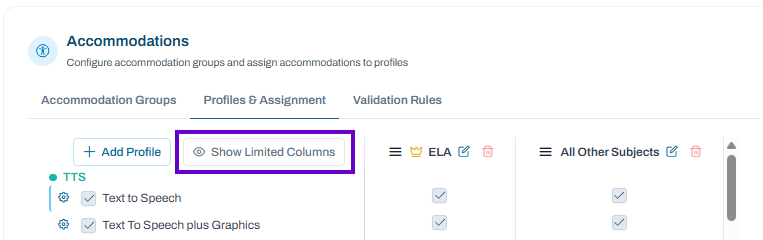
View Limited-Editing Accommodations
The Show Limited Columns option displays additional accommodation settings that are not shown in the standard profile assignment view. These columns provide administrators with greater control over how accommodations can be managed and approved.
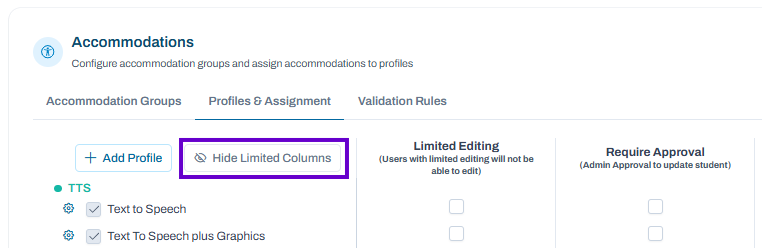
When selected, additional configuration columns become visible, such as:
- Limited Editing – Prevents users with limited accommodation permissions from modifying the accommodation assignment for that profile.
- Require Approval – Requires an administrator or authorized user to approve accommodation changes before they take effect.
- Additional restricted-access or workflow-related settings that may be configured for specific programs or accommodations.
To View Limited Columns
- Navigate to Client Settings > Accommodations > Profiles & Assignment.
- Select Show Limited Columns.
- Review the additional columns that appear to the right of the accommodation profile assignments.
- Configure settings as needed by selecting or clearing the corresponding checkboxes.
- Select Hide Limited Columns to return to the standard view.
Why Use Limited Columns?
Limited columns help organizations enforce accommodation management policies by:
- Restricting who can modify accommodation assignments.
- Requiring approval for certain accommodation changes.
- Supporting administrative oversight and review workflows.
- Protecting sensitive accommodation configurations from unauthorized changes.
Note: The settings displayed in limited columns typically affect accommodation administration and permissions rather than the accommodation itself. Access to these settings may be restricted to users with elevated administrative permissions.
Tips
- Use accommodation groups to quickly manage related accommodations.
- Create separate profiles when accommodations vary by testing population, program, or subject area.
- Review accommodation assignments carefully before saving to ensure students receive the correct supports.
- Subject-specific settings allow accommodations to be available only where appropriate.
Validation Rules
Use the Validation Rules tab to create rules that enforce accommodation requirements and prevent invalid accommodation combinations. Validation rules help ensure accommodation assignments meet program policies and administrative requirements.
Note: Validation rules are an internal program configuration. Contact your program delivery team for more information on managing validation rules.
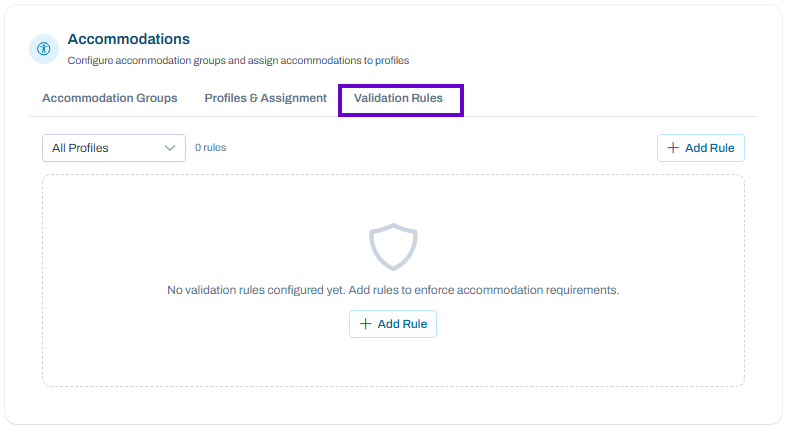
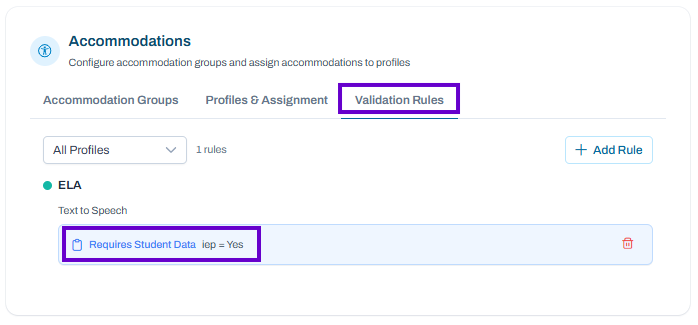
View Validation Rules
- Navigate to Client Settings > Accommodations > Validation Rules.
- Use the Profile filter to view rules associated with a specific accommodation profile or select All Profiles to view all rules.
- The page displays existing validation rules and their associated profiles.
Create a Validation Rule
Validation rules allow administrators to enforce accommodation requirements based on specific criteria. Rules help ensure accommodations are assigned consistently and only when appropriate conditions are met.
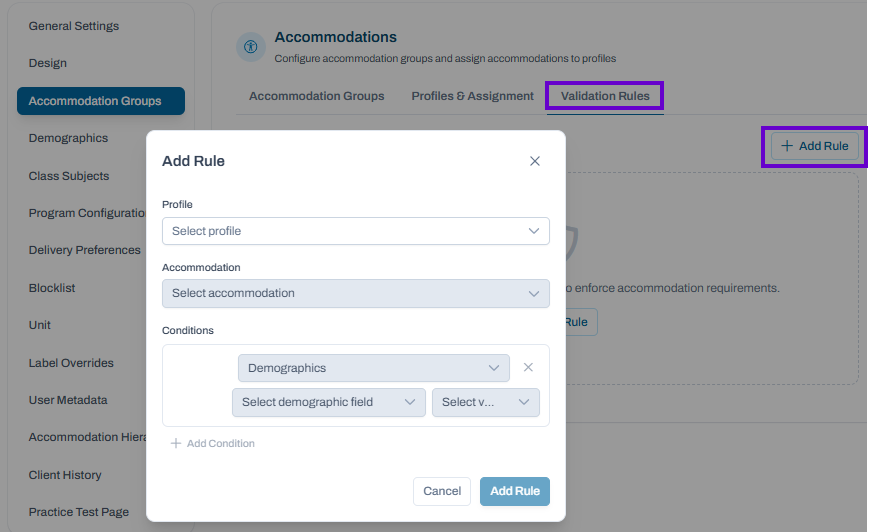
Create a New Rule
- Navigate to Client Settings > Accommodations > Validation Rules.
- Select Add Rule.
- In the Profile field, select the accommodation profile to which the rule will apply.
- In the Accommodation field, select the accommodation that will be validated.
- Under Conditions, define the criteria that must be met for the rule to apply.
Add Conditions
- Select the condition type from the first dropdown (for example, Demographics).
- Select a demographic field from the second dropdown.
- Select the applicable value from the third dropdown.
- To create additional criteria, select Add Condition.
- Repeat as needed to build more complex validation requirements.
Save the Rule
- Review the selected profile, accommodation, and conditions.
- Select Add Rule to save the validation rule.
- The new rule will appear in the Validation Rules list and will be applied when accommodation assignments are evaluated.
Example
A district may create a rule that:
- Applies to the ELA profile.
- Validates the Text to Speech accommodation.
- Requires a student's demographic record to contain a specific value before the accommodation can be assigned.
Best Practices
- Keep rules focused on a single validation requirement whenever possible.
- Use clear demographic criteria that are easy to maintain and audit.
- Test new rules before broad implementation to verify they produce the expected results.
- Periodically review validation rules to ensure they continue to align with current accommodation policies and program requirements.
Note: Validation rules help automate accommodation governance by restricting or enforcing accommodation assignments based on predefined profile and demographic criteria.
Manage Existing Rules
- Locate the rule you want to update.
- Open the rule to review its configuration.
- Modify the rule conditions, accommodations, or restrictions as needed.
- Save your changes.
Delete a Rule
- Locate the validation rule you want to remove.
- Select the Delete option.
- Confirm the deletion when prompted.
Common Uses for Validation Rules
Validation rules can be used to:
- Require one accommodation when another accommodation is selected.
- Prevent incompatible accommodations from being assigned together.
- Enforce program-specific accommodation policies.
- Ensure required approvals or conditions are met before accommodations are assigned.
- Help maintain consistent accommodation configurations across profiles.
Example Scenarios
- If Text to Speech plus Graphics is selected, a related accommodation may also be required.
- Certain accommodations may be restricted from being assigned together.
- Specific accommodations may only be allowed within designated profiles or programs.
Best Practices
- Create rules that reflect your organization's accommodation policies.
- Review rules periodically to ensure they align with current testing requirements.
- Test new rules before broad deployment to verify they behave as expected.
- Keep rule descriptions clear and concise so administrators can easily understand their purpose.
Note: Validation rules help maintain accurate accommodation assignments by providing automated checks during accommodation configuration and assignment workflows.
...
Tiny LinkTiny link: https://support.assessment.pearson.com/x/BgHVBw