...
Complete the setup using the sections below.
| Excerpt |
|---|
Install TestNav from the TestNav Download Page |
After you download TestNav Desktop for Windows and ProctorCache, complete the following:
These ordered steps correspond to sections below or a related setup page. You can click each link to go directly to the corresponding processes.
Install TestNav Desktop using the instructions below.
- Start TestNav Desktop to ensure that it installed properly.
- Set up ProctorCache on your proctor caching computer(s).
Run App Check to verify system readiness and capacity.
Set Up Response File Backups, and set up a Secondary Save Location.
...
TestNav program files are saved in C:\Program Files (x86)\TestNav. If you are using the .exe installer, you can choose a different install directory. |
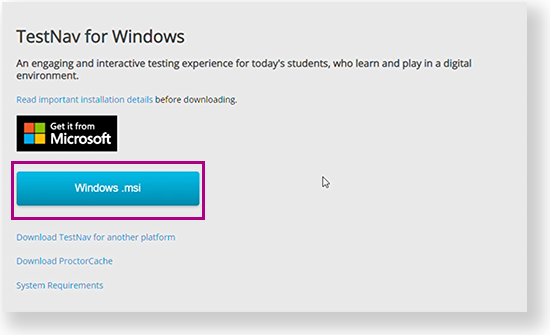
Double-click the .msi or .exe file that you downloaded.
Info .msi (Microsoft installer) file - contains explicit instructions about installing and removing an application.
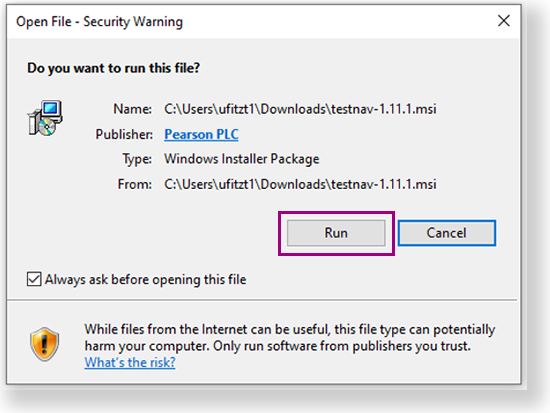
.exe (executable) file - provides a built-in installation wizard. You can choose program file locations using this type of installation.The Open File - Security Warning appears and asks if you want to run the TestNav file. Click Run.
Expand title Click here to view a screenshot... 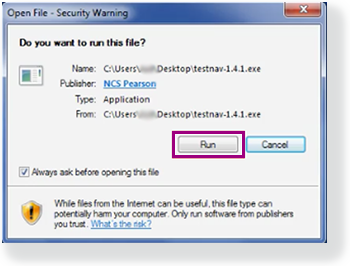
If you downloaded the .msi installer, the installer window appears and automatically installs TestNav.
Expand title Click here to view a screenshot... 
If you downloaded the .exe installer:
The Setup - TestNav window appears and asks if you want to continue installing TestNav. Click Yes.
The TestNav Setup Wizard appears. Click Next.
The Select Destination Location window appears. By default, TestNav program files save in C:\Program Files (x86)\TestNav. You can keep the default setting, or click Browse to choose another location. Then, click Next.
Expand title Click here to view a screenshot... 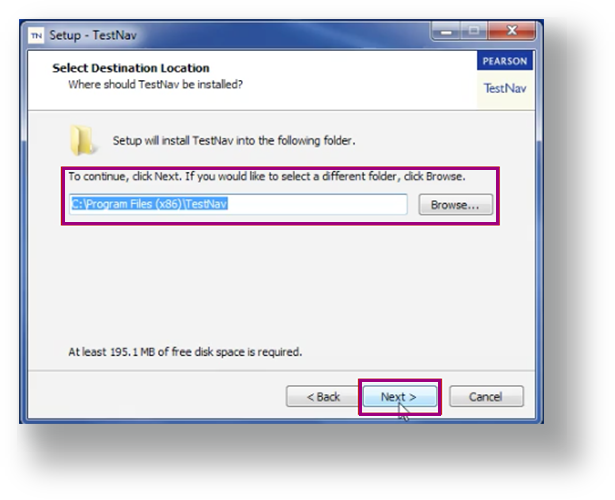
The Select Start Menu Folder window appears. By default, the setup wizard also stores program shortcuts in a Pearson folder in the Start menu folder. You can keep the default setting, or click Browse to choose another location. Then, click Next.
Expand title Click here to view a screenshot... 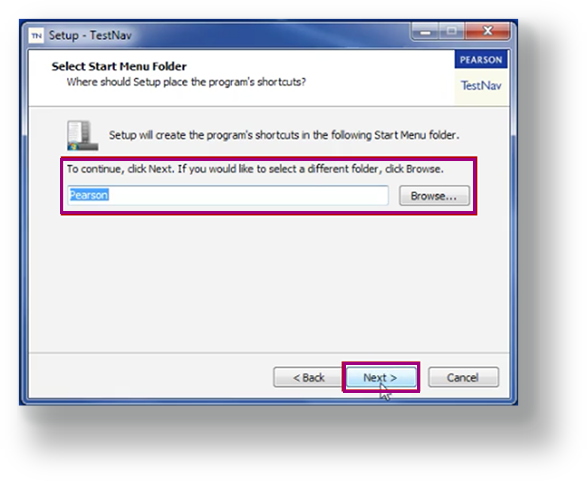
Click Install.
Expand title Click here to view a screenshot... 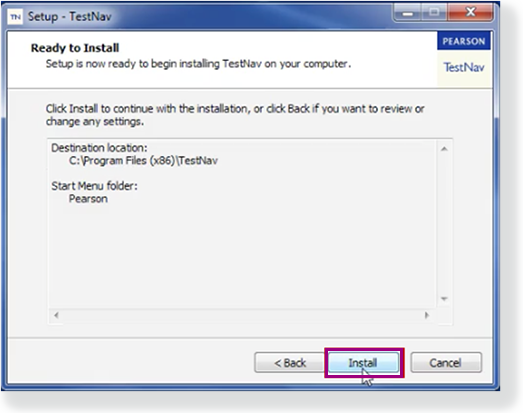
By default, the Launch TestNav check box is selected. If you do not want to immediately launch TestNav, deselect the check box, and then click Finish.
| Info | ||
|---|---|---|
| ||
Because TestNav installation does not add entries to the Windows registry, you can copy the TestNav application and push it to student computers for mass installation. |
TestNav Desktop Updates
Anchor |
|


...
|
...
From the Start menu, click TestNav.
TestNav should appear in the Start menu. If you do not see TestNav, type TestNav in the search box.Expand title Click here to view a screenshot... 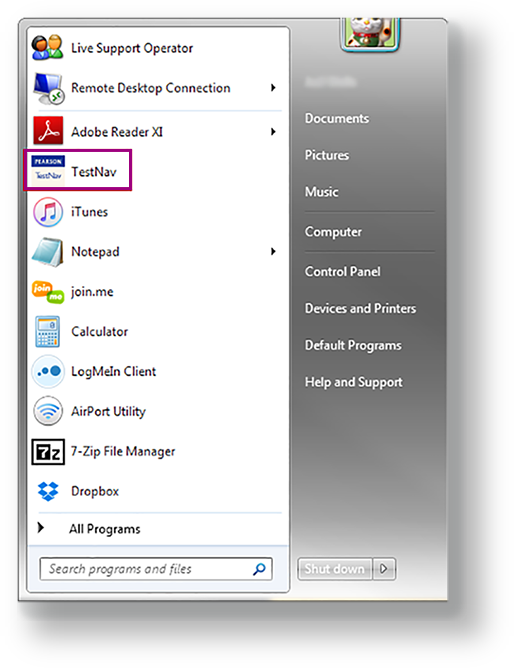
- If you have not already done so, choose the appropriate icon for your test on the home page. If your test was selected before the test session, you see the Sign In page, rather than the home page.
- If you need to select a different test, click the user drop-down menu at the upper-right of the page, and click Choose a different customer.
- Choose the appropriate icon for your test.
- Input your username and password on the Sign In page to begin your test.
...
|
Student Response File Setup
When a student responds to a test question, TestNav sends the response to the Pearson server. If the network experiences a connectivity issue, or the student encounters an error, TestNav saves the response to a saved response file (SRF). For configuration details, see: Set Up and Find Saved Response Files (SRF).
Allow Chromium to Access Private Networks
The first time you launch TestNav after installing, a dialogue may appear asking to allow Chromium to access private networks. If this dialogue appears, please click "Allow," as the Chromium process is what TestNav runs on.
Run App Check
It is essential to run the App Check on each student device before testing. For details, see App Check.
Sign in to TestNav
Start a test to ensure that you can do so without error. For details, see the instructions in Sign in to TestNav.
...
Default Primary Save Location
| Operating System | SRF Location | Log File Location |
|---|---|---|
| Windows | {USER.HOME}\Pearson\srf\ | {USER.HOME}\Pearson\logs\ |
...
You can set a secondary save location through your assessment management system. Set a secure file transfer protocol (SFTP) address as the save location to ensure that the secondary save applies to all testing computers and devices.
| Include Page | IR:_TN_SRFandLogs_SecSave | IR:_TN_SRFandLogs_SecSave | ||
|---|---|---|---|---|
| Anchor | trial | trial | ||
| Include Page | ||||
| ||||
| Include Page | IR:_TN_SRFandLogsRelatedInfoInstall | IR:_TN_SRFandLogsRelatedInfoInstall |
...