
-
Created by
 Tiwanna Bazemore, last updated by user-760ba on Oct 16, 2025
4 minute read
Tiwanna Bazemore, last updated by user-760ba on Oct 16, 2025
4 minute read
Before you can finish creating an item for scoring you must have a scoring rubric assigned to it. This article walks you through the process of creating a scoring rubric.
- Click on Rubric Setup in the Setup/Configuration menu (left hand navigation)
- Click on
 in the top menu bar
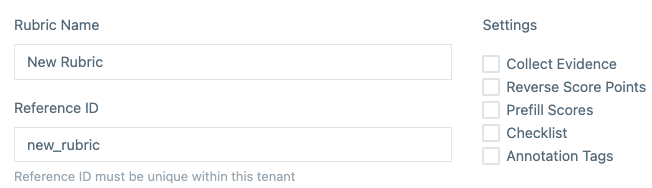
- Rubric Name - The label seen when assigning rubric's to Items
- Reference ID - used when working directly with the API
- Settings
- Collect Evidence - this adds an additional text field for the scorer to add notes specific to each trait being scored (vs. Text Traits)

- Reverse Score Points - scores from 1 | 2 | 3 | 4 are reversed to 4 | 3 | 2 | 1
- Prefill Scores - sets the default scored value of 1
- Checklist (text traits only) - this adds a checklist to be completed by the scorer
- Collect Evidence - this adds an additional text field for the scorer to add notes specific to each trait being scored (vs. Text Traits)
Trait Setup
There are two types of traits:
- Numeric Traits - Giving scorers the ability to score a response using a range of numbers (from Min to Max), Optional Half Points, Weighting
- Text Traits - Give the scorers an open option for providing a response for the response as a whole. Text Trait types are: Text, Long Text and Text Select
Note: As traits are added, they are immediately visible on the right side or at the bottom of the screen (depending upon your screen width) as Preview
Add Numeric Trait
Click the  button.
- Name - Label seen by the scorer for the scoring rubric
- Min/Max - sets the numeric range for the scoring 1 - 3 [ 1 | 2 | 3 ]
- Step - when set, an additional set of scores are included [ 1 | 1.5 | 2 | 2.5 | 3 | 3.5 ]
- Weight - the reported score of a trait is multiplied by the weight.
- Set a weight of 3 and a scorer scores the trait as a 2...the score will be exported as a 6.
- Set a weight of 1 and a scorer scores the trait as a 2...the score will be exported as a 2.
 - Score Point Descriptors add hover over text for each of the trait scoring values
 - Trait Settings provide additional options for the trait
- Reported Name including External Trait ID and External Item ID
- Masked Score Points - hide some of the sequential scores from the scorers [ 1 | 3 ]
- Condition Codes - add flags for scorers to set beyond the scoring rubric on the trait. These might include codes to flag a response as a 'sensitive paper' or 'blank' (student didn't provide an answer). Use the 'Inline Condition Codes' checkbox to display the condition code either under the scoring options, or next to.
- The condition codes are defined during Tenant Setup as Flag Codes
- The system defined response to the condition codes is defined during Tenant Setup
- Withhold score or Apply score, Set as Alert, Require Score
- Score Point Comments - Additional information can be captured when a specific score is given, allowing the scorer to further justify or explain by choosing an option from a menu.
- Linked Trait - When two traits are linked, one of the traits is hidden. The hidden trait will receive the same score as the visible trait when the response is scored.
Note: The Add Page function allows the ability to do script-based marking. Ask support for additional information.
Add Text Trait
Click the  button.
- Name: Label seen by the scorer for the scoring rubric
- Type: Defines the delivery and entry rules for the text trait
- Text: Provide a small text box allowing a scorer to enter a small amount of text.
- Long Text: Provide a scorer with a big text box for entering text.
- Text Select: Create "choices" that a scorer can pick from in a drop down.
- Define the menu choices by clicking on

- Define the menu choices by clicking on
- Required: This requires the scorer to complete this text trait before they can submit this score.
Click this link to view a short video that demonstrates the steps.