Program Configuration
A program is a way to group tests that share reporting features and visibility settings. This allows you to compare by content area and grade, and track student performance over time. A test must be assigned to a program to be available in the Performance Report. Programs are designed to work for a single academic year, not multiple years. Typically, programs are not split out by grade, test window, or subject as those filters are already available in reports. Consider them test categories or "buckets." Examples of program names include Spring Summative, Diagnostics, Checkpoints, Interims and Benchmarks.
In most cases, your program delivery team will configure programs after working with site administrators to determine reporting requirements.
- Go to Test Management > Program Configuration and do one of the following:
- Click the Create New to set up a new program.
- Click the edit icon in the in the Actions column to modify an existing program.
- Click the Clone icon in the Actions column to duplicate an existing program and modify as needed.
Refer to the expandable sections below to configure the new program.
Complete initial program setup on the General Settings tab. Define when, who, and what the program is used for.
Note: You must define a primary performance objective before you can save data in General Settings.
- Program Name: Required. This name will be used when selecting a program in the performance reports, so it should be easy to recognize.
- Program Code: A unique code generated automatically based on the program name (if no code is entered initially). Used internally.
- ADAM Scored: Select for tests delivered through the ADAM player. Leave this checkbox unchecked for tests delivered externally (such as through TestNav). A program cannot contain both ADAM and external tests.
- Active: Select to make the program available when assigning a test to a program and in reporting. You can leave this unchecked until you are ready to use the program.
- Class Reports: Select to allow users to access class-level reports in My Classes and Reporting for tests in the program.
- Student Results: Show combined view of all student results.
- Program Report: Program Reports compare results from different tests in the same program and support reporting by demographics.
- Standards Reporting: Standard sub-scores will be calculated, and standard reporting will be available to teachers and administrators. For ADAM-delivered test only.
- Item Analysis Reporting: Item analysis reporting will be available to teachers and administrators. For ADAM-delivered test only.
- Show item content, correct answer and student responses
- Show trait level reporting: Available for open response items
- Hide aligned items details: If checked, aligned item details will not be visible on Standard Performance report.
- Show Student Their Results: Allows students to see their results in ADAM. For ADAM-delivered test only.
- Show Student Item View: Allows students to see the test items in ADAM. For ADAM-delivered test only.
- Review Only: If checked only Program Reviewers will see this program.
- Only Report Battery Results: Only show battery test results. Test results will not be accessible in the ADAM user interface.
- Available Testing Windows: Required. Enter one or more window names (such as Fall, Spring). These are simply labels to facilitate reporting over time and do not control when the student can test.
- Available Grades: Required. Select one or more grade levels to use in the program.
- Available Content Areas: Required. Select one or more content areas used in the program, such as Algebra or ELA (these are defined in System > Client Settings). Content areas enable you to have multiple assessments for the same subject and area (e.g., Algebra II and Geometry).
- School Year: Select the school year for the program.
On the right side of the screen, define the performance objectives that you want to appear in reports, such as raw score. The available objectives will vary based on whether the Scored checkbox is selected in General Settings. Raw Score and Percent Correct objectives appear by default.
Note: The objective configuration is a template that can be changed at the test level. For example, if you define cut scores here, they can be changed on individual tests when assigning them to the program.
- Raw Score (RAW_SCORE): Always available. Reports show raw score if selected as a primary or secondary objective.
- Percent Correct (PERCENT_CORRECT): Always available. Reports show percent correct if selected as a primary or secondary objective.
To add additional objectives, select from the Add Objective dropdown. You can rename objectives in the Objective Name field.
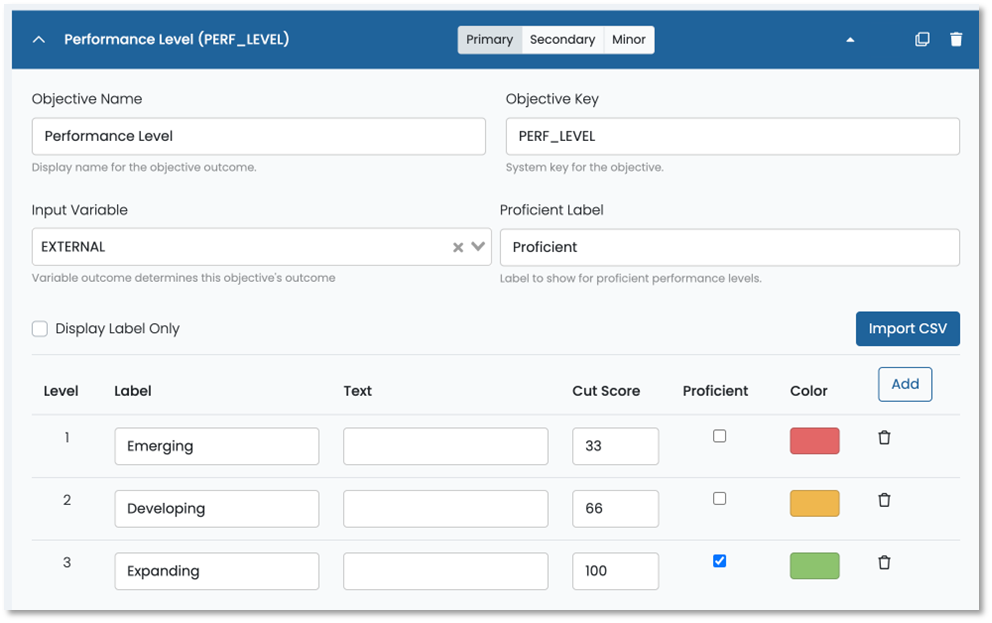
Performance Level (PERF_LEVEL):
- Usually set as the primary objective when used.
- Input Variable: Select RAW_SCORE or PERCENT_CORRECT (or another input based on an objective you have created). This value will be used to determine the output score.
- Performance Level Settings: Enter the Label, Text description (such as "Above expectations"), and Cut Score.
- Check the Proficient box when applicable for the performance level. Levels tagged as Proficient are used to calculated the Proficiency value in Performance report
- Optionally, select new colors by selecting an existing color. Select Add to create more levels.
Lookup (LOOKUP):
- Enter a database key in the Objective Key field, such as "LOOKUP_Scale." This field CANNOT be blank.
- Input Variable: Select RAW_SCORE or PERCENT_CORRECT (or another input based on objectives you have created). This value will be used to determine the output score.
- Lookup Settings: Enter data in the Cut Score and Output fields. You can also import a CSV file.
- The cut score starts at zero, so the lowest value you enter can be greater than zero, but you may use zero if you define a cut score for every raw score.
- Optionally, select the Use Color Picker checkbox to customize the colors of the score groups. Select Add to create more levels.

Dynamic Metadata (ITEM_METADATA):
- Enter a database key in the Objective Key field, such as "DYNAMIC_METADATA." This field CANNOT be blank.
- Score Calculation: Select NUMBER or PERCENT.
- Select Metadata: Select a Bank, then select a Metadata Field.
- You can only select one Metadata Field for each Dynamic Metadata objective.
- You can only select one Metadata Field for each Dynamic Metadata objective.
External (EXTERNAL):
- Only available when the ADAM Scored checkbox is NOT selected in General Settings (i.e., tests are delivered in TestNav).
- Objective Key must match the external passed data, for example "SCALE_SCORE."
- Score Calculation: Select NUMBER or PERCENT.
- Range Designation: Enter the default low and high scaled scores or number of questions, with 0 as minimum.
- The range for each test can be defined later when tests are added to the program.
- The range for each test can be defined later when tests are added to the program.
Primary, Secondary, and Minor Objectives
A program must have a primary performance objective, and optionally, secondary and minor objectives. The primary objective is the main focus of the report and will be emphasized on the report. Secondary and minor objectives will also be visible but not as prominent. For each objective, select Primary, Secondary or Minor.
For example, the primary objective may be Performance Level and the secondary objective may be Raw Score Percent Correct. Performance reports will emphasize score groups (with colors) defined in the Performance Level objective, while the secondary objective provides the score used to determine the performance levels. You may define additional objectives that feed data to the primary or secondary objectives shown on the reports.
Defining the report column order. The Outcome columns are displayed in the report based on the sequence of the configured objectives. Use the up/down arrows in the widget title bar to move objectives up or down. You can modify the order after linking tests to the program.
Not Applicable checkbox. Select the Not Applicable checkbox for an objective that you want to hide on the Performance Report; for example, if you don't want to show a Lexile score for a math test.
You can set up the Individual Student Results report on the ISR Settings tab. These settings can be modified at any time, even during test taking. The ISR report can be accessed from the Performance Report.
- Report Title: Enter a name for the report.
- Report Logo: Optional. Select a logo by browsing or drag and drop a file. JPG, PNG, and GIF are supported.
- Student Information:
- Show ID: Show the student ID on the report.
- Show Date of Birth: Show the student's date of birth on the report.
- Show Grade Level: Show the student's grade level on the report.
- Show School Name: Show the student's school name on the report.
- Show District Name: Show the student's district on the report.
Report Sections & Widgets
After defining the general settings, you can select and configure each section you want to include on the individual student report. Each section can contain multiple widgets with specified performance objectives. Report widgets will not appear on the ISR when there is no data for the student (except for Text, which is not dependent on student data).
- Add Report Section: Click to add a report section. Each section may contain one or more widgets.
- Section Title: Enter a name for the report section.
- Print Break Before Section: Insert a page break before the section.
- Add Widget: Select to add a report component to a section. You can add several report components to a section. For each widget, select a single Content Area, one or more Test Windows, and an Objective (database field).

Note: If data does not exist for an ISR component you have defined, it will not appear on the report.
You can add the following report components to the ISR:
- External Named: Only supports external data from TestNav. The External Objective is from TestNav data, such as scaled score.
- Growth: Shows a graph with performance over time. For performance levels, score groups appear as background colors on the chart. Supports both ADAM and external data from TestNav.
- Metadata Performance: Similar to the Growth report but using a grouping of items, such as reading comprehension or writing ability. Supports ADAM data only.
- Outcome Table: Only supports external data from TestNav populated based on Content Area, Test Window, and (optionally) Grade. You can build a table with up to two data columns and as many rows as needed. The left column is for the row description, and the two data columns allow you to select performance objectives defined in the program or manually entered objective keys (for example REPORTING_CATEGORY_PERCENT_CORRECT). Select the Add Text checkbox to a table description or legend.

- Page Break: Insert a page break at the selected location (anywhere within a section). You can also select the Print Break Before Section checkbox.
- Reporting Category Profile: Select the Content Area and add Reporting Category Keys (reporting category code) to display a table with reporting categories.
- Score and Performance: Shows the scaled score and a bar with colors for each performance level. Select the checkboxes to show test information, score group summary statements, and school and district averages. Supports ADAM data only.
- Score with Bar: Only supports external data from TestNav. Similar to the Score and Performance component but with an objective from TestNav data.
- Simple Level Output: Select a Performance Level Objective. Supports ADAM data only.
- Text: Use this component to share text information, including links. Enter a heading and text or links in the content area.
Use the Battery Edit tab to set up objectives for battery tests. After defining objectives here, they can be used on the ISR Settings tab by selecting Use Battery Outcome in an ISR widget. The Battery Edit tab is only available when battery testing is enabled in Client Settings (see Client Settings: Battery). The battery tests listed on this tab are populated via TestNav form sync based on the battery definitions defined in the scoring test maps.
- If an expected battery test is not listed, select it from the Create Battery Association dropdown. The battery association will be created in ADAM, and the battery will now appear in the table.
- Click the Edit icon to define that performance objectives for the battery used on the Performance Report. The following objectives are supported:
- Performance Level
- External
- Deleting a battery does not delete the battery association; only the objectives currently defined for the battery are deleted.
The Test Edit tab lists tests assigned to the program. From here, you can:
- Select the checkbox in the Review Reports column to place all reports for the test under review. Users with permission can review the test reports, and then clear the checkbox here or in Test Configuration to make the reports available to other users.
- Click the Edit icon in the Actions column to open Test Configuration.
- Click Save.
After creating a program, you can:
Assign tests to the program when creating a test from Test Management > Tests.
- Override some program settings at the test level. For Performance Levels, cut scores and labels can differ by test, but you cannot change which levels count as proficient, the color, or add/remove levels.
General Settings, such as whether or not to display item analysis, ISR Settings can be modified later, even when students are taking tests.
Important: After assigning a test to a program, the program's score type selections, windows, grade levels, and content areas cannot be changed. Make sure to carefully plan and configure the program before assigning tests.