Find a User
Users with the appropriate permissions can go to Rostering > Users to find and export all users with a given accommodations, assignment tag, school enrollment or other criteria. Some users also have rights to edit some data either per student or in bulk.
See also: Student Dashboard
- Go to Rostering > Users.
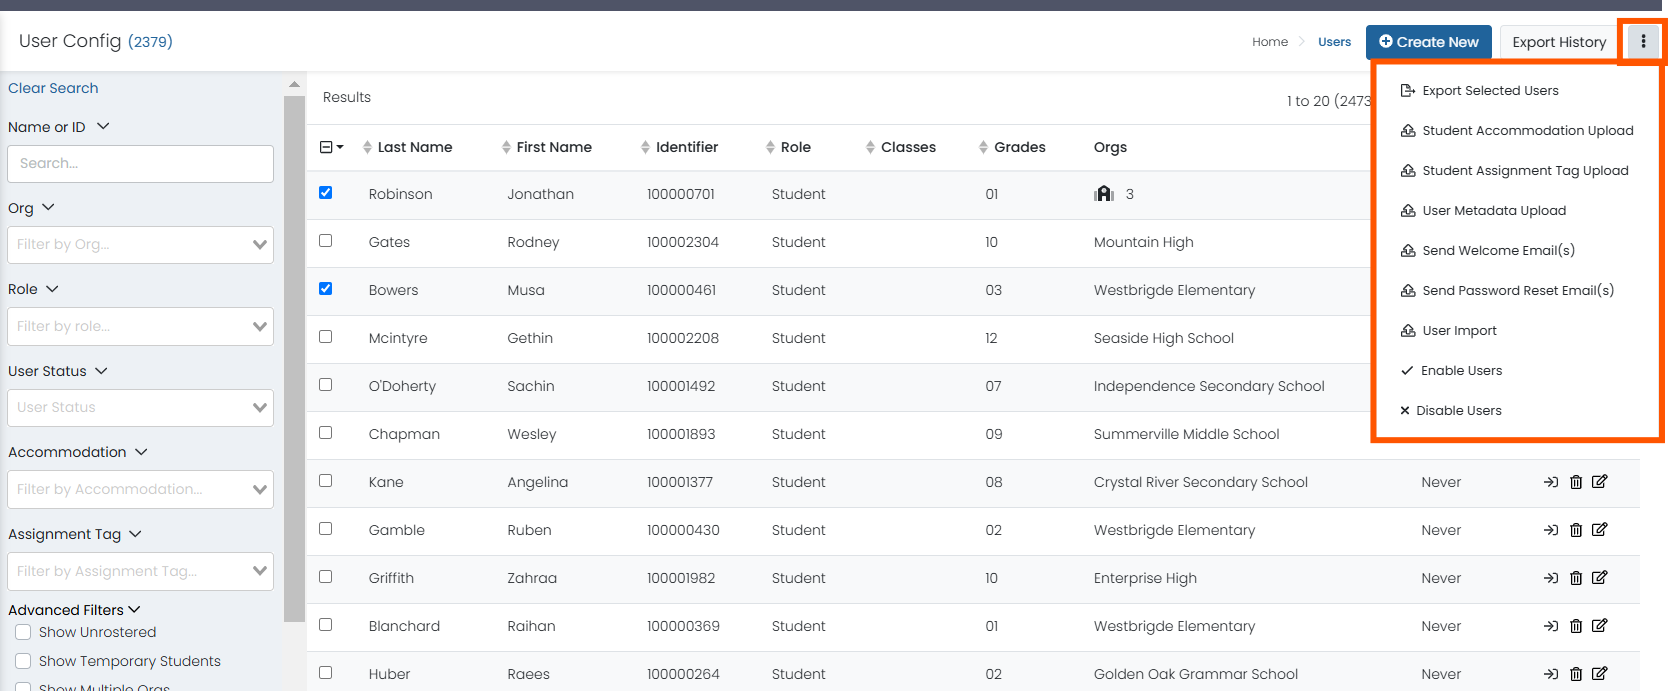
On the left side of the page, enter or select the appropriate filters. The search is dynamic; change the filter fields at any time to alter the search.
- Name or ID: Filter by keyword on the following fields: First Name, Last Name, Combination of first name and last name (e.g. John Smith), Identifier, User email.
- Org: Filter by a specific district or school. For a school, you can also select a specific class. This and other menus typically default to 25 entries; start typing in an organization (org) name to filter the list and select your org.
- Role: Filter by role (such as Student, Teacher, School Assessment Coordinator). If Student is selected for the role, additional filters for grade and course are available.
- User Status: Filter by disabled users or enabled users.
- Accommodation: Filter by a specific accommodation (such as Paper or Text to Speech).
- Assignment Tag: Some customers use assignment tags to set up test eligibility for students taking tests spanning multiple grades or off-level, such as Geometry or Biology. These are typically used when tests are not assigned by course or class, or when class rostering data is not loaded. Select a tag to view all assigned students. See Test Assignments.
- Expand Advanced Filters to select:
- Show Unrostered: Select the checkbox to include unrostered users in the search.
- Show Temporary Students: Temporary students can be created at test time when a new student is not currently set up to access a test. Select this option to view students who need to be merged with their official user account (their role will be Temporary Student). To merge a temporary student with an existing student record, click the Merge Temporary Student icon in the Role column. You can then select an existing student record to merge with. See Late Add to Proctoring Groups and Create and Merge Temporary Students.
- Show Multiple Orgs: Filter by users who belong to multiple organizations.
- Show Role Override
- Show Preferred Name Override
- Show Single Sign On Users
- For an individual user, depending on your role permissions, you can click the icons in the Actions column to:
- Login as user: Sign in as the selected user.
- Edit a user: See User Setup.
- Delete: Delete a user (Do not use if roster data is syncing from LaunchPad or other source).
- Note that you can hover over the Classes and Grades icons in their respective columns to show the classes and grades the user is associated with.
- After selecting one or more user checkboxes, you can perform the following actions from the Actions menu on the top right:
- Export Selected Users: Export the selected user records to a CSV file.
- Student Accommodation Upload: Upload accommodations for multiple students via a CSV file. Follow the instructions on your screen.
- Student Assignment Tag Upload: Upload student assignment tags, such as Algebra1, to be used as criteria when creating an administration. This makes it easier to create administrations with out-of-level testing. The assignment tags defined in your system (in Client Settings) will be listed on the upload page under Step 1. You can pre-select students on the User Config page to include in the download template, and then modify the assignment tags in the generated file for upload.
- User Metadata Upload: Upload user metadata fields from a CSV file. To do so, follow the instructions on the screen. The metadata fields can be viewed or edited in User Setup.
- Send Welcome Emails: Requires role permission.
- Send Password Reset Emails: Requires role permission.
- User Import: Import users from a CSV file. Follow the steps on your screen. You will need to select one organization and one role to import, and then download a sample template to populate. Only the roles you have access to can be uploaded. Teachers and students can only be imported into a school. This functionality can be used by costumers who do not get users from LaunchPad (or for roles not in LaunchPad).
- Enable Users: Users must be enabled to sign in to ADAM.
- Disable Users: Disabled users cannot sign in to ADAM.
