...
- Use Role Display Name; Default role names can be customized as needed. The entered Display Name value will appear across the application.
- Role Notes: This field is visible only to users who can see the Role Permissions page, and is a helpful place to jot down notes to explain what types of users should be assigned this role, a summary of the permissions for this role, etc.
- Roster Integrations: Do not enable this for any roles except System Admin. Customer users do not need to have this level of visibility into the nightly data feed outcomes for the automated import jobs.
- Single File Upload: This permission controls the display of the Data Import > Single File Upload tab , as well as the Data Import > Student Update Only tab
- . "Edit" access allows the user to see the Upload File button on the tab. Which data types they can import will depend on what checkboxes are selected (Orgs, Non-Student Users, Students). Additional note: the "Roster Data" permission must also be set to View in order for single file uploads to function as expected.
- Authentication: If enabled, the user will see the "Authentication" link in the LaunchPad menu. From here, they may be able to view, edit or create authentication methods, which impacts the display of the login page for the client account. This permission should be assigned to limited users. End users do not need to see configuration details for the authentication provider on their client account.
- Accounts: Rostered users with "Edit "access to Accounts can view Account Settings, configure User Metadata, update the account name and image, and modify Custom Validation settings. "View" access is needed in order to access the Downloads page. If Roster Data view permission is enabled, then Account view permission should be also. Set this to View for any role who will have the ability to view users.
- Sub Accounts: Subaccounts are a capability in LaunchPad to "nest" multiple accounts within one parent account. It is not used often but can be useful for state solutions in which districts have different authentication methods.
- Roles, Demographic, and Enrollment Record Search: If enabled, additional Roster Data links appear in the left navigation to search Role records, Demographic Records, and Enrollment records. However, those records are all aspects of a user. In viewing an individual user record, the LaunchPad interface will display the respective Role, Demographic and Enrollment records that the user may have. This is typically disabled for all roles. It is rarely needed to be able to search on these record types independently from the user record to which they are tied, and it is confusing for users to see these records in a list.
- Login As: Users with this permission will see the "Sign In as" option for users that they see in the Roster Data > User list. The Sign In As link appears as an action once a user record is opened, in the Actions menu.
- Launchpad Setup: The LaunchPad setup page controls the configuration of the apps that appear on the LaunchPad home page, to rostered users.
- Role Permissions: Do not enable this for any roles except System Admin or higher.
- Roster Data: If the user should see any roster data, select View and then set the level of access for each type.
- Roster Data: Demographics: For View or Edit, indicate if the user should see Economic & Family Status.
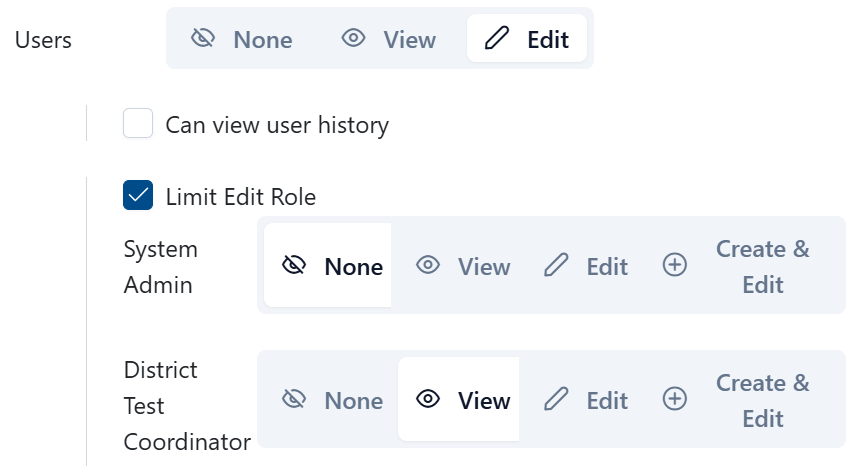
- Roster Data: Users: For View and Edit, there are additional options:
- Can View User History: can view histoory about the user for any role you have view or edit access to - all new/changed data for that user
- Limit Edit Role option displays all available roles. Designate which user role groups are visible or editable for this particular role. This configuration restricts the available role and actions when users navigate to the User page under Roster Data. This should be used when to restrict certain roles from having access to view certain user types.
- Manage Transfer Requests: Located use only with single fiel upload – Located below the list of roles, this option... need to have the account setting to enable transfers turned on, then need to have – you will need to desgnate the roles that have the ability to transfer requests
...