Set Up TestNav on iPadOS
Install and set up TestNav using the sections below.
During BOTH the infrastructure trial and the actual test, note which specific iPad each student uses during each test. The TestNav app saves SRFs to only one designated place on the testing device. If an error occurs, you can locate files only on that specific device.
Install TestNav
- Do not connect iPads to computers during testing.
- Note that iPadOS does not support Co:Writer and Read&Write extensions.
Find and Set Up Response File Backups
SFTP configuration is not supported by all assessment management systems. Consult your assessment management system user guide to determine whether the SFTP option is available.
Familiarize yourself with the default primary save location.
Configure the secondary save location through your assessment management system.
The same secondary save location applies to all computers and devices. You only need to set this configuration one time.Communicate SRF and log file locations/procedures to proctors (see Primary Save Location below).
Note which student tests on which device during infrastructure trials and on test days.
Primary Save Location
On iPads, the SRF default primary save location is not customizable.
| You can find SRF and log files two ways on iPads - using Safari or a USB cable. | |
|---|---|
| Safari |
|
| USB |
|
ADAM users...
Do not continue on this page. For additional instructions on tests managed in ADAM, see Log in to a Test using TestNav.
Run App Check
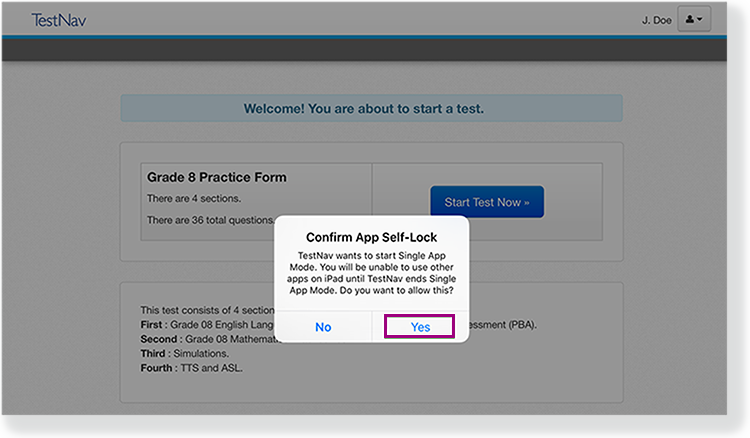
As you perform the tasks below, if presented with a Confirm App Self Lock message, click or tap Yes to continue.
- Click or tap the appropriate icon for your test from the home page to go to the Sign In page.
Click or tap the user drop-down menu, and select App Check.

App Check (without optional Configuration Identifier)
On the App Check page:
- Leave the configuration identifier field blank.
Click Run App Check.
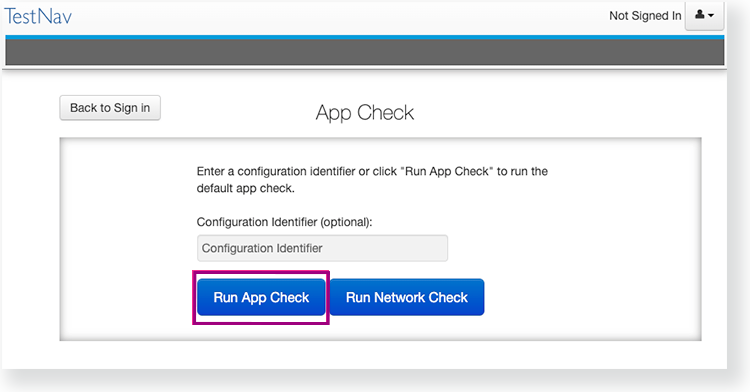
You see green checkboxes for Kiosk Mode Readiness and connectivity to TestNav, if the system passes. If one of these fails, you will see a Fail message and must check your connection and settings before running App Check again.
App Check (with optional Configuration Identifier)
If you have obtained a Configuration Identifier from your assessment management system:
Enter it in the Configuration Identifier field.
The configuration identifier allows TestNav to also check connection to ProctorCache computers.
Click Run App Check.
If ProctorCache connectivity fails, TestNav provides information for possible resolutions. Use this information to troubleshoot, and run App Check again.
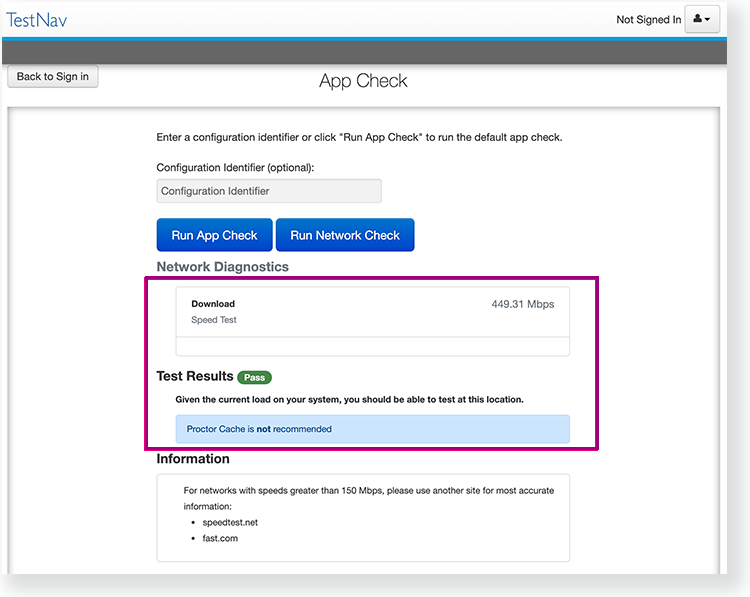
Run Network Check
On the App Check page,
Click Run Network Check.
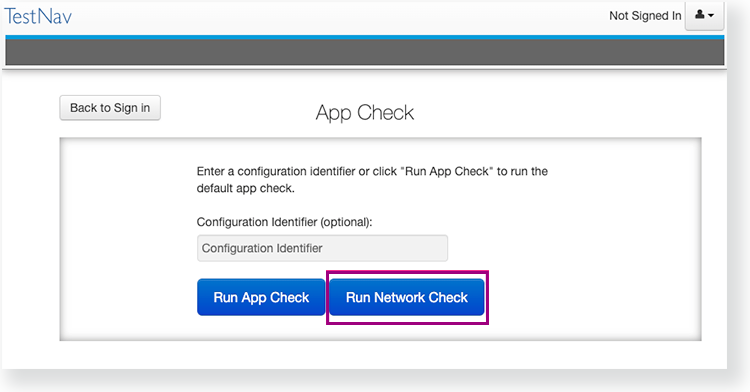
Estimate the number of devices that will connect to your network during testing, and enter it into the Number of devices field.

- Click Start Diagnostics Test.
See your Test Results under Network Diagnostics to determine whether your network has sufficient bandwidth to test without ProctorCache.
Sign In to TestNav
When you are ready to start a test:
Start the TestNav app.
The first time TestNav is launched, it displays the Enable Microphone Permission message, as well as the TestNav would like to Access the Camera message.Tap or click OK to grant permission for both.
If the student taps or clicks Don't Allow, TestNav displays another prompt, shown below:
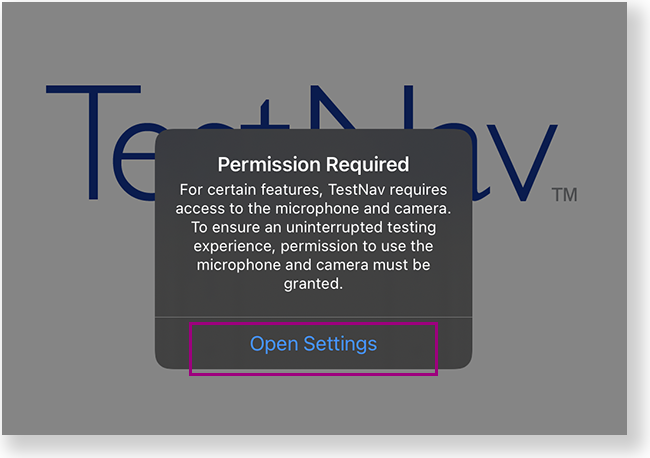
Tap or click Open Settings to enable the microphone and camera.
Tap or click the appropriate icon for your test on the home page. If your test was selected before the test session, you see the Sign In page, rather than the home page.
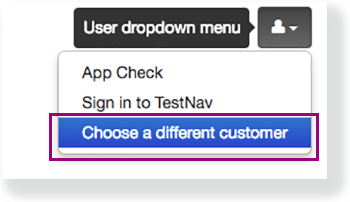
If you need to select a different test, tap or click the user drop-down menu at the upper-right, and Choose a different customer.
Tap or click the appropriate icon for your test.

Start a test to ensure that you can do so without error.
- If you see a Practice Tests link on the Sign in page, click Practice Tests and start a test.
- If you do not see a Practice Tests link, use an authorization ticket from your student management system and start a test.
Install TestNav
TestNav program files are saved in Applications/TestNav.
Double-click the .dmg file (for example, testnav-1.4.1.dmg) that you downloaded. The TestNav install window appears.
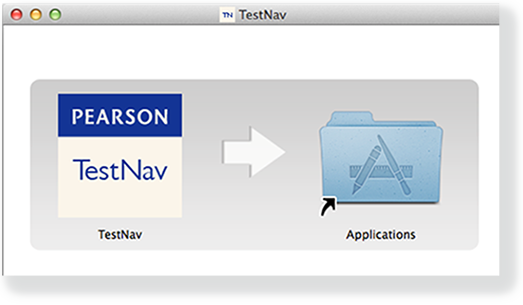
- Drag the TestNav icon into the Applications folder.
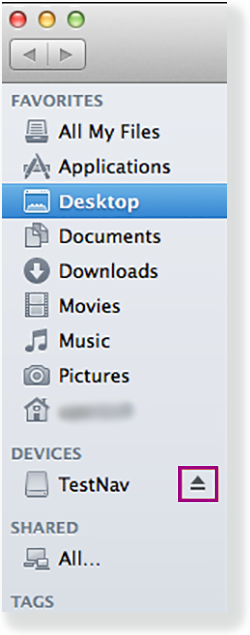
Eject the TestNav installer from Devices in the Finder sidebar. You can also eject it from the Desktop.
You can copy the TestNav application and push it to student computers for mass installation.
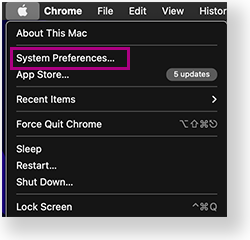
For macOS 10.14+, you must grant TestNav full privacy & accessibility control to administer secure tests. Click or tap System Preferences > Security & Privacy > Privacy. Scroll to Accessibility, and add or select TestNav.
Disable Siri and/or Dictation services before attempting to sign in to TestNav.
If you use computer restoration or imaging software (for example, Deep Freeze), exclude the Pearson directory and the logs directory, as these contain student backup files and logs for troubleshooting.
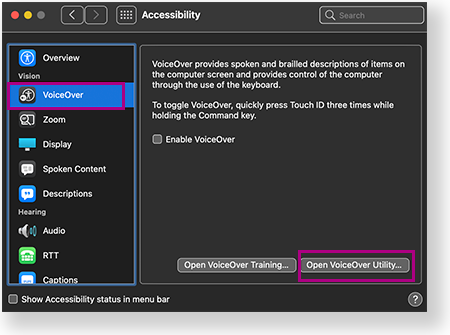
+Prepare Macs for screen reader users...Before signing in, deselect Show Caption Panel in the Accessibility settings for VoiceOver use during a TestNav test:
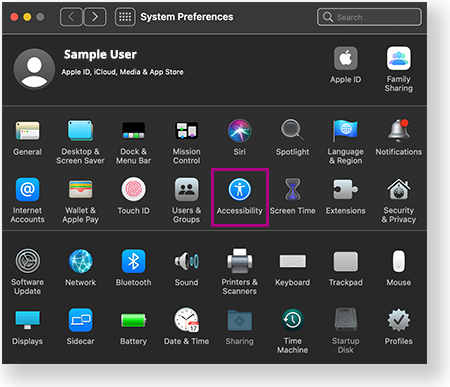
- Go to System Preferences > Accessibility.
- Select VoiceOver > Open VoiceOver Utility.
- Select Visuals > Panels and Menus, and then deselect Show Caption Panel.
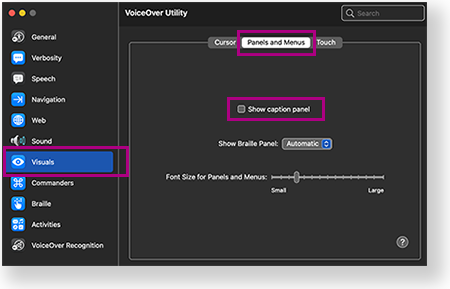
 If Show Caption Panel is selected, the Caption Panel appears during a secure test. This triggers an error and TestNav exits the student from the test.
TestNav App Updates
TestNav program file updates are saved in {user_home}/Library/Application Support/Pearson. You must give students write access to the update directory.
- Any necessary patch updates automatically install whenever TestNav starts or when a student attempts to log in. This ensures the update is implemented even if schools leave TestNav running over the course of a few days.
You can also push the latest TestNav update, rather than waiting until each student opens TestNav. To push an update, take a snapshot of the Pearson folder, and push that folder to all student computers. - Updates that require reinstallation are scheduled for winter and summer breaks.
- Pearson will communicate all updates with instructions in advance.
When you install TestNav, it creates the TestNav folder within the Pearson folder shown in the path above. The TestNav folder contains the following:
- The update file folder, named with the update version number (for example, 1.4.1)
- The default file, which stores the customer login preference for the next login
The login preference stored in the default file can change if you select a different customer from the Sign In page. You can set the default file to read-only to prevent students from overwriting it after you set your test preference.
If you encounter any issues during an update, you can find the errorlog folder within the update folder (for example: 1.4.1 > update > errorlog). The errorlog folder logs any issues TestNav may encounter when it attempts an update. You can also delete the Pearson folder to reset TestNav, clearing out any updates stored in that directory.
Set Up Response File Backups
TestNav has a default primary SRF save location for all computers and devices. For detailed information on saved response files (SRFs) and log files, see Understand SRFs and Log Files.
SFTP configuration is not supported by all assessment management systems. Consult your assessment management system user guide to determine whether the SFTP option is available.
Before testing, refer to your assessment management system user guide to configure TestNav and complete the following steps.Configure primary and a secondary save location through your assessment management system.
Configure student accounts to have complete read, write, and delete access in these save locations.
Communicate SRF and log file locations to test proctors.
Give proctors access to SRF and log files by either of the following:
Grant admin rights to proctors on each testing computer.
Instruct proctors to access these files while the student is logged in to the testing computer.
Default Primary Save Location
Operating System SRF Location Log File Location OS X {USER_HOME}/Pearson/srf/
{USER_HOME}/Pearson/logs/

Pearson strongly recommends that you configure a network drive as a secondary save location to ensure that you do not lose responses, even if a student cannot continue to test on the same computer.
- When starting a test that requires kiosk mode, the student should:
- Enter a username and password, and tap or click Sign In.
On the Confirm App Self Lock message, click or tap Yes to continue testing.
- Students that click or tap no, cannot continue testing in the secure test.
- Students can test in kiosk mode for a maximum of 8 hours from the time the student signs in. If the time limit expires, kiosk mode stops and the student is exited from the test.
The proctor, then, must:- Resume the student in the assessment management system.
- Restart the iPad.
- Have the student sign in again.
Run an Infrastructure Trial
Pearson strongly recommends running an infrastructure trial to verify the technology setup is complete and to familiarize teachers and students with the test. Use your training site through your assessment management system to complete the trial before the actual test day.
Related Information
You can learn more about SRF and log files on the Set up and use TestNav page.