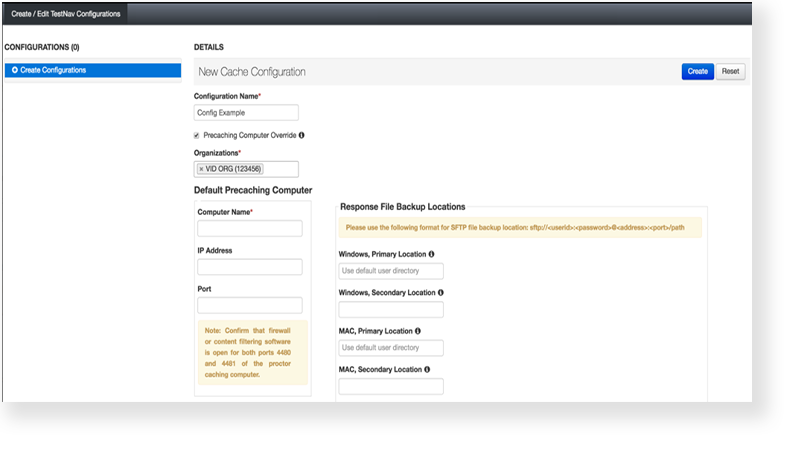
...
Pearson recommends proctor caching for all online tests. A caching computer downloads and stores test data, such as multimedia files or test questions, and then serves that data to individual test computers from within the local network. This enables faster test page loading times and more efficient test taking.
...
Anchor | ||||
---|---|---|---|---|
|
Extra Table Properties | ||||||||
---|---|---|---|---|---|---|---|---|
| ||||||||
|
Anchor | ||||
---|---|---|---|---|
|
...
if you use ProctorCache.
You must complete these tasks only once per test administration. unless you require a change.
If you require a change, you can complete it at any later date.
UI Text Box | ||||||||||
---|---|---|---|---|---|---|---|---|---|---|
| ||||||||||
|
...
|
...
|
...
|
Create Configuration
Do this BEFORE you create any test sessions. Later, while you are creating your test sessions, you will select the named configuration that you create here to be used for each test session.
From Setup > TestNav Configurations, open the task list and select Create / Edit TestNav Configurations and click Start.
...
title | Click here to view a screenshot... |
---|
...
...
...
Expand | ||
---|---|---|
| ||
Click Test Connection to make sure the configuration works.
...
If the connection is not successful:
...
|
...
UI Text Box | |||||||||||||||||||||
---|---|---|---|---|---|---|---|---|---|---|---|---|---|---|---|---|---|---|---|---|---|
| |||||||||||||||||||||
Optional
|
...
|
...
|
...
Click Create.
Optionally, additional proctor caching computers can be added to the configuration. This is generally done in larger schools where testing may involve multiple grades and forms and larger numbers of concurrent testers. In cases like this, a second caching computer and the additional throughput it provides may be beneficial.
Warning |
---|
If you only perform the configuration step, test content is not yet downloaded and precached. Precaching is not performed automatically, but something you must perform manually. |
...
Precache Content
Do this AFTER all test sessions are created, but before the first test session begins. This will ensure that you cache all of the content needed. This feature requires the use of a Java applet, so the computer from which you perform the action must have Java installed and you must allow the Java applet to run in your browser in order for this to work.
From Testing > Sessions, search to find test session(s) set up to use proctor caching or click the down arrow next to the Search button to reveal and select the option to show all results. Select the session(s) you wish to edit.
...
title | Click here to view a screenshot... |
---|
...
Open the task list and select Precaching Test Content and click Start.
...
title | Click here to view a screenshot... |
---|
...
Click Precache. You can also click View Status at any time to view caching status. If content is not appearing when precaching and there are no students in the session, add students to the test session and try again.
...
title | Click here to view a screenshot... |
---|
...
An information screen will appear to let you know that caching is in progress and the parameters being used. At the same time, the ProctorCache application will open. From that application you can view caching progress. See Use ProctorCache - FOR DELETE for directions.
Expand | ||
---|---|---|
| ||
The screen indicates that precaching has started. The ProctorCache screen gives you access to information about cache status. See Use ProctorCache - FOR DELETE for more details. |
To refresh cached content, use the instructions in Manage Cached Content for Online Test Sessions.
...