See also: Client Settings: Accommodation Hierarchy, Accommodations Overview
Administrator roles with the appropriate permissions can add or edit the accommodation profiles in Client Settings. Initially, there is only one default profile, but additional ones may be created to differentiate accommodations that should be available to some subjects only. Once set up here, profiles are available to be assigned to specific tests. All profiles are available in the student record, where you can select the appropriate accommodations for that student from each profile. After an accommodation has been assigned to a student or test, its checkbox will be disabled in Client Settings to prevent data errors.
Considerations for Setting Up Accommodations
- Will the students be testing in TestNav or AD Player? See also: Accommodations List.
- Do or will any test have content that support the accommodation? (e.g., don't set up closed captioning if there is not a form with closed caption videos, etc.)
- The hierarchy of forms if using multiple accommodated forms. See also: Client Settings: Accommodation Hierarchy
- Do any subjects permit different accommodations? For example, some subjects may make TTS available to all students in which case there is no need to assign an accommodation versus others in which only specific students can be assigned. If yes, create multiple accommodation profiles and assign to tests accordingly. There is no need to create a profile for each subject; only those that are different. For example you might have two profiles: 'ELA' and 'Math/SS/SCI.'
- If any tests are delivered in another language, what exactly is translated (paper, online version, read aloud, test instructions only, etc.)
- Are/should any accommodations be set up to require approval?
- Who will be able to bulk upload student accommodation assignments? Who will be able to only edit individual students? Who can edit some accommodations, but not others? See also: Rostering in System: Role Configuration.
CLASSIC USER INTERFACE FUNCTIONALITY
Enable Accommodations
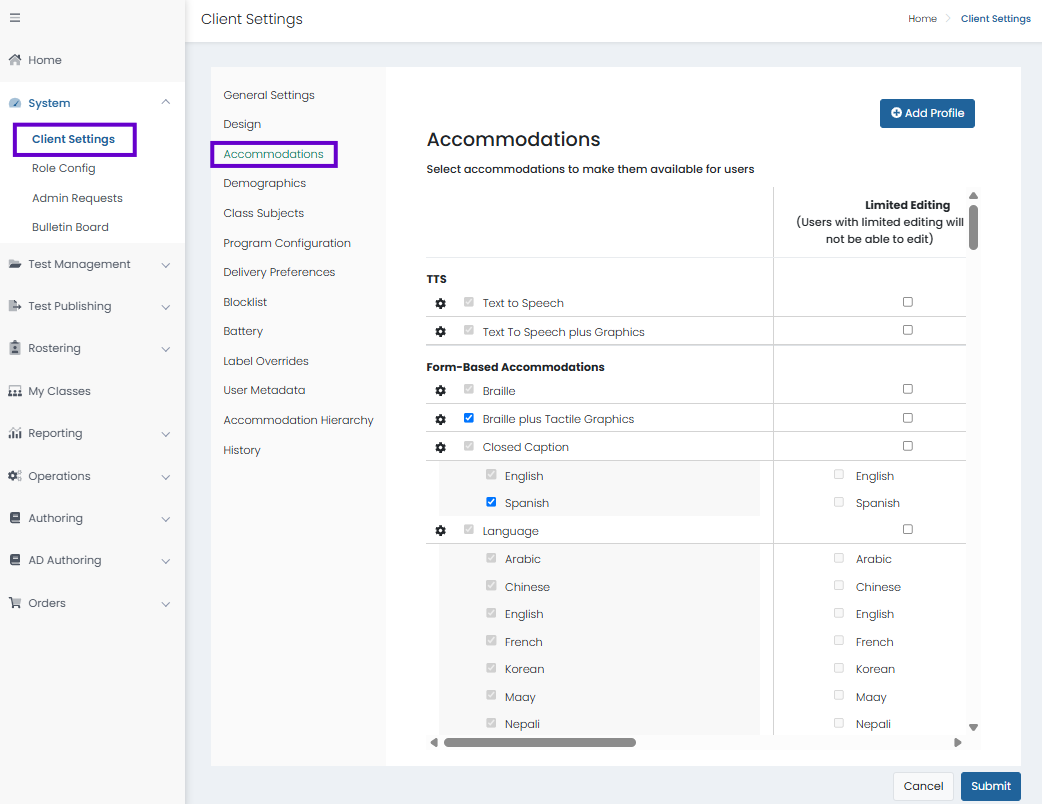
- Go to System > Client Settings > Accommodations.
- In the left column, select all accommodations that can be assigned to at least one profile. Accommodations not yet assigned to any student appear in blue and may be removed. For a description of all accommodations, refer to Accommodations List.
- Select the gear icon (
 ) for an accommodation to change any of the following:
- Instructions: Enter instructions with a header for users who assign accommodations to students, and then select Confirm. These instructions only appear when editing individual students, not when bulk uploading accommodations.
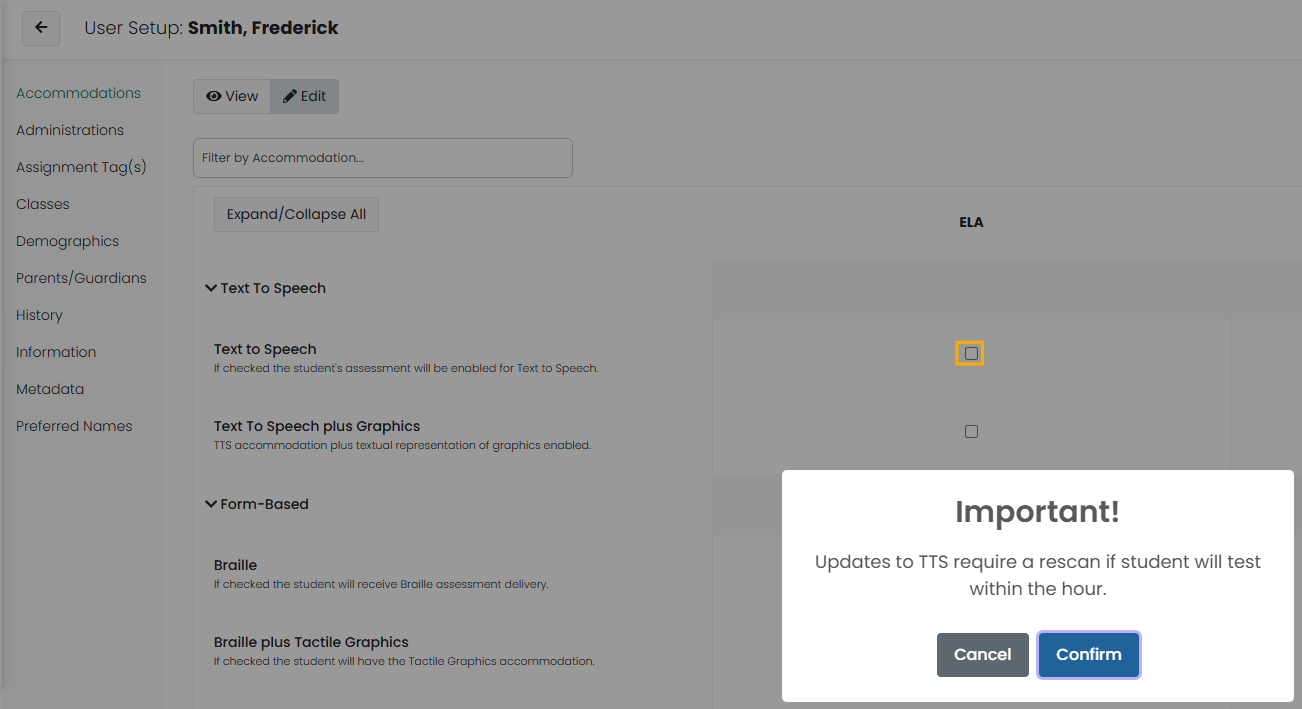
- Display Name: Enter a new display name for the accommodation. If the name is changed, the default name will appear crossed out with the new display name next to it.
- Description Text: Enter text to replace the default description for the accommodation. To reset the description, remove the add text and select Confirm.
- In the Limited Editing column, select the accommodations that users will not be able to change if 'Limited Accommodations Editing' is selected for their role in Role Config.
- In the Require Approval column, select the accommodations that will require admin approval to change for students. Designated roles can be given permission to approve accommodations changes in Role Config > Rostering >Approve Accommodation Changes.
- Edit an existing accommodation profile or click the Add Profile button to add a new profile that can be used for a type of test, such as ELA or Math.
- The Default profile contains accommodations if they were defined prior to implementing accommodation profiles.
- Select the Edit icon on an existing accommodation profile to make changes. You can rename the Default profile as well.
- Any accommodation can be made the default profile by dragging it into the first column position. (Click the drag icon at the top of the profile to move it left or right.)
- After making changes to an accommodation profile, Submit at the bottom of the page.
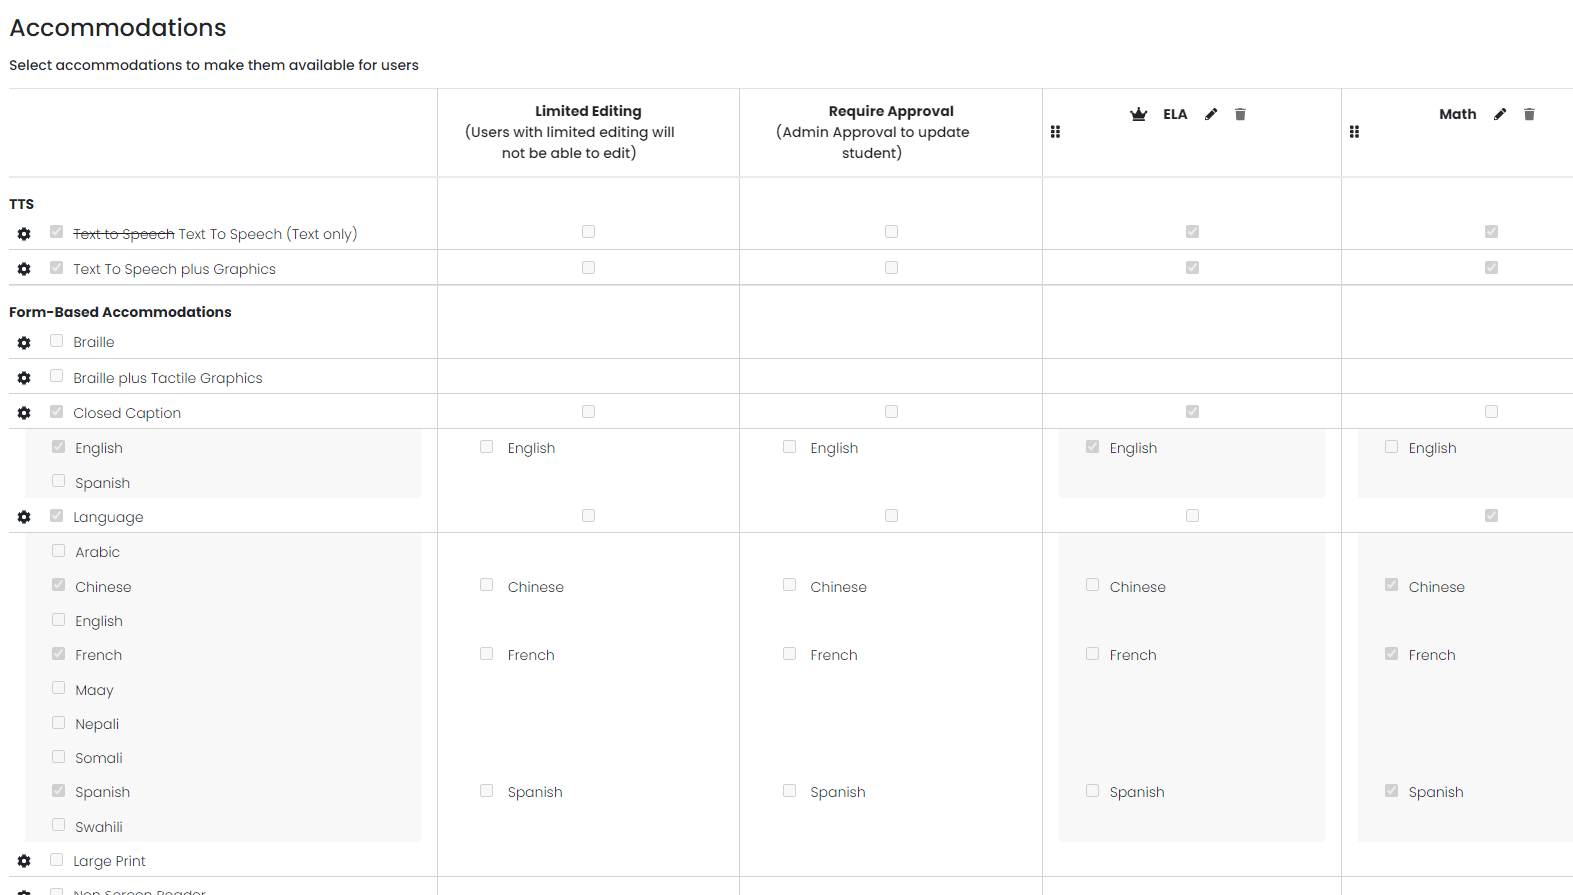 Sample Client Settings > Accommodations page
UPDATED USER INTERFACE FUNCTIONALITY
NOTE: This section details the updated Accommodations configuration settings within the updated user interface.
Enable Accommodations
Updated User Interface:
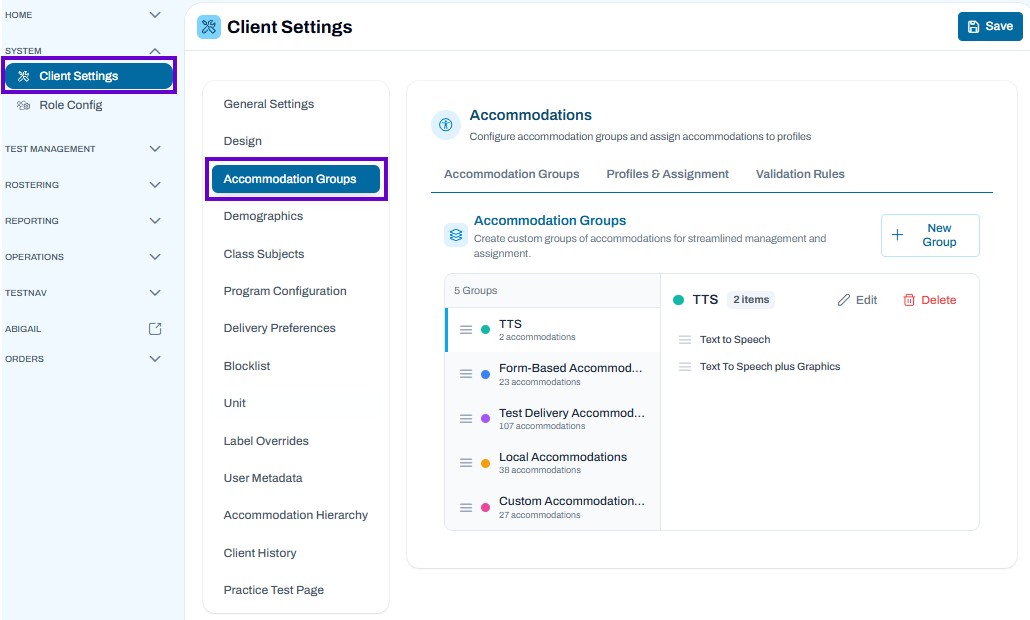
Go to System > Client Settings > Accommodation Group.
Accommodation Groups
Use the Accommodation Groups page to organize related accommodations into reusable groups that can be assigned to accommodation profiles. Grouping accommodations simplifies administration and helps ensure consistent accommodation settings across users and programs.
View Accommodation Groups
- Open Client Settings > Accommodation Groups.
- The left panel displays all available accommodation groups and the number of accommodations in each group.
- Select a group to view its included accommodations.
Create a New Accommodation Group
Accommodation Groups allow administrators to organize related accommodations into reusable collections that can be assigned to accommodation profiles. Using groups simplifies accommodation management and helps ensure consistent accommodation assignments.
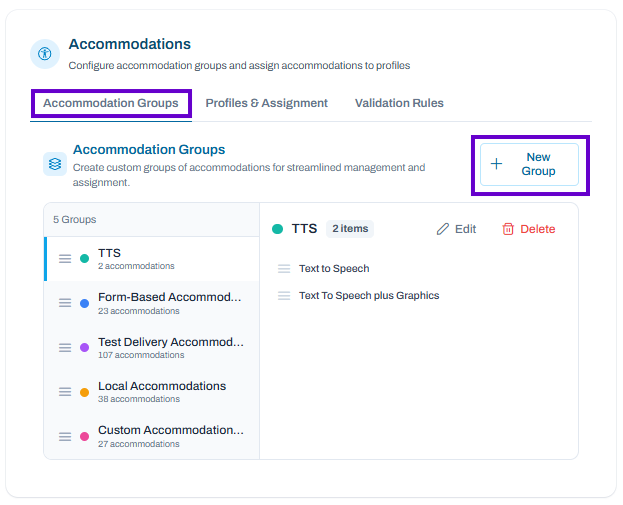
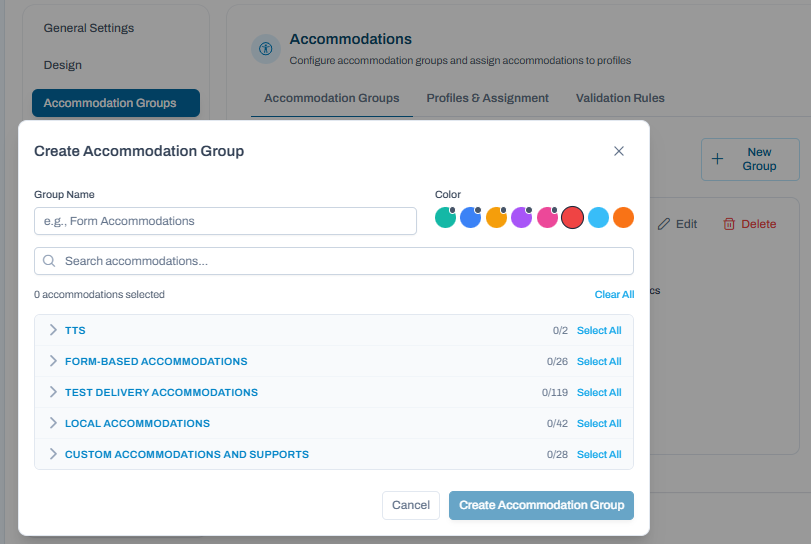
To Create a New Accommodation Group
- Navigate to Client Settings > Accommodation Groups.
- Select New Group.
- In the Group Name field, enter a descriptive name for the group (for example, Form Accommodations or Read-Aloud Supports).
- Optionally, select a color to help visually identify the group throughout the system.
- Use the Search Accommodations field to quickly locate specific accommodations.
- Expand an accommodation category by selecting the arrow next to the category name.
- Select the accommodations you want to include in the group.
- Use Select All to add all accommodations within a category.
- The selected accommodation count updates automatically as accommodations are added.
- Review the accommodations included in the group to ensure they meet your intended configuration.
- Select Create Accommodation Group to save the group.
After Creating a Group
Once created, the accommodation group becomes available for use within the Profiles & Assignment section (described below), where groups can be associated with accommodation profiles. Changes made to a group are reflected wherever that group is assigned.
Tips
- Create groups based on common accommodation types, programs, or administrative needs.
- Use clear, descriptive names so users can easily identify the purpose of each group.
- Review existing groups before creating new ones to avoid duplicate configurations.
- If selected accommodations need to be removed before saving, deselect them individually or use Clear All to start over.
Edit an Existing Accommodation Group
- Select the accommodation group to modify.
- Choose Edit.
- Add, remove, or update accommodations within the group.
- Save your changes.
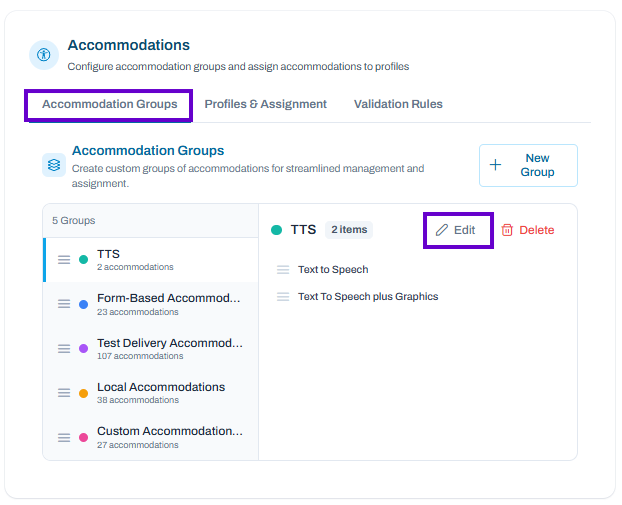
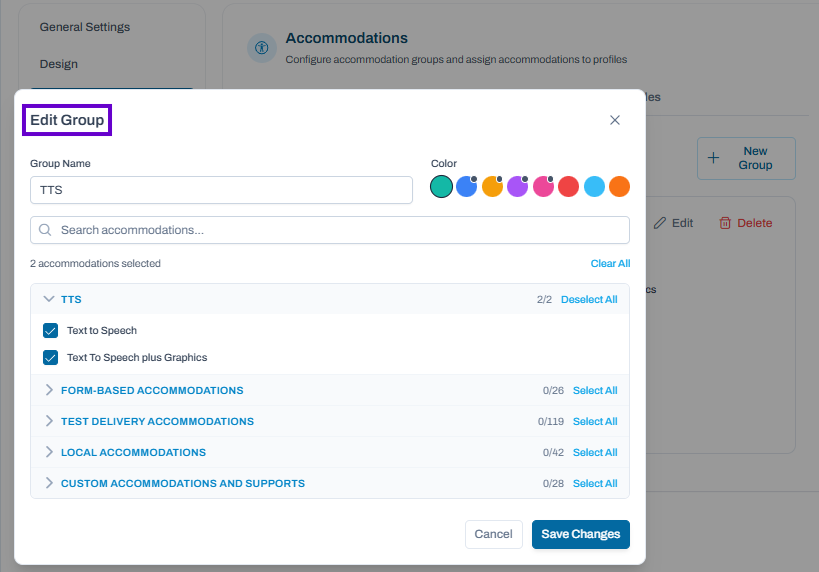
Delete an Accommodation Group
- Select the accommodation group you want to remove.
- Choose Delete.
- Confirm the deletion when prompted.
Best Practices
- Create groups based on common accommodation categories, such as Text-to-Speech, Form-Based Accommodations, or Local Accommodations.
- Use groups to streamline accommodation assignment and reduce configuration effort.
- Review group membership periodically to ensure accommodations remain accurate and up to date.
Note: Creating or modifying an accommodation group does not automatically assign accommodations to users. Groups must be associated with accommodation profiles through the Profiles & Assignment tab.
- In the left column, select all accommodations that can be assigned to at least one profile. Accommodations not yet assigned to any student appear in blue and may be removed. For a description of all accommodations, refer to Accommodations List.
- Select the gear icon () for an accommodation to change any of the following:
- Instructions: Enter instructions with a header for users who assign accommodations to students, and then select Confirm. These instructions only appear when editing individual students, not when bulk uploading accommodations.
- Display Name: Enter a new display name for the accommodation. If the name is changed, the default name will appear crossed out with the new display name next to it.
- Description Text: Enter text to replace the default description for the accommodation. To reset the description, remove the add text and select Confirm.
- In the Limited Editing column, select the accommodations that users will not be able to change if 'Limited Accommodations Editing' is selected for their role in Role Config.
- In the Require Approval column, select the accommodations that will require admin approval to change for students. Designated roles can be given permission to approve accommodations changes in Role Config > Rostering >Approve Accommodation Changes.
- Edit an existing accommodation profile or click the Add Profile button to add a new profile that can be used for a type of test, such as ELA or Math.
- The Default profile contains accommodations if they were defined prior to implementing accommodation profiles.
- Select the Edit icon on an existing accommodation profile to make changes. You can rename the Default profile as well.
- Any accommodation can be made the default profile by dragging it into the first column position. (Click the drag icon at the top of the profile to move it left or right.)
- After making changes to an accommodation profile, Submit at the bottom of the page.
Tiny Link: https://support.assessment.pearson.com/x/BgHVBw

 user-6d962, last updated by Erica Smith on Jul 02, 2026
7 minute read
user-6d962, last updated by Erica Smith on Jul 02, 2026
7 minute read