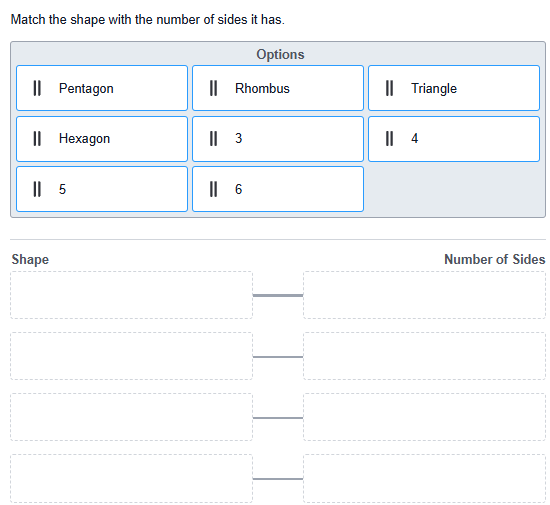
You can use the Associate interaction to create drag and drop items.
See Author Test Items and Choice Interaction for general instructions on item creation.
- From the Editor tab, select Add Interaction > Associate.
- Enter a Prompt.
- Under Choices, enter answer choices. Formatting tools are available in a popup menu.
- In Max Match, indicate how many times each choice may be used.
- Under Settings, Max Column is the maximum number of columns that should be used for the answer choices (in the Options section in the image below, this is 3).
- Choices Label: In the image below, 'Options' is the Choices Label.
- Left/Right Column Label: In the image below, 'Shape' and 'Number of Sides' are column labels.
- Grip Style: Optionally, add one of several 'grippers' to each choice to more clearly indicate this object may be dragged.

- Label Alignment: Choose the alignment for the column labels, if added.
- Min and Max Associations: Indicate the minimum and maximum number of pairings the tester can make.
- Shuffle: Select to scramble the choices. For the item analysis reports, the order of choices in the item setup are reflected for all students.
- Under Correct Response, drag and drop answer choices to set the correct associations.
- Enter Properties. See also Item Properties.
- Enter Score Settings as described below.
- Be sure to Save.
Scoring Settings
Indicate a Max Points value. When using Partial Scoring, enter a point value in the Points column for each answer choice. Optionally, indicate the Minimum Points that a student should get regardless of their answer. See also: Set Up Partial Scoring.
Use the Association Order setting to control how students must answer to receive points.
- Exact Order (default): Answers must match the Correct Response.
- Any Order: Answers can be placed in any order as long as the correct associations are made.
- Enforce Pair Order: Answers can be placed in any order (up and down), but associations must match the Correct Response (left and right).

Tiny Link: https://support.assessment.pearson.com/x/rYD8Bg