Role Configuration
Designated administrators can use the Role Configuration page to create and manage user roles, such as Student, Teacher, and School Test Coordinator. In most cases, the Pearson Program Delivery Team will configure roles after working with customers to determine their requirements.
- Go to System > Role Config.
- Select the Add Role button to a new role.
- For each role, define the settings described below.
- Optional: Select a role, and then select the Duplicate Role button to copy the role or select the Remove Role button to delete it. Select Export Role Configuration to export the settings to an Excel spreadsheet.
Important: For environments using nightly feeds to update data, settings that get updated nightly should not be editable. Any data element being uploaded should be view only. This may include users, organizations, classes, etc.
Basic Setup
Classic User Interface:

Updated User Interface:
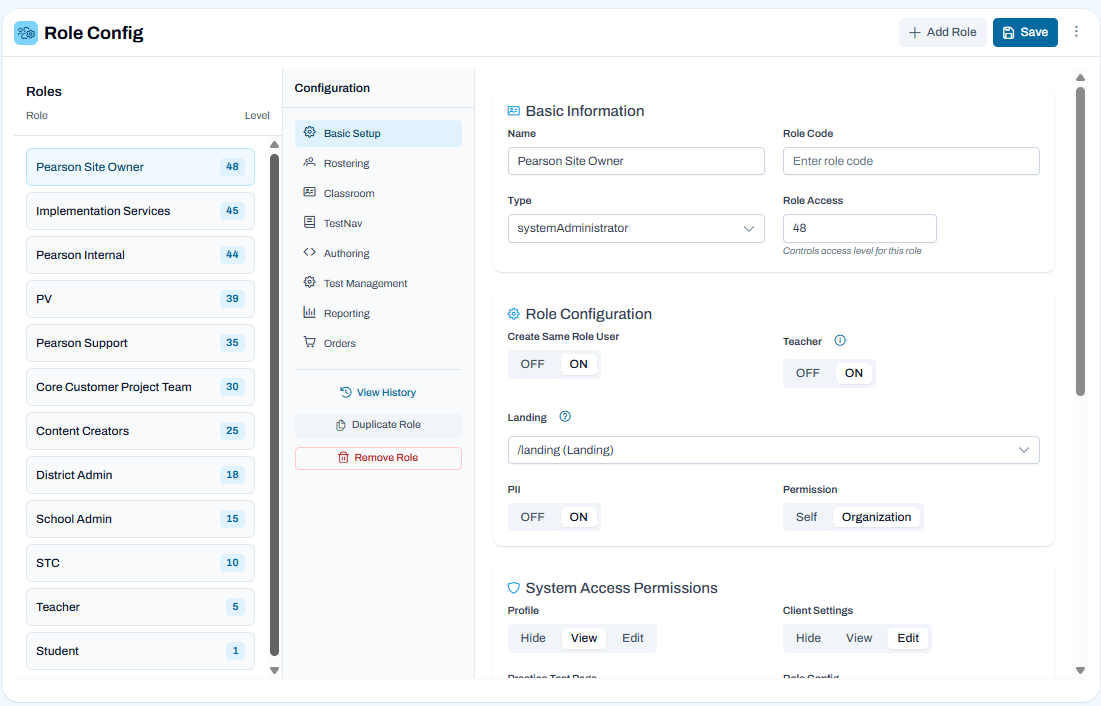
- Basic Information
- Name: Enter a meaningful name for the role, such as School Test Coordinator.
- Role Code: Enter a unique role code. This is required for ordering paper test materials and elsewhere.
- Type: Each system role can only be assigned once (if more are needed, use Other). You can create multiple roles for Teachers, Parents, Students, and Other. The role access level can be modified to make room for additional roles later.
- Role Access: Enter an access level from 1 to 50. Users can only view other users with an access level equal to or lower than their own access level. For example, a teacher role with access level 2 will not be able to see be able to see school administrators with an access level of 3. Users with permission to edit other users can create or edit new users with an access level equal to their own. As a best practice, leave some spacing between numbers so you can insert custom roles as needed without having to renumber all.
- Role Configuration
- Create Users in the Same Role: When enabled, user can create additional users at the same numerical role hierarchy as themselves. Users in a role with Rostering > 'Admin User Import' set to 'On' configured with a Basic Role Setup > Role Code also have the ability to use the Admin User Import to upload and create users with that same role.
- Teacher: Enable for users who are in a higher user role than Teacher, but who teach classes so they may have features characteristic of the Teacher role.
- Landing Page: Select the ADAM page you want users to see after they sign in to ADAM. For example, "/landing (Landing)" for the home page. Students should start at /my_classes and teachers at /landing or /my_classes.
- PII Access: Select whether Personally Identifiable Information (PII) will be visible to this role (this setting applies only to first and last names, not demographic information). PII access should be On if the role has permission to view or edit users in Rostering, and Off if the role does not have view or edit permission to users.
- Permission Scope: Self or Org. Self grants the role access only to their own personal organization scope (a teacher can see only their own classes). Org means the role can see their organization and all child organizations (a district admin can see all the schools in their district). Most roles can be set to Org, but student and teacher roles should always be set to Self.
- System Access Permissions
- Profile: Allow the role to view or edit their personal profile. The edit permission allows the user to change their password, first name, and last name. Do not give edit permission to users who were not created within ADAM.
- Client Settings: Allow the role to view or edit the Client Settings. Users with View or Edit access to this setting also can view Client Settings > History.
- Role Config: Allow the role to view or edit the Role Configuration page.
- Help: Allow the role to access the Help link from the user menu. This link can open any URL defined in System > Client Settings.
- Chat Access
- Knowledge Base Chat: Provides access to a chat interface that retrieves and answers questions using system knowledge base content.
- Data Analyst Chat: Provides access to a chat interface that enables querying, analyzing, and interpreting system data and reports.
- Create Bulletins: Allow the role to view or edit bulletins on the System > Bulletin Board page. The edit permission allows the role to create, edit, or delete a bulletin. All roles selected as the audience for a bulletin will see it on the home page regardless of the setting here. See also: Home: Bulletins and Dashboards.
- Advanced Bulletin Options
- Send Bulletin Emails: Allow the role to send notification emails to the selected audience when creating a bulletin.
- Enhanced Bulletin Access: Grant users a permission to view all bulletins created in the system. This helps users who may be scoped to parent organizations see all bulletins, regardless of assignment of roles in the ‘Audience’ section of a bulletin.
- Advanced Bulletin Options
Rostering
Classic User Interface:

Updated User Interface:
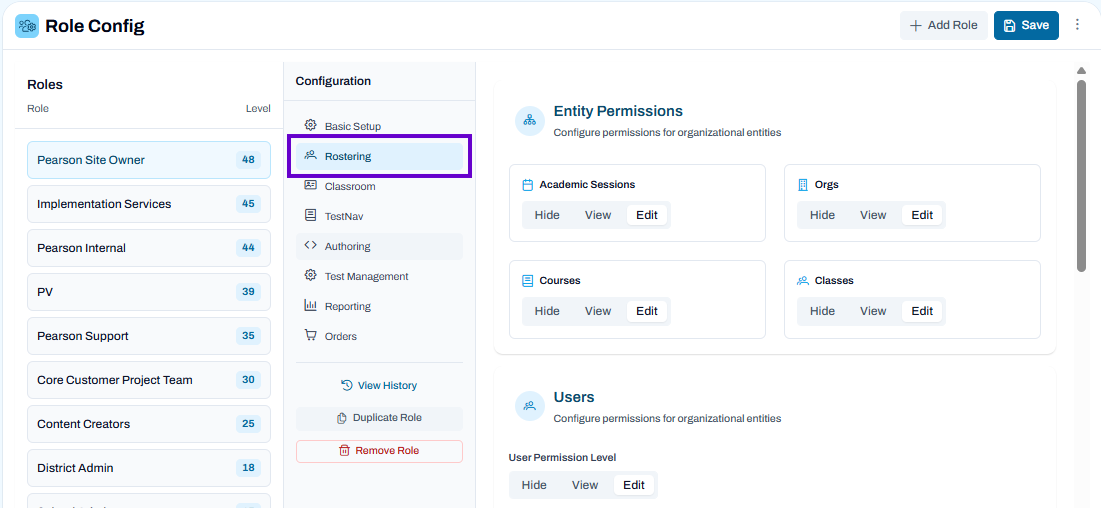
Rostering permissions can be assigned to any role but should not be given to student or parent/guardian roles. Do not allow edit access for any data that is sourced from LaunchPad.
- Roster Uploads: Allow the role to upload rosters from the Rostering > Roster Upload page.
- If enabled, for each sub-setting, select On for the uploads the role can perform (Organizations, Classes, Users, Accommodations, etc.).
- Entity Permissions
- Academic Sessions: Allow the role to view or edit the Rostering > Academic Sessions page.
- Orgs: Allow the role to view or edit the Rostering > Orgs page.
- Courses: Allow the role to view or edit the Rostering > Courses page.
- Classes: Allow the role to view or edit the Rostering > Classes page.
Users
- User Permission Level: Allow the role to view or edit the Rostering > Users page.
- General Permissions
- Preferred Names: Allow the role to view or edit the Preferred Names tab in the user record. Note that if preferred names exist in ADAM, they will be displayed in ADAM regardless of the setting applied here. The permission here only gives access to the fields on the Preferred names page.
- User History: Allow the role to access the History tab in the user record. This tab shows a history of changes to the user record.
- Non-Student Information: Allow the role to view or edit non-student information. The edit permission allows the role to update or delete the non-student users, such as teachers.
- Limit Role Assignments: Limit the current role to assigning users to only the roles selected in the Permitted Roles menu, which appears after selecting On. They will also not be able to reassign roles that they do not have permission for (the role will be locked).
- Admin User Import: Allow the role to import admin users from Rostering > Admin User Import. The import is based on the org code and role code (entered at the top of the Role Configuration page).
- Login as User: In Rostering > Users, allow the role to log in as another user from the Actions column. While logged in as another the user, a banner appears at the bottom of the screen with a red background / border and provides a logout button for easy session termination. Grant sparingly as there is no audit trail: only give this permission to roles at the highest org level that need it for setup or troubleshooting.
- Merge Temporary Students: Allow the role to merge temporary students in Rostering > Users. See Proctoring: Late Add and Create Temporary Student.
- User Data Management
- User Metadata: Allow the role to view or edit user metadata fields in User Setup. See Client Settings: User Metadata Fields for more information.
- User Metadata Upload: Allow the role to upload user metadata fields in User Config.
- Student Permissions
- Student Information: Allow the role to view or edit the Information tab on the student record in Rostering > User Setup. The permission should be set to view for students imported from Launchpad to prevent editing their data.
- Student Demographics: Allow the role to access the Demographics tab in User Setup. When On, for each sub-setting, allow the role to view or edit the demographic (or hide it). Only the demographics selected in Client Settings > Demographics will be visible to the role if the sub-setting is On. As a best practice, hide fields for which no data is being sent.
- General: Sex and date of birth.
- Race & Ethnicity: Standard Federal classifications.
- Educational Classifications: Gifted & Talented, IEP, English Language Learner, etc.
- Family Economic Status: Migrant, Free Lunch, Parents in Military, etc. Only give this permission to roles that should be allowed to see this information.
- Other: City of Birth, State of Birth, Country of Birth, Other Accommodations, Primary Exceptionality, Public School Residence Status.
- Student Accommodations: Allow the role to view or edit the Accommodations tab in User Setup.
- Limit Accommodations Editing: When set to On, this setting works together with the Client Settings > Accommodations "Limit Editing" checkboxes to define which accommodations cannot be edited by the role. As an example of a use case, some customers only allow a state-level administrator to apply a VOID accountability code. Any accountability codes marked as ‘Admin Code’ in Delivery Preferences will only be displayed to users with who have Limited Accommodations = Off. Users who have it set to 'On' will not not have the option to assign accommodations set for limited editing.
- Student Assignment Tags: Allow the role to view or edit Assignment Tags.
- Students Parents: Do not use.
- Student Administrations: Allow the role to access the Administrations tab in User Setup. This tab lists the student's administrations.
- Student Reporting Organization: Allow a reporting organization (a district or school) to be selected for the student in User Setup. This can be used, for example, for students who attend a charter school but provide reporting to a district for funding. Multiple orgs can be selected. The school(s) of enrollment (in the Schools menu) cannot be selected because reporting for this school is already available by default. Note: While this permission controls editing the Reporting Org for one student, the ability to bulk change multiple students is controlled by the user permission Reporting > Session Explorer Export.
- Student Dashboard: Allow user to search for a student and access the Student Dashboard from the Navigation bar. This provides a quick way to view accommodations and test assignments for a student. It provides an overall dashboard holistic view of a specific student's information. This includes consolidated views for Performance, Sessions, and Demographic & Accommodations information. The dashboard allows the user to take action(s) on the information displayed, as applicable with permissions assigned. This includes printing a PDF of all performance results or viewing individual student reports. See also: Student Dashboard.
- User Actions & Import/Export
- User Import: Allow the role to import users into ADAM from Rostering > Users.
- Export Users: Allow the role to export ADAM users from Rostering > Users.
- Send Emails: Allow the role to send welcome email and password reset email from Rostering > Users.
- Admin Requests
- Submit Requests: Allow the role to submit student transfer requests from the Create New Request icon (
 ) in the banner. Lower-level roles, such as at a school, may need this permission or district level may manage both requests and approval.
 - Manage Requests: Allow the role to access the System > Admin Requests page to manage student transfer requests. Should be given to higher-level roles, such as at the district.
- Request Type: Control which request type(s) are available, if the request system is turned on. The configured Request Types are also included in the ‘Export Role Configuration’ process.
- Approve Accommodation Changes: Allow the role to approve changes to accommodations for students that have been flagged to require approval in Client Settings > Accommodations.
- Accept Unscoped Requests: Allow the role to approve requests from outside their organization. By default, roles can only manage requests within their organization.
- Submit Requests: Allow the role to submit student transfer requests from the Create New Request icon (
My Classes
Only applies to teacher and student roles.
Classic User Interface:
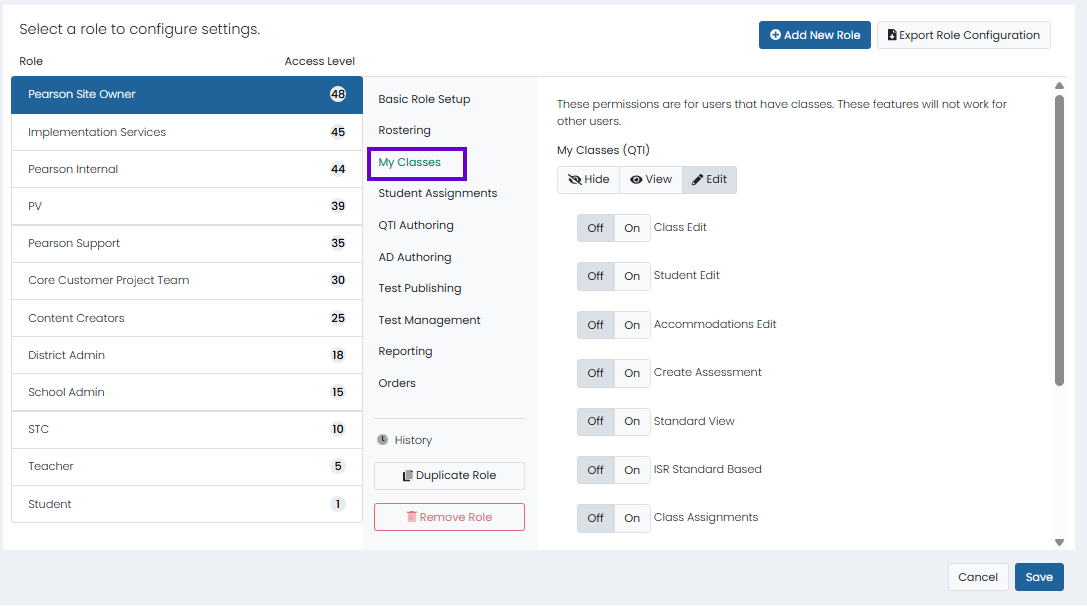
- My Classes (QTI): Allow the role to view or edit the My Classes area. Student roles should be set to View if you want to students to see their classes and the tests assigned to those classes in ADAM. If enabled, teachers will see a link to My Classes in the left navigation, and students will simply see their classes listed on their home page. When editing is enabled, select On for each area the role can edit. Any information coming in via LaunchPad should not have Edit access.
- Class Edit
- Student Edit
- Accommodations Edit
- Create Assessment
- Standard View
- ISR Standard Based
- Class Assignments
- Student Performance Report: Allow the role to access the Student Performance Report.
Classroom
Only applies to teacher and student roles.
Updated User Interface:
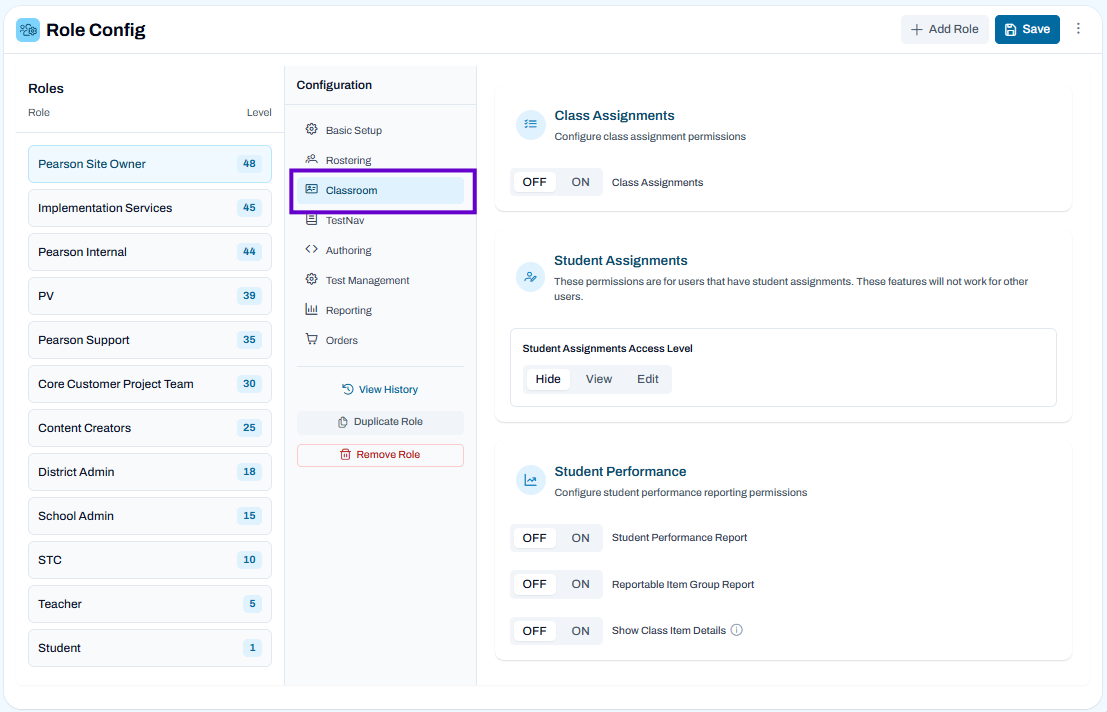
- Class Assignments: Allow the role to view or edit the My Classes area. Student roles should be set to View if you want to students to see their classes and the tests assigned to those classes in ADAM. If enabled, teachers will see a link to My Classes in the left navigation, and students will simply see their classes listed on their home page. When editing is enabled, select On for each area the role can edit. Any information coming in via LaunchPad should not have Edit access.
- Student Performance
- Student Performance Report: Allow the role to access the Student Performance Report.
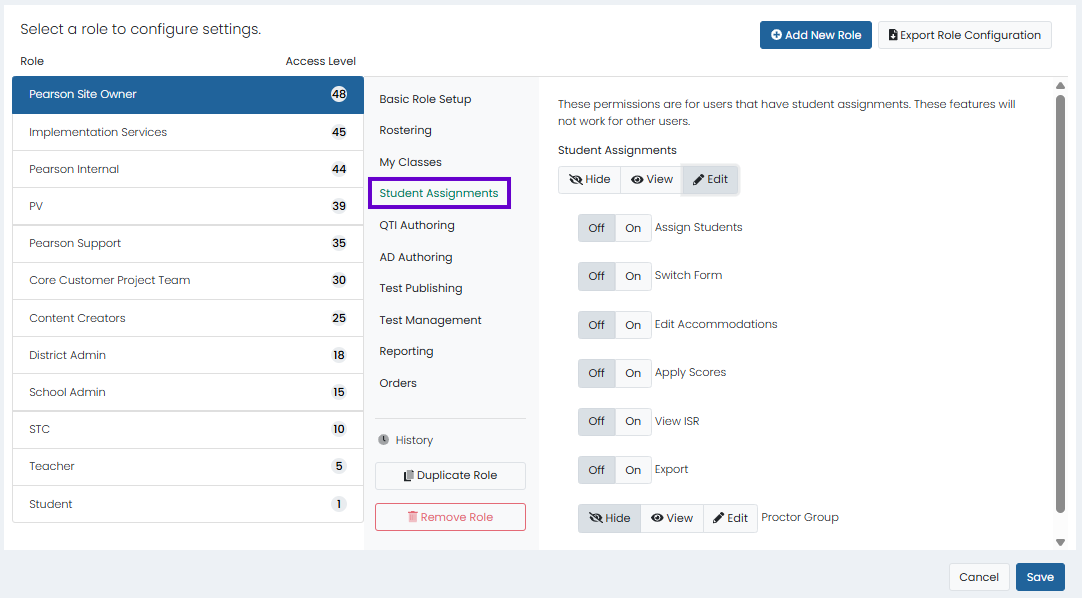
- Student Assignments
NOTE: Do not enable settings in Student Assignments if using My Classes. These permissions are for users that have student assignments and will not work for other users. By default, they are disabled.
Set to Hide, View or Edit. If Edit is selected, toggle On or Off the following options:
Assign Students
Switch Form: If enabled, user can override the form assigned to a student for a test. When a user has this permission, an action is available in the menu to give the user the ability to select a new form to manually override the assigned form. Note: the setting for the rescan all option from the administration card to rebalance spiraled forms should NOT be used if the ability to manually override forms is given to users.
Edit Accommodations
Apply Scores
View ISR
Export
Student Assignments*
Classic User Interface:
NOTE: Do not enable settings in Student Assignments if using My Classes. These permissions are for users that have student assignments and will not work for other users. By default, they are disabled.
*In the Updated User Interface, this section is now embedded under Classroom, as shown above in the previous section.
Student Assignments: Set to Hide, View or Edit. If Edit is selected, toggle On or Off the following options:
- Assign Students
- Switch Form: If enabled, user can override the form assigned to a student for a test. When a user has this permission, an action is available in the menu to give the user the ability to select a new form to manually override the assigned form. Note: the setting for the rescan all option from the administration card to rebalance spiraled forms should NOT be used if the ability to manually override forms is given to users.
- Edit Accommodations
- Apply Scores
- View ISR
- Export
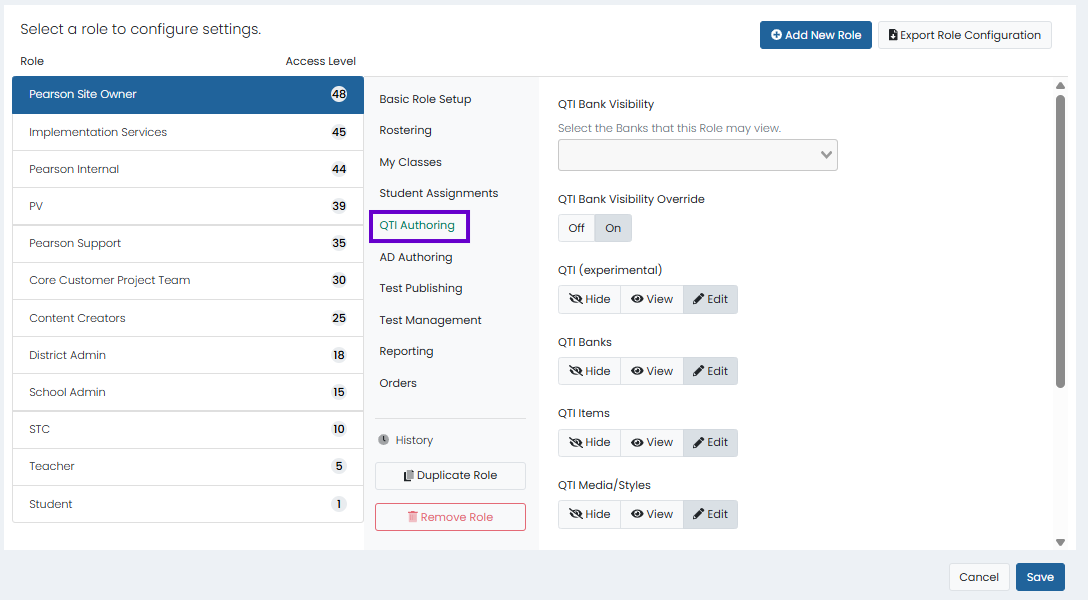
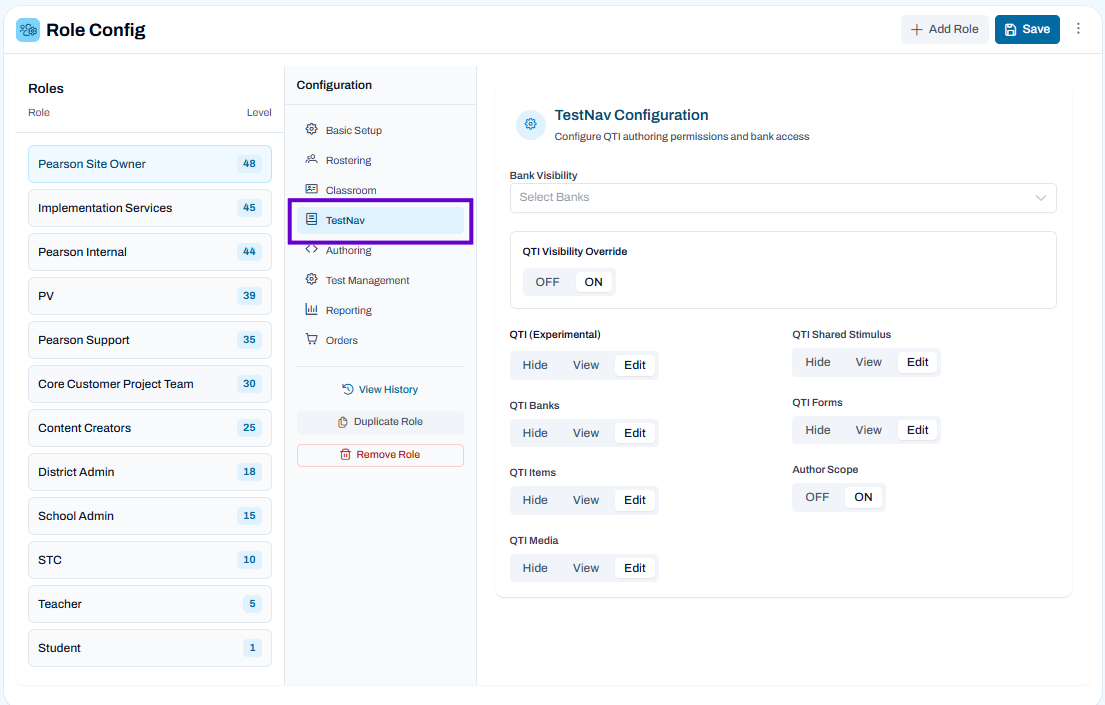
QTI Authoring / TestNav
Classic User Interface:
Updated User Interface:
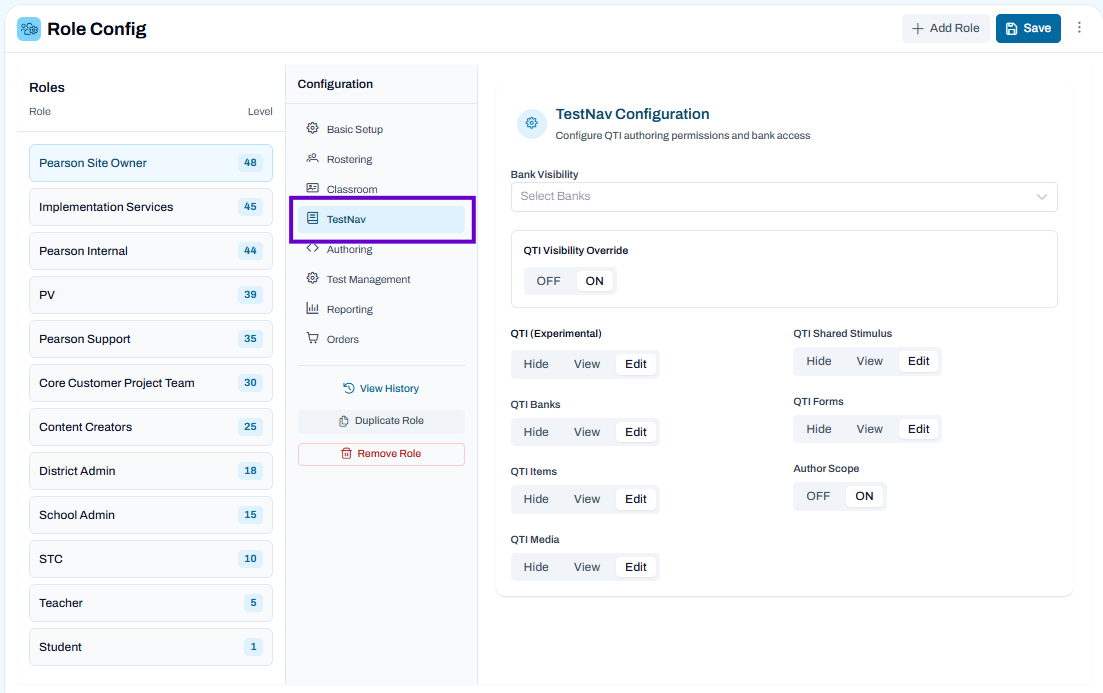
QTI Authoring is used primarily as a way to make ABBI forms available in ADAM for use on tests delivered in TestNav.
- TestNav Configuration
- Bank Visibility: Select the banks the role can see. Multiple banks can be selected. Banks must first be created to appear here, including TestNav banks if needed. Limit access to banks with summative items or district items to the appropriate roles.
- QTI Visibility Override: Allows the role to see all banks. When On, the QTI Bank Visibility menu is disabled.
- QTI (experimental): Not used. Always hide.
- QTI Banks: Allow the role to view or edit banks on the Authoring > Banks page.
- QTI Items: Allow the role to view or edit test items on the Authoring > Items page.
- QTI Media: Allow the role to view or edit stylesheets or images/PDFs on the Authoring > Media/Styles page. Multiple stylesheets can be used to give different types of questions a different look and feel.
- QTI Shared Stimulus: Allow the role to view or edit passages on the Authoring > Shared Stimulus page.
- QTI Forms: Allow the user to view or edit Forms on the Authoring > Forms page.
- Author Scope: Select On to limit users with this role to author only for themselves.
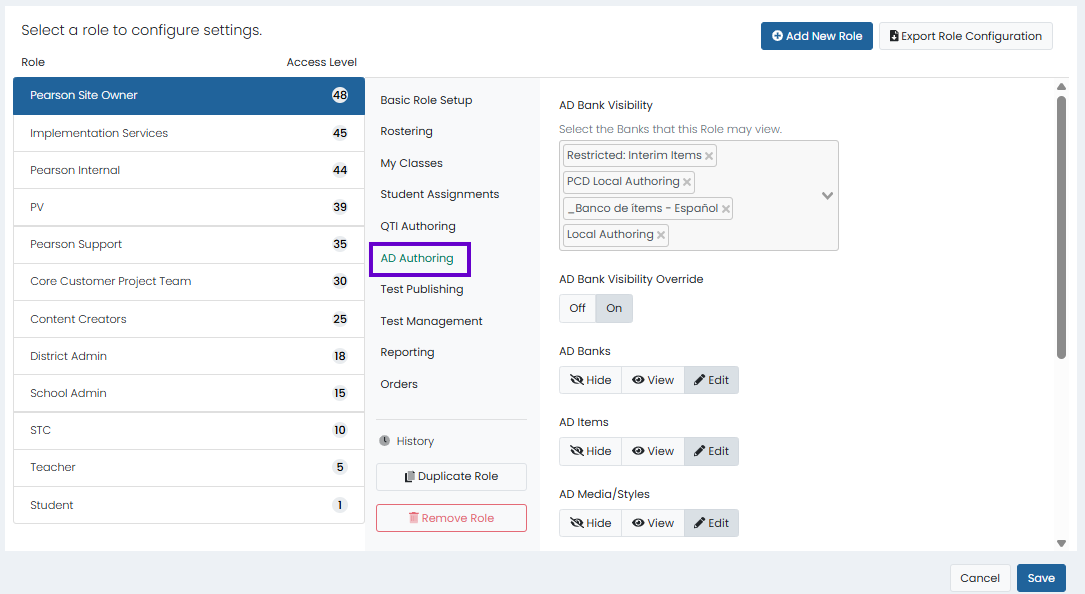
Authoring
Classic User Interface:
Updated User Interface:
The ability to create and use items and forms depends not only on these user permissions, but also Item Bank setup. See also: Define Bank Workflow and Define Bank Permissions
- Authoring
- Bank Visibility: Select the banks the role can see. Multiple banks can be selected. Banks must first be created to appear here.
- AD Visibility Override: Allows the role to see all banks. When On, the QTI Bank Visibility menu is disabled.
- AD Banks: Allow the role to view or edit banks on the Authoring > Banks page.
- AD Items: Allow the role to view or edit test items on the Authoring > Items page.
- AD Media: Allow the role to view or edit stylesheets or images/PDFs on the Authoring > Media/Styles page. Multiple stylesheets can be used to give different types of questions a different look and feel.
- AD Shared Stimulus: Allow the role to view or edit passages on the Authoring > Shared Stimulus page.
- AD Forms: Allow the user to view or edit Forms on the Authoring > Forms page.
- AD Statistics: Users with View AD Statistics permission can access item performance metrics, response distributions, and form-level summaries to evaluate item quality.
- Author Scope: Select On to limit users with this role to author only for themselves. Without this enable, users will only see items they create.
Test Publishing*
Classic User Interface:
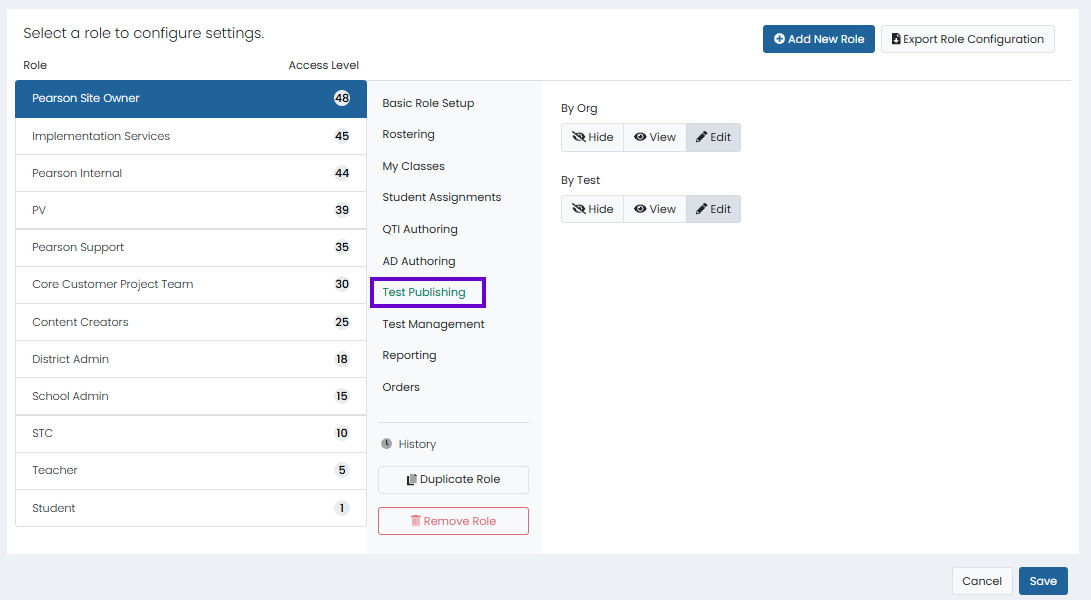
*In the Updated User Interface, this section is now embedded under Test Management, as shown below in the next section.
Test Publishing allows selected roles to publish tests to organizations so that they can create administrations. Summative customers generally do not need this functionality. See also: Options for Publishing a Test.
- By Org: Allow the role to select a test and publish it to selected institutions.
- By Test: Allow the role to select an organization and publish selected tests to it.
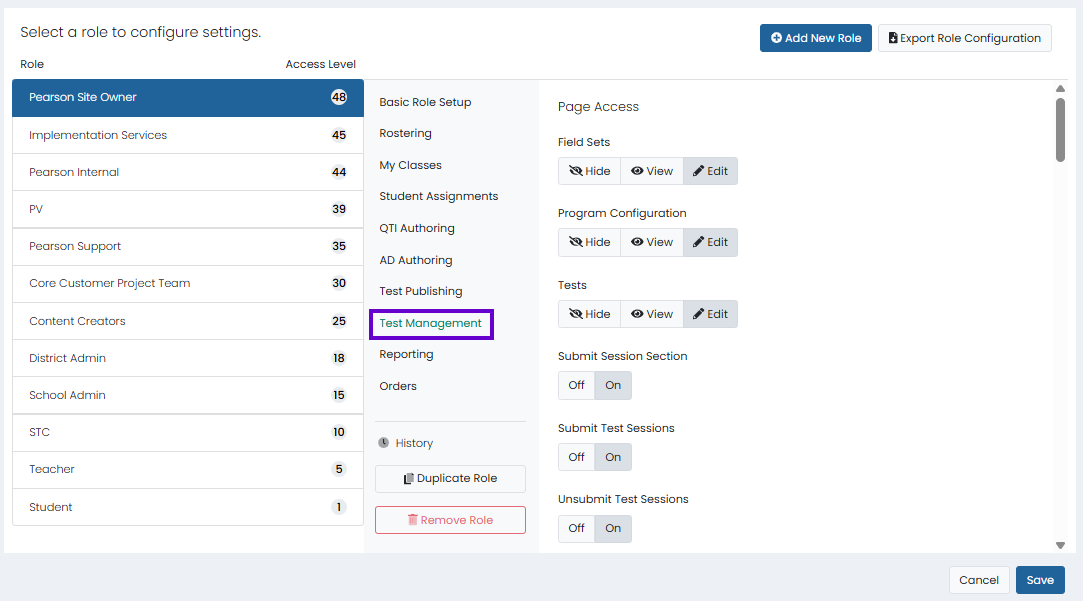
Test Management
Classic User Interface:
Updated User Interface:
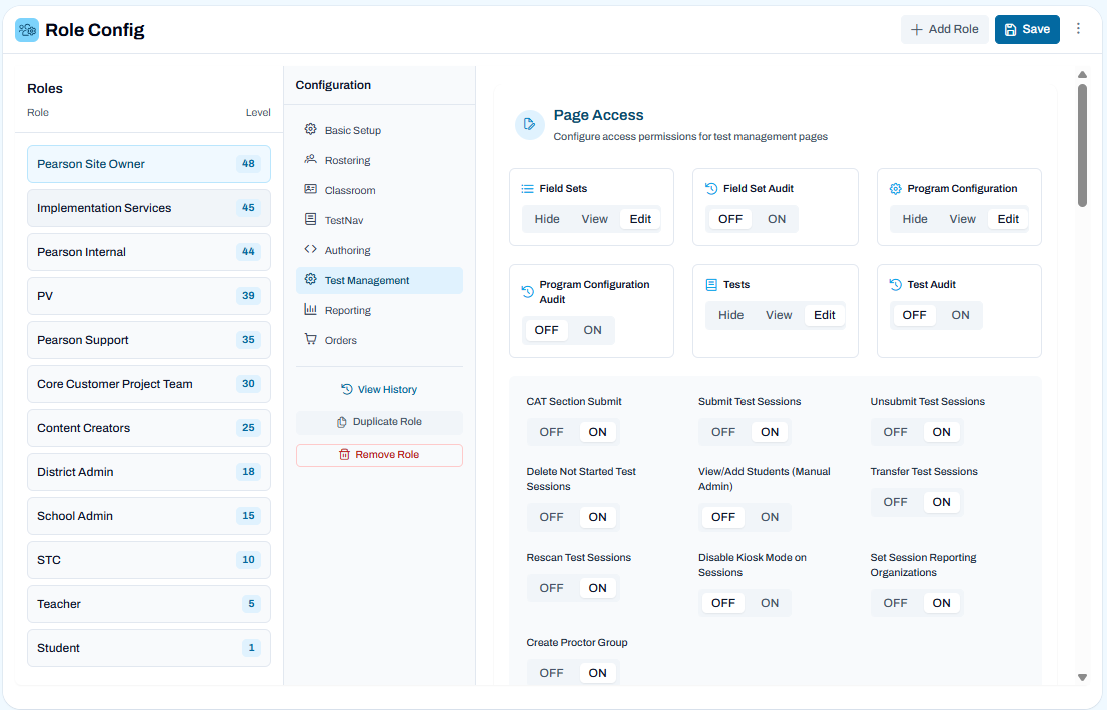
- Page Access
- Field Sets: Allow the role to view or edit the Test Management > Field Sets page. Field sets define how students sign in to a test. Most customers should need only one field set but may have two or three. See Creating a Field Set.
- Program Configuration Audit: Allow the role to view or edit the Test Management > Program Management page. Customer Support will set this up, although some customers may do this. Can be set to view for certain customer roles to see the settings. See Program Configuration.
- Field Set Audit: When enabled, users can view field set change history, see who made changes and when, and review previous configurations.
- Tests: Allow the role to view or edit the Test Management > Tests page. Teacher roles should have edit permission if they are allowed to create tests but should be hidden from teachers for summative customers where teachers do not create tests. Note that tests can have different levels of security that allow only certain people to view or edit them; for example, teachers might be able to create their own tests but not see district or state tests.
- Program Configuration: Provides access to view, edit, and manage program-level settings and administrative configurations within the system.
- Test Audit: Test Audit provides access to view audit logs showing changes to tests, including what was modified, by whom, and when.
- Submit Test Session Section: Allow the users to force submit a section for CAT tests from the proctor dashboard for students testing with TestNav. For multi-section CAT tests, when a student misses a day of testing, this allows proctors to move the student ahead in the test to begin the new section. This functionality does not apply to linear tests or CAT tests with only one section. Additionally, the test configuration includes ‘Allow Section Submit’ option.
- CAT Section Submit: CAT Section Submit provides access to submit completed computer adaptive test sections for scoring and progression within a test session.
- Submit Test Sessions: Allow the role to submit a test session in Session Explorer. Limit access to this as it is easy to accidentally select on the Proctor Dashboard for a student who is actively testing. In most cases, all unsubmitted tests will be submitted at the end of the test window.
- CAT Section Submit: CAT Section Submit provides access to submit completed computer adaptive test sections for scoring and progression within a test session.
- Unsubmit Test Sessions: Allow the role to unsubmit a test session in Session Explorer. Follow state and local test policy to determine setting.
- Delete Not Started Test Sessions: Allow the role to delete test sessions that have not been started by the student.
- View/Add Students (Manual Admin): Provides access to view existing students and manually add or manage student records within test sessions.
- Transfer Test Sessions: Allows the user to transfer sessions between two students from Session Explorer. The action allows the transfer of Student 1's session to Student 2 and Student 2's session to Student 1. The Transfer Session action is available for sessions that have Progress as ‘Reseated’ or ‘Submitted’ and can be transferred to sessions in the same administration. The transfer action is recorded in Session History.
- Rescan Test Sessions: Allows the user to manually refresh session information to match current student data. This includes refreshing an assigned form for a student where accommodation settings may have changed. Rescan can be performed on ‘Not Started’ sessions only. Users have the option to rescan all administrations for a student or select individual sessions in multiple places in the system: Users > Administrations, Session Explorer, Administrations, and Student Dashboard. Rescan is applicable to eligibility administrations only.
- Disable Kiosk Mode on Sessions: Provides access to turn off kiosk restrictions for test sessions, allowing broader device or navigation controls during testing.
- Set Session Reporting Organizations: The reporting organization field allows editing on an individual session level. The ‘Reporting Orgs’ field remains on the Rostering > Users > Student Edit > Information page. Both the Session Explorer and User Edit > Administrations page display the reporting organization(s) for each session. Additionally, the Reporting Orgs field is included in the Session Explorer export. The kebab action menu on both pages allows the user to edit the value at the individual session level, controlled by the user permission. The organization value(s) listed in the ‘Schools’ field on the Rostering > Users > Student Edit > Information page is the student's enrollment school(s). This value is automatically populated in the ‘Reporting Orgs’ field when a session is created for a student. Additionally, the value(s) in the ‘Reporting Orgs’ field is populated in the ‘Reporting Orgs’ field for each session. A user cannot manually enter the same values in these two fields in User Setup. Each new session created will use the values from this page to populate the Reporting Org for the session. Once a user has edited the Reporting Org on an individual session, it will not be updated by any rescan functionality.
- Create Proctor Group: Allow the role to manually create proctor groups.
- Proctor Groups: The Hide, View, Edit, and Export permissions all allow the user to view proctor groups, remove students from proctor groups, and export/upload proctor groups via CSV file. The Export permission allows the role to use the Upload Proctor Group feature on the Proctor Groups page to create multiple groups at once.
- Practice Tests: Do not enable; use Training Administrations instead.
- Rejected Tests: Allow the role to view or edit the Operations > Rejected Tests page.
- llows users to access a separate RMS PV URL for viewing rejected test documents.
- View Unscoped Rejected Tests: Provides access to view rejected tests that are not restricted by organizational or program scope.
- Edit Proctor Group Status: When enabled, allows the user to inactivate a specific test code in an administration by changing the status of a proctor group from active to inactive. Once the proctor group is set to inactive, when a student tries to use that test code a ‘Proctor Group Inactive’ warning will be shown on screen. (Available on LTR sites Summer 2025.) See also: Deactivate a Proctor Group.
- Administrations: Allow the role to view, read, or edit the Test Management > Administrations page. "Edit" allows creating, editing, and deleting administrations (depending on the org scope; a teacher cannot edit a district administration). This includes late adds and deletions from proctor group sessions. "Read" allows access to view administrations without access to view any configuration pages. "View" allows access to view both administrations and configuration pages (but no editing ability). Roles with view, read, or edit permission can view proctor groups regardless of the permissions selected for Proctor Groups above.
- Administration Audit: Administration Audit provides access to view audit logs of changes to test administrations, including what was modified, by whom, and when.
- Administration Options:
- Form Name: The user can see the form type without this. Not needed by most users.
- Admin Submit Sessions: Allows user to submit sessions (excluding not started) by administration. When enabled, a menu option called 'Submit Sessions' appears on the Administration kabob menu. Auto submit can be triggered from the administration card for both linear and CAT (single section and multi-section) forms and for all tests: ADAM, A&D and TestNav. (Available on LTR sites Summer 2025.)
- Update Accountability Codes: Allows the role to update accountability codes without requiring that they also have Edit access to Administrations.
- Update Accountability Administrator Codes: Allows the role to update accountability codes that are designated as admin-only in Client Settings.
- Administration Audit: Administration Audit provides access to view audit logs of changes to test administrations, including what was modified, by whom, and when.
- Training Administrations Options: Allow the role to view, read, or edit the Test Management > Training Administrations page. Training administrations can be used to teach your users about ADAM and serve as an infrastructure trial.
- Training Administration Options:
- Form Name: The user can see the form type without this. Not needed by most users.
- Admin Submit Sessions: Allows user to submit sessions (excluding not started) by administration. When enabled, a menu option called 'Submit Sessions' appears on the Administration kabob menu. Auto submit can be triggered from the administration card for both linear and CAT (single section and multi-section) forms and for all tests: ADAM, A&D and TestNav. (Available on LTR sites Summer 2025.)
- Update Accountability Codes: Allows the role to update accountability codes without requiring that they also have Edit access to Administrations.
- Update Administrator-Only Codes: Allows the role to update accountability codes that are designated as admin-only in Client Settings.
- Training Administration Options:
- Features
- View Admin History: Consider disabling as the Admin Card > Actions Menu > History is only partially supported for eligibility administrations.
- Manual Rescan: Allow the role to perform a manual admin rescan (via the Scan New Students option in the administration card). The scan checks to see if new students are eligible to take the test and adds them. Not used for summative tests, which have their own method for automatically scanning.
- Manual All Rescan:
- Admin Allow Disable: Allow the role to disable administrations.
- Export Admin: Allow the role to Export Admin Details. Roles that can view or edit administrations can have this permission. The export contains generic administration information.
- Export Tests: Allow the role to Export Tests from the Test Management > Tests page. This permission allows the export of test details, not test content.
- Edit TTS: Applies only to Dynamic Text to Speech (TTS) for ADAM tests, not TTS on TestNav tests. Allows the role to edit Dynamic TTS settings from the Proctor Dashboard for the test session only or for both the session and the student profile. When set to Read Only, a student's TTS setting can only be updated from Rostering > Users. The role does not need edit permission for users to edit TTS for both session and profile. This permission does not apply to accommodations other than Dynamic TTS on ADAM-authored tests.
- Update Session Delivery Mode:
- Rescore Admin: Allow the role to rescore administrations from the administration card. Only enable this setting for roles that can make the decision to rescore. Roles that cannot see test content should not be able to rescore. Rescoring may need to be done if an answer key was wrong and had to be changed.
- Print Paper Forms: Allow the role to print paper forms from the Proctor Dashboard. This functionality is only available for TestNav, not tests created in AD Authoring.
- Print Paper Forms (Admin): Allow the role to print paper forms from the Admin Card. This functionality is only available for TestNav, not tests created in AD Authoring.
- Proctor Session Reviewer: Allows enabled users to add session notes to the Proctor Dashboard. Like the implementation for Session Explorer, the functionality allows notes to be added from the Proctor Dashboard. Only one note is stored and there is not a history of any changes to the note. Notes entered can be seen by users with appropriate permission. This feature is typically made available when there is a need for the proctor to communicate testing irregularities but have someone else review and take action as needed.
- Proctor Launch: If also enabled on the test, allows proctors to launch student tests on behalf of students. This functionality is not available for TestNav or secure (kiosk mode) tests.
- Claim Code Print: Provides access to generate and print claim codes used by students to access tests.
- Form Plan Export: Provides access to export form plan data for reporting, analysis, or external use.
- Form Plan Admin Card View: Provides access to view administrative summary cards for form plans, including configuration and status details.
- Form Plan Admin Assigned Attempts: Provides access to view assigned testing attempts for users within a form plan.
- Proctor Instructions – Dashboard: Provides access to view proctor guidance and instructions within the dashboard during test administration.
- Student Instructions: Provides access to view instructions presented to students for test participation.
- Org Date Selection Report: Provides access to run and view reports filtered by organization and selected date ranges.
- Proctor Extended Time Code: Provides access to generate or use codes that grant extended testing time to students.
- Instant Proctoring: Allow the role to initiate instant proctoring (start a test session on the fly).
- Create Temporary Students: Allow the role to create temporary students on the Proctor Dashboard. See Proctoring: Late Add and Create Temporary Student.
Session Details: Allow user to access session details from the Proctor Dashboard.
Show UIN: Allow user to view UIN information on the details page.
- Bulk Import: Provides access to bulk import operations. Bulk Import enables administrators to configure tests, forms, and administrations at scale by exporting existing configurations, editing them offline, and re-importing to apply validated create/update changes in bulk.
- Bulk Test Import: Provides access to bulk import tests.
- Bulk Form Import: Provides access to bulk import forms.
- Bulk Administrations Import: Provides access to bulk import administrations.
Test Publishing: *In the Updated User Interface, this section was previously a standalone section called Test Publishing, as shown above.
Test Publishing allows selected roles to publish tests to organizations so that they can create administrations. Summative customers generally do not need this functionality. See also: Options for Publishing a Test.
By Org: Allow the role to select a test and publish it to selected institutions.
By Test: Allow the role to select an organization and publish selected tests to it.
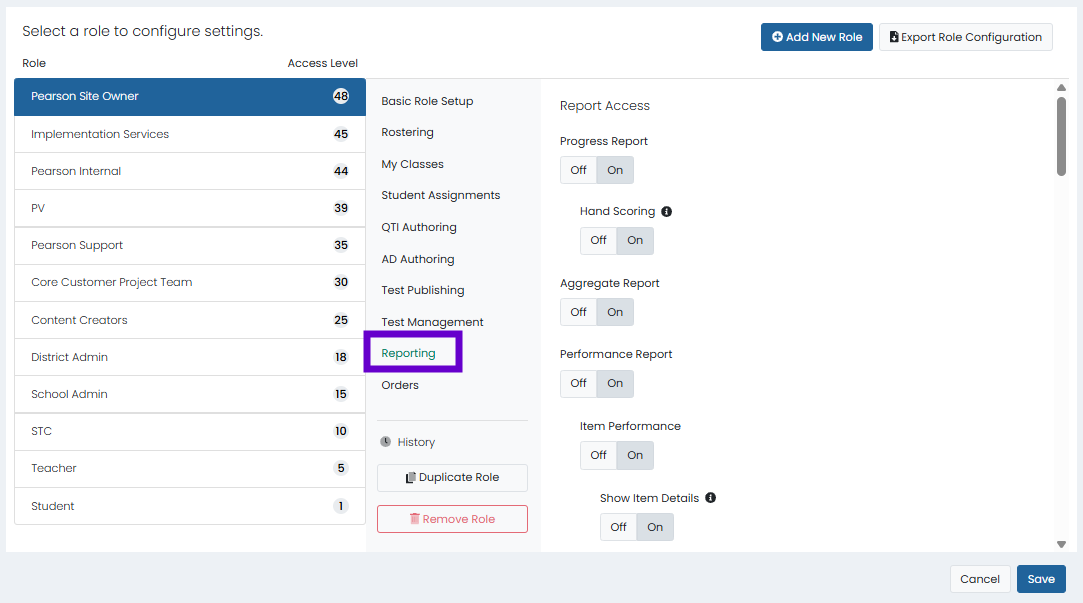
Reporting
Note: Teachers and students should not be given access to these reports.
Classic User Interface:
Updated User Interface:
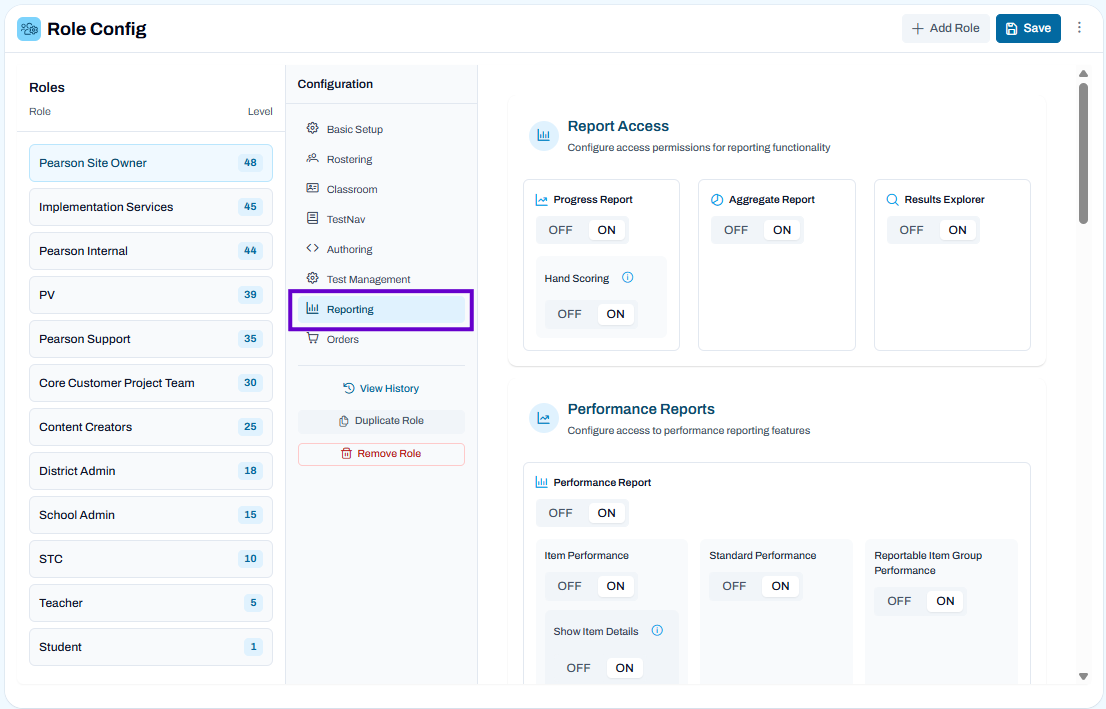
- Report Access
- Progress Report: Turn on to allow the role to view the Reporting > Progress Report.
- Hand Scoring: Turn on to make this role available in the Human Scoring section Rules menu of a test to allow this role to perform hand scoring on any administration using this test.
- Aggregate Report: Turn on to allow the role to view the Reporting > Aggregate Report. This report is not available to roles with ‘Permission Scope’ set to Self in ‘Basic Role Setup.’
- Results Explorer: Turn on to allow the role to view the Reporting > Results Explorer. This report is not available to roles with ‘Permission Scope’ set to Self in ‘Basic Role Setup.’
- Progress Report: Turn on to allow the role to view the Reporting > Progress Report.
- Performance Reports
- Performance Report: Turn on to allow the role to view the Reporting > Performance Report. This report is not available to roles with ‘Permission Scope’ set to Self in ‘Basic Role Setup.’
Item Performance: Provides access to view performance metrics for individual test items, including difficulty and response patterns.
Show Item Details: Provides access to view detailed information for each item within performance reports.
Standard Performance: Provides access to view performance results aligned to standards or learning objectives.
Reportable Item Group Performance: Provides access to view performance for defined groups of reportable items within a test.
Demographics Performance: Provides access to view performance data segmented by demographic groups.
Target Performance: Provides access to view performance results aligned to specific targets or measured skill areas.
- Student Performance Report: Turn on to allow the role to view the Student Performance Report (available from the Performance Report for schools and classes). See also: Student Performance Report
- Class Performance Report: When eligibility criteria is used to create administrations, users can view class-based results. When the report is turned on, users have an option in the action menu to navigate to the report. The Class Performance report shows all classes that have students with results for the selected test. Only use if class roster data is loaded into ADAM. This report is not available to roles with ‘Permission Scope’ set to Self in ‘Basic Role Setup.’
- Teacher Performance Report: Enable to support the display of results by teacher. Only use if class roster data is loaded into ADAM. This report is not available to roles with ‘Permission Scope’ set to Self in ‘Basic Role Setup.’
- Report Reviewer: Turn on to allow the role to review Performance Reports that have been placed under review. This can be done in Program Configuration and Test Configuration. This report is not available to roles with ‘Permission Scope’ set to Self in ‘Basic Role Setup.’
- Performance Report: Turn on to allow the role to view the Reporting > Performance Report. This report is not available to roles with ‘Permission Scope’ set to Self in ‘Basic Role Setup.’
- Activity & Analysis
- Activity Report: Select On to allow the role to view the Reporting > Activity Report. See also: Activity Report.
- Export Options:
- Export By Section QTI: Turn on for this option appear in the Export menu.
- Export By Section Learnosity: NA. Always leave Off.
- Export Options:
- Test Assignment Report: Turn on to allow the role to view the Operations > Test Assignments page. You can use this page to search for students who are assigned (or not assigned) to a test.
- Activity Report: Select On to allow the role to view the Reporting > Activity Report. See also: Activity Report.
- Session Explorer
- Session Explorer: Turn on to allow the Role to view the Session Explorer page, where users can search for student test sessions by student name, test name, test program, etc. This report is not available to roles with ‘Permission Scope’ set to Self in ‘Basic Role Setup.’ See also: Session Explorer.
Session Explorer Options
Session Explorer History: Provides access to view the history of actions and changes within Session Explorer.
Session Explorer Export: Provides access to export session data and results from Session Explorer for reporting or analysis.
- Session Explorer Section Export (Applies to TestNav delivered assessments only; see also: Session Explorer Sections Report).
- Session Reviewer: If enabled, allows user to review individual sessions and add notes, if needed. An icon appears next to sessions that have been marked as reviewed and users can hover to read notes, see the last updated date/time information, and the user who edited the record. ‘Advanced Filters’ help users filter on review information: Reviewed and Has Notes. (Available on LTR sites Summer 2025.) See also: Review Session and Add Notes.
- Review Student Responses: Turn on to allow user to review student responses for submitted tests from various areas of the system. This provides visibility to all test items and is not typically used for summative tests. Users with the correct permissions can now view each item and review student responses from a specific test session. Available in the following locations (available on LTR sites Summer 2025):
Session Explorer > Actions > Student Responses
Admin Card > Students > View > Actions > Student Responses
Admin Card > Proctor Groups > View> Students > Actions > Student Responses
Student Dashboard > Actions > Student Responses
- Bulk Submit Sessions: Provides access to submit multiple test sessions at once for scoring or completion.
- Session Event Explorer: Turn on to allow filtering sessions by session event types (e.g., Accommodation Changed, Proctor Approved, Student Merge, etc.). Enabled users can view a new page with expandable rows showing event details, and an export with one row per session-event combination. The information presented is the same as in Session History.
- Session Event Explorer Export: Allow user to export session events.
- Report Asset
- Report Asset: Turn on to allow the role to view the Report Assets page, where you can find and download reports or other PDFs published to you. This area may be used to store external/legacy reports from previous years. Leave off if no reports loaded. See also: Report Assets.
Upload Report Assets: Allow use to add reports based on their org level.
- Review Report Assets: Allow user to ignore any set date restrictions set in Client Settings for viewing Report Assets.
- Reporting Functions
- Export Administration Results: Allow the role to Export the test, Export by Question, or Export with Trait Scores (from the administration card for completed administrations) to an Excel file.
- Export Delivery Results: Allow the role to Export the test, Export by Question, or Export with Trait Scores (from the Delivery card for completed deliveries) to an Excel file.
- Download Bulk ISR: Turn on to allow user to download multiple Individual Student Reports at a time.
- Edit Program Objectives: See also: Program Configuration
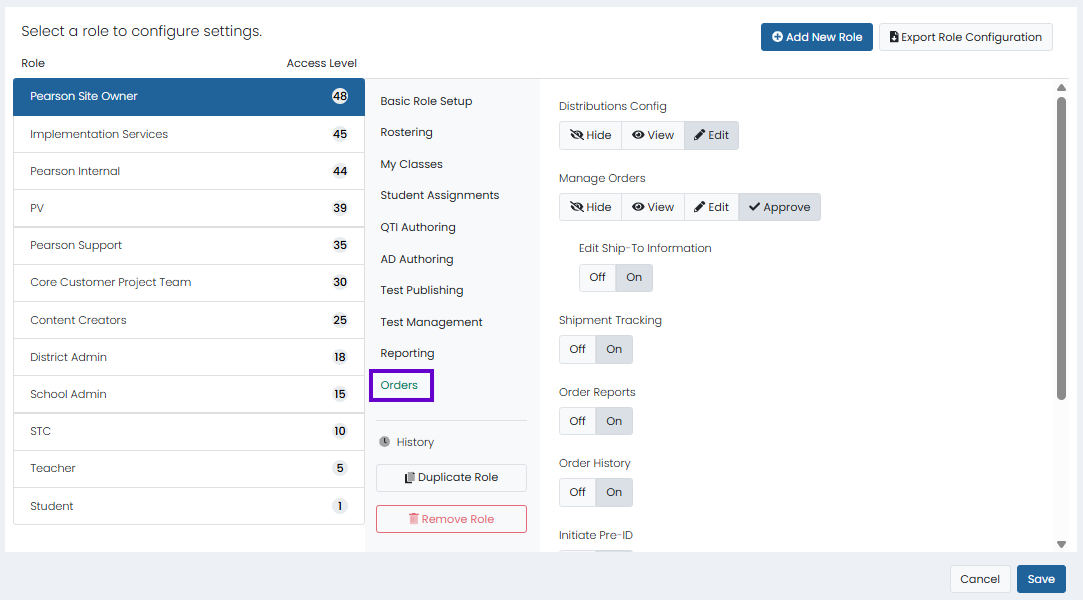
Orders
Classic User Interface:
Updated User Interface:
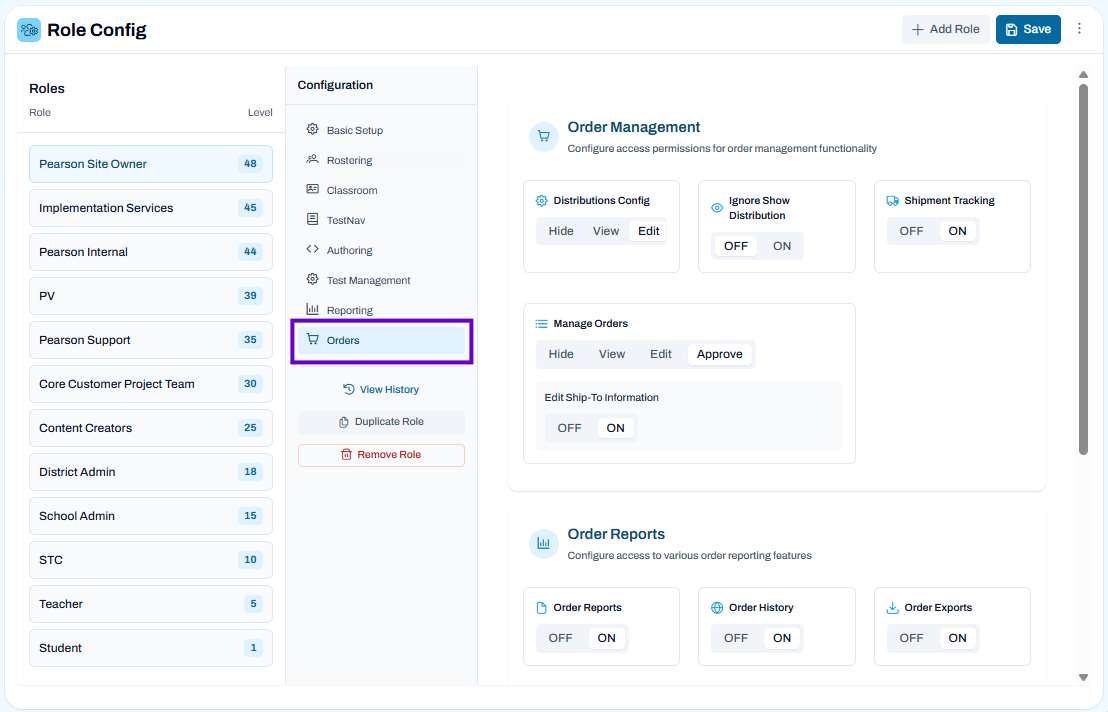
Provide permissions to roles that will order paper test materials.
- Orders Management
- Distributions Config: Allow the role to view or edit the Distributions Config page.
- Ignore Show Distribution: Provides access to bypass distribution visibility controls and view distributions regardless of standard display restrictions.
- Shipping Tracking: Allow the role to track order shipments.
- Manage Orders: Allow the role to view, edit, or approve orders of paper tests on the Manage Orders page.
- Edit Ship-To Information: Controls whether users can edit ship-to contact information and shipping addresses in orders. Without the permission turned on, the user will not see the Edit buttons and if submitting an order with invalid data, a notification will occur.
- Order Reports
- Order Reports: Allow the role to order reports.
- Order History: Provide visibility to online order processing.
- Initiate Pre-ID: Allow the role to initiate Pre-ID.
- Orders Export: Provides access to export order data and details for reporting, analysis, or external use.
- License Export: Provides access to export licensing data, including allocation and usage details, for reporting or analysis.
- Pre-ID Management: Provides access to manage pre-identification records and processes used to prepare student data for testing.
- Initiate Pre-ID: Provides access to start or trigger pre-identification processes to generate or update student testing records.